0

(Week 12) - Journal 52 : A Day in the Life of Me

Oh yeah I'm not late to submit my entry this week.  Although I'm still recuperating from flu in whcih I suffered the whole week last week, I was just too excited to create my page for this week's prompt.  At Journal 52 blog, everyone will be able to find every week's prompt so go check it out and join the fun or just simply do your weekly pages if you don't feel like joining.

What's exactly the prompt this week?  Here it is:

Week 12′s Prompt: A Day in the Life of Me…

What do you do everyday from the time you wake up to the time you go to sleep? For this week’s prompt, create a page in your journal about your favorite part of the day or the things you do each day. You can collage, paint, doodle – whatever is most fun for you!

I decided not to enumerate what I do upon waking up till I go to sleep but opted to highlight my favorite part of the day ... everyday =)  For this prompt I decided to use my Cricut coz it has been ages I think since I played with my machine.  Yeah, I still need to find time to play my Brother ScanNCut for the first time.  Hhhmmmmm, maybe next week or maybe tomorrow... we'll see !

My favorite part of the day is (drum rolling......)

Having a quiet time with the Lord!  I read the Bible based on the Scriptures for the day then write down what I learned in my Bible journal.  Sometimes I write a prayer based on the readings.  It is the best part of the day for me because I get to intimately talk to God.  I have a habit of praying no matter what I do even when I'm cooking or have to finish my obligations at work or waiting for a bus or riding the car.  I see to it that God is part of my every single move everyday.  Yeah, even crossing the street or taking a walk with our dog, crafting,  etc., etc., etc.


Oftentimes I sing this particular song before I start or after reading the Scriptures for the day with a big smile on my face.  I believe almost everyone knows this song from The King and I :  Getting to Know You.

Getting to know you,
Getting to know all about you.
Getting to (like) know you,
Getting to hope you like me. 


Haven't you noticed
Suddenly I'm bright and breezy?
Because of all the beautiful and new
Things I'm learning about you
Day by day. 


The materials I used are :


So there you go!

Happy crafting and peace be with you =)

6

(Week 11) - Journal 52 : STARS

This journal page is really a late entry submission!  I do have a valid reason and I have been vocal about this right from the day I got the prompt.  Before I dwell on the matter let's take a look at the prompt as stated at Journal 52.  It says.......

Week 11 Prompt: Stars


“For my part I know nothing with any certainty, but the sight of the stars makes me dream.” – Vincent Van Gogh
For this week’s prompt, take inspiration from stars or the night sky. You can doodle, draw, collage, paint – whatever medium is most comfortable for you.

When I got the prompt I knew I will have a difficult time doing my page!  Stars!!!!!

Here's a poem I have written so you will know what STARS mean to me.

I love the twinkling stars high up in the sky.
No one knows how many they are
but one can just imagine that it covers the entire universe.

I always watch the stars at night with my mom and dad
We make a wish ... even wishes from falling stars.
Some wishes were granted some wishes were forgotten.

The dawn has come for my mom to say good-bye
The day has come for my dad to say good-bye
What's left of me is emptiness
Tears were uncontrollable
But I have to live as long as God wishes.

The last words mom told me...
I will be watching you
I will be with you
All you have to do is close your eyes and think of a star
shining bright smiling at you ...
that's me.  I love you!
Thank you for your love and care my daughter.
I know you will be alright for we have raised you
so well with God' love.

The last words of my dad to me ...
When you are sad, happy, confused, worried
uncertain, joyful, victorious, or in pain
Look in the sky and find the 2nd best shining star
for that is me and your mom as one
watching and guiding you.
We can never be the first best
for the best shining star is God.
Look for it and feel HIS love and peace.
I love you
Thank you for taking care of me up to my last breath.

Honestly, it took sssssssssssssoooooooooooooooo much effort doing this entry ... laughter but more tears were part of the process due to memories but I did my best so here it is:


Materials:
Canvas sheet
Black Gesso
Flourescent (Neon) Acrylic Paints by Panduro
Studio Acrylic Paints - Pearlescent
Silver Acrylic Paint by Panduro
Letraset Neon Markers
Glitters - silver, snowflake, and crystal
Crafters Companion Stick and Spray
Balzer Designs Stencil - Burst
Star Beads
Nylon thread plus big hole needle
Faber Castell Pitt Artist Pen - White

The Process:

  • Cover canvas with black gesso and let dry.  I used heat tool to dry it faster.
  • Drop randomly all neon acrylic paints on the sheet.


  • Spread it wildly using a paint spatula and I got this look..... love, love, love the texture!

  • Once dried, spray glue and scatter glitters all over then let dry to make sure it adheres properly.

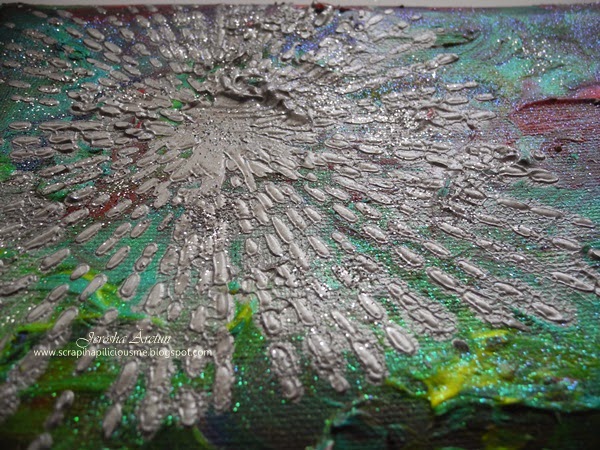
  • Get your stencil ad using a spatula add silver paint and spread evenly.

  •  While it is still wet add more glitters and let dry!  FUN!!!!

  •  Make a star and adhere then cover it with silver glitters.  I added red on the sides of the star using Pearl Maker pen.  I used Yellow Neon Letraset marker to highlight the rays =)

  •  Let it dry for 30 minutes coz there are a lot of layerings.  Sew star beads around the edges and write your sentiment.

 I really love the texture, layers, and twinkling of the different glitters I used =)


Ok, now I have to end and post this coz my son is coming home any minute now.

Happy crafting!

0

Last Minute Thank You Card

I have been sick for one whole week last week and so I missed a lot of crafting and things I'am responsible for at work.  I went back to work yesterday and tried to finish all my tasks and now I feel sick again ... stuffy nose :(  Although I was sick last week, I managed to attend one of our staff's farewell party.  She is  65 and so she opted to retire from work - Oh lucky her!  Hubby and I also wanted to retire from work but we of course know it's not the right time .. yet!

She has been with us from the very beginning we opened our first store in the city and then came the 2nd store.  She was like a mother to all of us - she can be strict to anyone that includes us her employers hahahahahahahahahahhahahaha but we appreciate everything she has done for opur companies and I really admire her being organized =)

Her farewell party held at her home was a memorable one because she invited some of our previous staffs so it was kind'a reunion for everyone.  The food was ssssssssoooooooo delicious and the drinks were overflowing!

As a token of our appreciation, her colleagues gave her open tickets in theater since she loves theater shows.  As for us we gave her a set of silver jewelry with lots of diamonds.  Yeah, we included insurance for safety purposes.  Ok, here came my problem:  Hubby asked me to make a thank you card at the last minute!  Duh!  I'm still recuperating!!!!  The fastest and simplest thing I can make is by using punchers so here it is .... a very simple card indeed and thanks to my left-over "Thank You" sentiment which I cut using cricut a long time ago using New Arrival Cricut cartridge =)  As for the punchers I used Martha Stewart Daisy Fan as well as Doily Lace Trim.


0

(Week 10) - Journal 52 : Why Do I Make Art?

That's one question I never get at all!  But for the sake of argument ... or should I say explanation and justification for all the tools and materials I have I will gladly answer the question for this week's prompt.  But first let me orient you on the week's prmot which was given to us by no other than Chelle Stein of Journal 52 =)

Week 10 Prompt: Create for a Cause

"So often we make art, and ask ourselves? Why? What’s the point of this?
Well, art can be used for a number of wonderful things – for health and healing, for personal development, to bring people together, for raising awareness for a number of causes.
For this week’s prompt, create art that has a cause…why do you make art? Or, think about a cause you are passionate about that you could create a page about in your journal."

Now that's deep, isn't it?  I have no cause why I make art.  I do it for myself but maybe someday I will be involved in making art for a cause.  Well, every year I make cards or art works for Cancer month.  Normally a fellow crafter from around the globe will request us to make bunch of cards and send it to her in which she will be giving it to a hospital or an organization.

Anyway, I really, really, really reviewed deeply why I spend money and time/effort in creating crafts.  Most of the time I make for clients ... other times I make it for friends without any reason .... in some cases which is often I create items as gifts ... BUT I really do make art for the love of it and the fun that goes with it.

As I reviewed deeply I was able to summarized my justification et al explanation in 5 pointers:
  • God's Gift - I'm honing and using one of the gifts that God has given me.  I share it by creating and giving and teaching.
  • Balance -  I need to find balance in my everyday life in this crazy world.
  • Sanity - oh yes!  I'm a multi-tasking mom and it will drive me crazy to just do things under the title of a mom, wife, and homekeeper.
  • Enjoyment - I need to do things that makes me happy otherwise hubby and my son will suffer hahahahahahahahhahahaha if you know what I mean.  Plus doing art brings out the child-in-me, don't you?
  • Expression - I do almost all kinds of craft but in art journaling I really get to express what I feel.  There are many ways to express art but I enjoy most expressing my feelings through colors.  Most of all Art is an outlet fro me to express myself as an individual.
Here's my entry for the said week:


The Process:

1.  I sprayed the canvas with colors then used a corrugated board with white paint for some effect on the whole layout.
2.  I used a 3D paint on the stencil for the silhouette effect.  I love how this turned out coz it feels rubbery.
3.  I highlighted the silhouette with stickles thus creating a shadowy effect.
4.  Got some color chips from a paint store and opted to use ROYGBI (yes without the V)
5.  Grabbed my alphabet stamps and decided to emboss it, too.


6.  I had to use a black UNI pen to write the words so it will be readable then wrote my justification.


7.  I adhered each color chip using magic tape.  One just have to flip it to read what I wrote.
8.  Used Faber Castell Pitt Artist Pen (white) and Neon Pen by promarker to write my title question.
9.  Added an angel wing on the silhouette
10.  Last touch is adding question mark paper clips.

Have a great week!

Thanks for viewing =)


0

Brother ScanNCut CM600 Images/Patterns

Ever wondered what images/patterns you will get or should I say built-in your machine?  I did!!!!!  I searched and searched for internet at least a glimpse of the images/patterns before I buy BUT to no avail.  I just took the risk of buying the unit.  All I know is that CM300 model means 300 built-in images and since I bought the CM600 en toto I got 600 images/patterns.  I believe that's enough for me since I have tons of images that I can scan and cut using this machine PLUS in the very near future all users will get free images from the Brother website ... if I'm not mistaken.  Also, I have 120 Cricut Cartridges  to date so definitely I will still use my Cricut Expressions from time to time.  Wondering what I will do with my Silhouette?  I use it for my PC fonts and dingbats.

Heniweys, as I have promised from my yesterday posts with regards to The ScanNCut machine, here are the images/patterns included at the CM600 model:


So there you go =)

Have a great week-end!

0

Brother ScanNCut Has Arrived (Unboxing)

Finally, finally, finally my Brother ScanNCut has arrived yesterday morning after 10 days of waiting game.  Are you interested to buy one?  The model I bought is CM600 and I bought it at Create and Craft TV which is based in UK.  There is CM800 in Denmark but sending it here costs a lot as compared to Create and Craft TV for only 9.90pounds.


Can you believe I haven't tried it?  In fact, when it arrived I just unboxed it and opted to do gardening instead.  Hubby found bunches of spring flowers at the front yard and since it's my free day I removed all the unwanted grass and dead leaves so new flowers may sprout freely.  After 2 hours of gardening I had to stop coz my body ached pretty bad especially my back.  The backyard needs TLS, too, but will do that when the weather get better.

Anyway, maybe you are wondering what you're gonna get if in case you buy the machine ... so let's unbox it!

First, the box came with slight damages and my first reaction was "OMG!!!!!  I hope the machine is fine and undamaged."


I'm so surprised that the item is so light to the point that I wondered if there is a machines inside.  Upon opening the box I felt relieved because no damages insid.


Get the main box out of the postal box and you will see the Brother SanNCut Project and Idea Book.  Lots of great idea and it's tutorial in the said book plus the complete checklist of what's included inside the box so don't forget to check it twice.


Once you really open the main box inside you will see immediately 2 sheets of cutting mat.  One mat is low tack adhesive mat and the other is the standard mat both in 12 x 12 inches.  Note:  One of the mats (standard mat) if you flip it over you will see your Iron-on fabric applique contact sheet.  I still need to explore this further coz I have no idea about appliques =)  Sorry I forgot to take a picture of the said sheet.  It's smaller than the cutting mats.


After the mats just on top is the high tack adhesive fabric support sheet which once again I have to explore this further by playing with the machine itself. 


The fabric support sheet is on top of an a4 box so let's open that small box first:  You will find
these items:

It contains a white pouch and inside that pouch are your spatula, touch pen, deep cut blade/holder, and the standard cut blade/holder.


 Aside from that you will find the Operating Manual in CD form, Quick Reference Guide, ScanNCut Canvas info, List with details of the accessory,  the product safety guide written in different languages, a warranty card.   OOOpppsss there it is - the fabric applique sheet beside the CD Operating Manual!


You will also get the Basic Quilting Guide and I find it very useful especially for those who haven't tried quilting or sewing =)   And of course the booklet of all the images built-in the machine.  Patterns/images varies depending on the model you will buy or bought.


Note:  The above booklets I will show details on my next post so hang on =)

Now, let's check the baby!!!!  there she is nicely and safely packed =)


She's a real beauty.  I haven't removed the seal so naturally i haven't tried the machine yet.  Hopefully this week-end =)


Happy week-end everyone!

Eeekkkk I almost forgot - yes AC Adapter and a power cord are included, too =)

2

(Week 09) - Journal 52 : Color Swatch Inspiration

I thank God that I was able to do the week's art journal page for Journal 52 this day =)  It was an easy one I guess for everyone participating in the workshop because we get to play wither with colors we love or colors we hate or colors we have never applied ... ever.

After getting the prompt from Journal 52 "For this week’s prompt, choose something to use as color inspiration and use those colors to create a page in your journal. Color is everywhere! You can use colors from a piece of clothing, a dish, a picture, or of course there is always Pinterest or make your own color scheme for your page."

Who doesn't love colors?  No one I believe.  In my case there is one particular color that I will never learn to like but only to appreciate and that is pink.  Yeah, I know almost all women especially little girls just love pink.  Sad to say not in my case.  Before you judge me or condemn me for saying that please know first the reason why.  Pink make me sick literally :(  I'm the kind of person who gets affected with the colors I wear and this has been proven thousand times over by my friends and my parents.  I get fever for some reason we don't understand.  One example I remember very well is that when one of my closest friend at our church was getting married, I was her maid -of- honor and I have to wear a baby pink long dress.  Guess what?  Three times we had fitting and just after minutes of wearing it I felt weak and  ... fever followed next :(  Yes, the bride-to-be decided that I wear something else and I wore an ecru dress filled with different small colorful flowers ... yes it has pink flowers but it didn't make me sick at all due to other colors of flowers sewn all over the hem and shoulders, whew!  So, now you know and hopefully understand why I can never ever love pink ... only up to appreciation.

Now, for my project, I entitled it "In Sickness and In Health".  I played with PINK and my favorite colors of all time ORANGE and YELLOW plus added grey as my neutral shade.  Wearing bright colors make me energized ... if I wear black and white I am so prim and proper ... if I wear the sky colors I'm so calm but happy and contented.... if you let me wear neutral colors I'm quiet as can be like I feel invisible.  Have you ever been influenced by the colors that you wear?


You can obviously see that I played with ribbons and  yarn flowers using my flower loom I patiently made a long time ago.   The tag?  I made it as a tag from the inspiration page I got in Damernas Swedish fashion magazine:


 The simple process:

Chose ribbons that I want to use then cut strips.

sew ... sew ... sew....


I wonder what would the next prompt be.

Happy crafting =)

Back to Top