Showing posts with label Hybrid Scrapbooking. Show all posts
0

Welcoming Spring 2014 Hybrid Pleated Card + TUT

It has been 4 days now since our cute dog Kasper, a Yorkshire Terrier died peacefully.  He was 14 years, 3 months, and 10 days old but he was like a puppy to everyone who meets him.  Our house is empty without him and we still can't hold back the tears even if we justify the truth that it was really time for him to go.  I try to drown myself into exhaustion just so I will not feel the pain.  Most of the time I'm at my craft room playing with my cricut or cleaning or just create something.

Here's what I have made since last night:  A Spring Card.  Kasper loves the Spring season and if I close my eyes I can actually see him running around and enjoying the wind.  We would take long walks during this season.  Spring has started here in Sweden and although it is painful to embrace the season, I decided to create a happy Spring card.


The main cover of the card.  I adhered band, then the dragonfly brads and of course applied stickles, too.

The middle part of the card .  I applied stickles on all the flowers.  I used EK Success edge puncher for the grass effect.


 The Tutorial:

Print your choice of digital background and make pleats.


A closer look of the pleats.


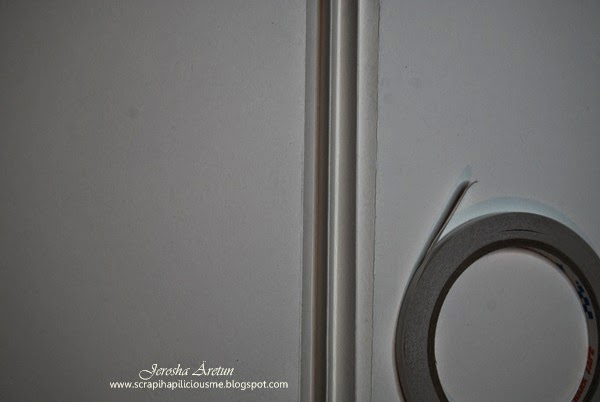
Secure the folds/pleats with a double sided tape. I often use power tape when Im using heavy cardstock.


This is how it should look like.  You will have 3 hills and 2 valleys.  In the valley part that's where you will adhere your middle part of your card.  On the other valley that's where I adhered the grass effect using EK Success edge puncher.


Happy crafting everyone!

0

Handmade Paper Beads - Jewelries

After a month of fun, sun, and sailing in Italy, I took a lot of effort to clean my main craft room.  I noticed that I just shoved a lot of crap under the drawers and tables.  One of my findings were some digital papers I printed which sad to say I don't remember the designer .. sorry :(  Trying my best to recall why on earth did I printed few digital papers and after few hours I realized that it was meant for a hybrid project specially for TDS Lifestyle which long ago for few years I was one of the hybrid designers.  Now, what to do with the printed digital papers?

Luckily sun has been shining bright and high here and it's best to stay outside specifically at the garden drinking wine and crafting of course!  Well, I decided to create paper beads and give a go in creating 2 sets of jewelry.  Not bad I should say for doing it the first time =)

Hhhmmmm one of these days I will dip each bead in my UTEE but for now I let it be ...


This is the green set - butterfly theme=)


The blue set - forever friends theme =)

 PS.  Any paper will do if you plan to make this kind of project.  You may even use pages from magazines which I believe my son and I will be rolling lots of papers tonight.

Happy crafting!


0

Valentine Wine Bottle Accent Plus Home-made Bailey's Recipe

In every occasion one of the most popular gifts to give is a bottle of wine. Valentine's Day is fast approaching and maybe you have time to concoct your own Bailey's but wouldn’t it be great to give a bottle of wine or home-made Bailey's with a handmade cover or tag to accentuate the bottle?  I created these wine bottles cover-tags for TDS Lifestyle ages ago ... hmmmmm I believe it was the year 2010 January for TDS Lifestyle Valentine's Edition.  I was one of their hybrid designers for 3 years. I also made my own Bailey's since I truly LOVE Bailey's especially the original flavor.  Anyway, down below you will find the supplies and instructions how I created these hybrid project PLUS my own recipe of Bailey's.  Let me know if you are interested to grab the templates I have made for both bottles.  Just leave a message =)


Supplies Needed:
• Digital Kit by Gemini Creationz
• Sterilized Bottle (2L)
• Recipe for Homemade Baileys
• White Cardstocks
• WACO Pearl Maker – Gold
• Stickles – gold and red
• 3D Foam Adhesive
• K&Company Pearl Brad
• Accent 1 Template (Round Base)
• Accent 2 Template (Necktie Base)
• SU Scallop Punch
• Sun Burst Punch

Instructions:
1. Open your editing software and begin creating a layout from Gemini Creationz Queen of Hearts kit that you want to use and print on a draft mode.
2. To make sure that the placement of elements you chose were in proper places, I suggest you make the templates in transparency so you have an idea how the wine bottle accent will look like. It’s easier to see with transparency before making the final print.
3. When satisfied print your design in high quality mode.
4. Using your transparency accent template, trace and cut.
5. Make a score line on the top side of your cut cardstock and fold. This depends on the size of your bottle. You have to make a fold that will serve as the neck handle of the wine bottle accent.
6. Punch in the middle portion of the folded area using SU scallop punch.
7. Make a slit so it will serve as an opening when you hang the accent. Most bottles have a clean neck and simple cap so after punching there is no need of making a slit. In this project I used IKEA’s 2L bottle and it has a different style of cap.
8. So there you have it. Now, all you need is to prepare the homemade Baileys


Home-Made Bailey's!

Who doesn’t love Baileys? No one I guess. Baileys has been on top of my list when it comes to something to drink. A sip gives me a different kind of joy that I tend to savour the taste every second of it. The sad part is we all know how pricey it can be. After few tries I was able to make my own Baileys based on my liking and satisfaction. My family and friends have tried it and they say it sure does taste like real Baileys. The best part is it can be kept in your refrigerator for 1 month but I doubt if it will last that long because you’ll never stop drinking this concoction. The recipe here is good to fill 1L of bottle.

Ingredients:

1C Cream - I use ordinary whip cream that I find in the grocery store. I have heard about UHT ('ultra heat treated', or 'long life') cream so that their drink lasts longer, but I have learned that UHT cream has a funny taste to it that might not be good to use in a recipe as special as this.

1C Condensed Milk – Forget about evaporated milk because the condensed milk will surely give an extra-rich, creamy taste. If you’re not much into condensed milk, reduce the amount add maple syrup or caramel syrup instead.

1T Instant Coffee – Baileys has a coffee flavour so just mix the granules in a tiny bit of boiling water. Coffee essence is also an alternative if no instant coffee is available.

1T Vanilla – To have a vanilla flavour use extract and not flavouring.

Almond Extract – (optional)

2T Choco Syrup – Use chocolate syrup like Hershey’s or any brand available in your supermarket.

Whiskey – An Irish whiskey is a must. It doesn’t have to be the most expensive bottle since the taste will be softened by the cream.


Procedure:

Combine all ingredients in a blender and set on high speed for 30 seconds and no more. If you blend it too long, the cream will thicken and you will end up eating a dessert instead of having a great drink.

Bottle in a tightly sealed container and refrigerate.

Shake before using and serve with ice.

Note: To make a mint flavoured drink, dribble in a little creme de menthe or peppermint essence. To have an almond flavour Baileys, add few drops of Almond extract. Bitter Almond drops can also be used but not more than a drop.

Enjoy!

Happy Drinking!
Happy Crafting!


0

If The Shoe Fits! (Ladies Paper Shoes)


.... of course it's handmade with love! I made these 41 pieces of hybrid paper shoes last Christmas, 2011, for a vintage store and for our staff at Specsavers but unfortunately I got sick the day I had to deliver. Each shoe is unique since I don't make duplicates. I still have few pieces but don't know where I kept it hihihihihihi.

Each shoe pattern was cut manually then embossed using assorted embossing folders. I printed out digital pictures from The Graphics Fairy (under the Christmas Category) then highlighted with stickles before adhering to each shoe. I used lots of edge punchers ... some flowers were handmade by me, too, which you may find under Flower Making Category!
What to do with these shoes?  Use it for gift-giving purposes coz the shoe itself is a beautiful way to pack your small gifts.


Next time maybe I'll make some using fabrics or felts.

Thanks for viewing =)


0

Mixed Media Hybrid Collage: Defining Me

It was difficult to think of a unique project when the theme is Defining Me but so glad I was able to think of this project after a lot of contemplating and decision making. I could have made something that defines me as a mother or as a woman but the best part is just to define myself as a crafter hahahahahahahahahaha.

This project was specially made and was published last Nov 20 - Dec 4, 2009 at The Daily Scrapper now TDS Lifestyle.

Making a collage is definitely full of fun and challenges along the way. But first, one has to have an objective on what the collage is all about. It usually represents who you are or what kind of things you like to do and the list can be endless. With Christine Honsinger’s Clarabelles Collage World digital kit, I was so determined to create a mix media hybrid collage about me as a crafter. Everything you see in my collage has clearly defined of who I am in my craft world.

Defining Me: (As a Crafter)
Orange is my favourite color side-by-side with yellow and gold.
I’m addicted to crystals, beads, flowers, stickles, laces and ribbons among others.
Winter, Spring, Summer, or Fall, I scrap and craft.
I do believe in angels and when I craft I normally think of them and smile.
The world represents the feeling of satisfaction when I took crafting seriously here in Sweden – it makes me feel on top of the world and in-control. It is in this endeavor that I gained lots and lots of friends and fellow crafters world-wide.
The clock – no time of preference and limit when I scrap and craft.
During Summer I try to craft in our garden – flowers everywhere and colourful butterflies plus birds chirping around.
Digital, Hybrid, Altered Art, Scrapbooking, Decoupage, Stamping, Card Making, and Mix Media are the things that I’m so crazy about as a crafter.
The Crafter’s Creed – this is definitely me as a mother, wife, and most of all as a crafter.


 Tools and Materials Needed:
• Wooden Frame without glass – 15” x 38”
• White Acrylic Paint
• Decoupage Lack and Seal
• Decoupage Brush
• Brayer
• Dap Stick Around
• Royal Coat Dimensional Magic
• Stickles
• Waco Pearl Maker – Cream
• Color Box Pigment Brush Pad - Bronze
• Zig Millenium pens
• White Cardstocks
• Provo Craft Alphaletterz Chipboard
• Prima Flower
• Flower Soft - Spring
• Pemacc Crystal Beads
• Heidi Swapp Ghost Clocks
• K & Co Metal Alpha Art
• CChobby laces
• Tilda Pompoms
• Sense Chipboards
• Panduro –metal kite, grossgrain ribbons, wooden heart, mini bottle caps, tissue papers, crown chipboard, Sweden flag
• Philippines’ products – butterflies, pink bag, crystal flowers, wooden flowers with ladybugs

Instructions:

1. Decide on the size of your board frame.

2. Paint the base board with white acrylic paint and let dry. Having a white background is one of the basics in decoupage.

3. Open your photo editing software and choose from the digital kit you prefer to use as your base and embellishments.

4. Print and let dry at least overnight since decoupage technique is one of the best (if not the best) way in adhering everything plus it will make the collage long-lasting and durable. If you have no available decoupage lack, simply mix white glue with water and use flat brush for application.

5. Collect additional embellishments you have from beads, ribbons, crystals, etc.

6. Begin arranging the whole thing but be patient because oftentimes re-arranging takes forever.

7. Once satisfied, you may adhere everything permanently.

8. Let the finished collage dry completely and usually overnight drying is the best.

9. Once totally dry, seal your collage by brushing gently decoupage seal lack and let dry again overnight.

10. Remember: Don’t be scared or apprehensive in making a collage. Create however you want it for after all it is the artist in you that’s working – expressing what you think and feel at that moment under the influence of inspiration you have in your mind.


***************************

The Crafter’s Creed

I will never leave home without my camera, everyday is a potential photo op.
No scrap of paper bigger than my smallest punch shall be thrown away.
I will be there for my fellow crafters to offer help, advise or support, or just an ear for venting.
I will gently remind my family that they will thank me someday for the memories.
I will tolerate husband’s comments as to amount of money I spend for my craziness.
I will NOT point out that he has the thing for loud speakers, TV’s,
electric guitars, and other technologies.
I will not covet my neighbours stamps, punchers, dies, or markers (at least not openly).
I will plan all family vacations to places that have at least one Local Craft Store.
I will always have at least one album in prominent view at all times
should friends, relatives, and colleagues just happen to drop by.
I will faithfully measure my paper stash and run (not walk) to LCS when pile dips below 6”.
I will not show my children the floor plan I have to convert their room for crafting
until they reach adulthood.
I will take at least one picture of myself weekly so that my grandchildren will know
I was really young once.
I will be forever thankful to Mr. Kodak for his wonderful invention.
When my husband is old and gray and reminiscing through my scrapbooks, I will refrain from saying “I knew you would appreciate my obsession someday”
then I’ll snap some pics of him in his rocker!

 Thanks for dropping by!


0

Thanksgiving Wine Glass Markers

Sweden does not celebrate Thanksgiving Day but with Glory Days digital kit by Tempusfigit, I was inspired to create wine glass markers useful for a family Thanksgiving gathering. Each wine glass is adorned with symbolic charm that is significant to what we all should be thankful for. 


Supplies Needed:
Digital Kit Glory Days by Tempusfugit
Shrink Film
Marvy Brush Marker – black
Just Rite Stamps
Memento Dye Ink Pad – tuxedo black
Tim Holtz Distress Ink Pads – Spiced Marmalade, Frayed Burlap, Tattered Rose
EK Success Scalloped Scallop Edge Punch
Color Box Pigment Ink – bronze
Royal Coat Dimensional Magic
Cardstock (left-over)
Rings
Charms (assorted)


Instructions:
  1. Open your editing software and choose the elements from the kit that you want to use and print on a sheet of shrink film, let dry.
  2. Cut each element not forgetting to punch holes on each.
  3. Set the oven according to the shrink film’s instruction as stated on the package.
  4. Let cool after “baking”.
  5. Stamp sentiments on distressed paper and cut according to the size of your preference.
  6. Punch the cardstock, adhere the sentiments, and cut.
  7. Apply dimensional magic on each sentiment and let dry at least 3 hours.
  8. Assemble the wine rings.
 
Symbolic Charms Meaning:

Bingo Card – Laughter: Thankful for the FUN in our lives for we have laughed and smiled alone or with our loved ones.

 Bird – Happiness: Thankful for the BLESSINGS we receive each day that brought happiness and inspiration in our lives.

 Butterfly – Adventure: Thankful for the FREEDOM for in it we are able to spread our wings and discover our possibilities.

 Clock – Life’s Journey: Thankful for the LIFE God has given us for it enables us to have a chance and admire everything around us.

 Hand with Flowers – Family: Thankful for the FAMILY we love and care everyday for without them life would be meaningless.

 Padlock – Traditions – Thankful for the traditions passed on from generations to generations providing SECURITY to our families - a security that one is sure of who he is and what his ancestors were.

 Playing Card – Memories: Thankful for the MEMORIES good or bad that will last a lifetime.

Postal Stamp – Friendship: Thankful for the FRIENDS we have gained all over the world that even though far from each other, we try our best to keep in touch for us to laugh, guide, cry, teach, dream, and create.

Puzzle – Reflections: Thankful for the TRIALS that come along the way for with those trials we have something to reflect about and make us a better and stronger person.

Red Rose – Miracles: Thankful for surviving this polluted world and still giving us good health and sanity.

 What are you thankful for?


0

How To Make Acid-Free Paper

This project I have made July 2009 and was published at TDS Lifestyle October 2009.

 Every paper crafter knows that cardstock is the most important material needed to create cards, scrapbook layouts, in some cases printing digital kits plus we are also aware how expensive acid-free cardstock can be, right? During our paper crafting, we naturally have left-overs bits and pieces, right? I save all my left-overs and arrange it in ROYGBIV in an expandable envelop because I have plans of recycling those and make my own acid-free papers. One doesn’t have to spend money in acquiring all the materials needed to make your own paper coz we all have it in our very own kitchen. This recycling can be done anytime of the year especially if you are blessed with all-year round sunshine.  In my case I have to take the opportunity only on summer time.  


Supplies Needed::
  • Left-over acid-free papers/cardstocks
  • Blender/Food Processor
  • Plastic Basin that can totally immerse the size of your deckle and mold
  • Deckle – Hoop / Frame used for cross-stitching
  • Mold- Round flat Flour Strainer
  • Old Towels
  • Liquid starch (optional)
  • Craft White Glue (optional)
  • Sponge
Note: 
If you have no wooden frame and screen available to use as your mold, you may use a flat flour sifter of any shape like what I did. 
 
If you have no basin large enough to immerse your mold and deckle, use your kitchen sink.

Summertime is the best coz you just hang all the handmade papers to dry quickly. During cold or rainy seasons, you may dry each handmade paper by sponging and inserting each on old towels with cookie sheets layer by layer until no more water dripping. This part is best to do in the bathroom or outside coz it can be very messy.

You may add glitters, flat beads or fresh flowers during the process.

Never throw the left-over tiny particles at the end of the process coz you may still patiently create small uneven shape of handmade papers.

Lastly, if you use ordinary papers then you will be creating a NON acid-free and if you will be using your left-over acid-free cardstock then naturally the output would be acid-free.

Instructions:

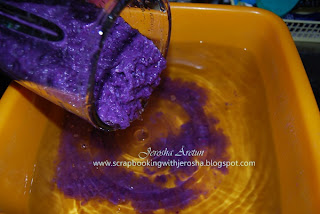
  1. First is to rip your papers into small pieces and let it soak on water for few minutes. This process will soften the paper fibers and saves time in blending. Place into the blender about half full and fill the blender with warm water and start blending. Usually it takes 30 to 45 seconds to have a smooth and well-blended consistency. If you notice that there are still big flakes, then blend again until you are satisfied. 
      

  2. Now, fill the basin about half way with water and add your pulp and stir the mixture. Remember that the more pulp you add the thicker the finished paper will be. If that happens, just add more water. 

     
  3. If you have plans of using your handmade paper for writing, it is best to add and stir 2 teaspoons of liquid starch. The ingredient will help prevent inks from soaking into the paper fibers. 
     
  4. To make your handmade paper sturdy meaning you can bend the papers, add and stir 2 or 3 teaspoons of white glue. 

     
  5. If you plan to add small objects like flat beads, glitters, or fresh flowers, now is the best time.
  6. Dip the mold into the pulp and then level it out gently by wiggling it side-to-side while submerged until the pulp on top of the screen looks even. 

     
  7. Slowly lift the mold and wait till the water has drained. If you think the paper is very thick, either you remove some pulp from the tub or add more water. If it is too thin, either you add more pulp and stir the mixture again not forgetting to add more liquid starch and glue or simply remove water. 

     
  8. When the mold stops dripping, gently place it on an old towel. Gently press the mold down flat, to drain more water. Then use sponge to press out as much water as possible. Wring the excess water from the sponge back into the large plastic basin. 

     
  9. Here comes the tricky part. – Turn upside down the mold fast to release the paper. If it doesn’t fall-off, gently tap the mold. If it sticks to the mold, you may have pulled to fast or not pressed out enough water. 


  10. Hang each on a clothesline when the sun is shining brightly or when you are sure that no more excess water from towels with cookie sheet lay down each on newspapers. 


  11. Repeat the steps above until you were able to recycle your acid-free left-over cardstocks.
  12. Viola! You just have recycled your left-over acid free papers and may now use as part of your embellishments.
 Here's a sample of handmade paper after adding fresh flowers in the process.

 
 As I've said tiny bits from the process should not be thrown immediately.  Try to make more papers out of it.


Happy crafting!

Happy Recycling!


Back to Top