Entry #54 - NCM 2010 : Proposed Wedding Invitations (7 of 7)
Prima Flowers
Glittered and Embossed Cardstock in off-white by Panduro
Ricrac band bought in the Philippines
Pearlmaker (silver)
MS Edge Puncher - Scallop Dot
Panduro Design Cardstock
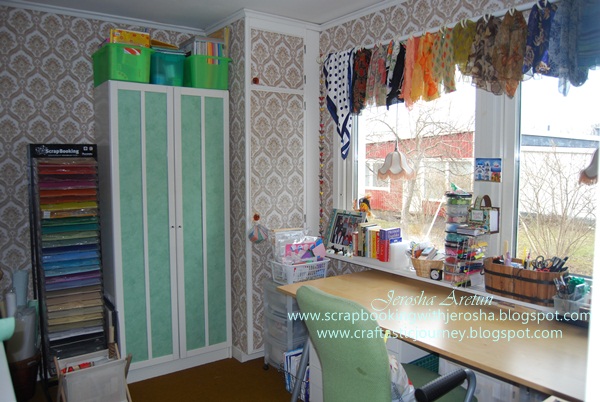
2009 How I Organized My Room :D
I am really happy, contented and fulfilled that I dedicated my whole day by showing how much I cared about my craft materials and tools - and that is by having the discipline of cleaning my room and keeping them safe.
Now, the question is?
Will I be able to maintain the cleanliness? The answer is NO! Simple because I create things and naturally it will be a mess hahahahaha.
Let's re-phrase the question, Will I have the discipline to clean my room after I have crafted for the day? The answer is YES! I will do my best to return things where I got them immediately after I use it because I WILL NOT allow another major organization of my room because it's sssssssssssssssssoooooooooooo tiring!!!! hahahahahahaha I promise myself that everytime I have a new tool or material, I will put them where it belongs.
So there my dear friends and fellow crafters, I, Jerosha Äretun, finally know and learn the true meaning of ORGANIZATION :D
Aren't you guys proud of me? hahahahahahahahahahaha
I did it all by myself without anybody helping me hahahahahahahahahaha
Love you guys!
Thanks so much for the love and support you all gave me and giving me :D
Cheers to our friendship and may God bless us all!
Let me show you the BEFORE and AFTER shots =)
Thanks for viewing =)
I know soon I will be re-organizing again simply because I just can't stop buying things :P
How I Organize and Store My Stickers
ooooooooooooohhhhhhhhhhhh just when the National Craft Month is almost over, I get so preoccupied with lots as in LOTS of things, aaaaaaarrrrgggggggggggghhhhh!!!.
Ring Markers
Here's how I did the rings :DSo easy to make and we can make our own personalized embelishments :D
3 Birthday Cards for the Day
Anyway, for this day, I created 3 birthday cards. I don't know why hehehehehehehehehehehehe. Maybe to get away from organizing my craft room hahahahahahahaha..... just kidding :D I created birthday cards because I will be needing it hahahahahahahahahaha simple as that!

Silver glitter ink stamp pad by HobbyCrafts
Punched mini flowers and mini sun
Polka Dot Ribbon by Panduro
Green satin ribbon by Panduro
Silver glitters for the cenetr of each dlowers
Tag by Panduro
"Happy Birthday" stamp by Printworks

I used the cuttlebug embossed paper with ink which I did several weeks ago
Green Satin Ribbon by Creative Hobby
Violet Satin ribbon from my mom 28 yrs ago
"Birthday Cake" stamped image by Printworks
Stickles of different colors
Stampin' Up Ticket Puncher
Promarkers
Left-over cardstocks
Cuttlebug Embossing Folders (4 kinds)
Stampin' Up Photo Corner Puncher
Prima Flowers
Brad by YouDo
Green Satin Ribbon by Panduro
"Happy Birthday" stamped image by Inkadinkado
Have a great evening everyone!
Now I have to go and look for our tickets :D
Mini Easter Baskets Using Empty Tissue Roll
For the 27th day of this month, I created Joseph's request hehehehehehehe. He chose the colors he like in creating these baskets plus he chose the cuttlebug embossing folder, too :DHe really wants me to create bags where we're gonna put candies for Maundy Thursday. Here in SWeden, every Maundy Thursday, kids go around and knock and ask for candies. They wear costumes but not halloween type costumes. They wear like witches instead both boys and girls. He also wants to give candies to his classmates before the Esater break. So, how can I say NO to my little boy ... almost pleading with hazel shaped eyes and super long lashes plus a sweet smile .... with hugz and kisses, too. Of course I said YES and he was REALLY glad and excited. I almost said NO coz I had to make 48 baskets hahahahahahahahaha. 25 pcs for his school then 23 will be here at home just in case kids come and ask for candies hehehehehehehehehehe :D
At first I was thinking of using my Cricut Machine plus the Tags, Bags, and Boxes cartirdge but then I know that kids are only after the candies and it will break my heart if I see my creations just at the bin. I also have to consider that I can't give them much candies coz it's forbidden in their school. Few candies I think will pass hehehehehehehehhe. So, I thought of creating a mini basket that can be filled with 4-5 candies (depending on the shape). I also used ordinary kiddie cardstocks.
The main base is empty tissue roll :D
Materials :
How To Unmount Rubber Stamps
I sorted out patiently all the stamps and categorized each. After doing such, I then realized that there are some rubber stamps that I prefer to be used using acrylic blocks. Don't worry, I will not unmount my collection of Stampin Up Rubber Stamps as well as the House Mouse Stamps. By just the thought of it gives me shivers in my spine hahahahahahahahahha
A lot of crafters do unmount their stamps in order to save space. There are different ways to store acryclic and unmounted stamps but that part I have to deal with later or tomorrow or within the week. One thing for sure, before the National Craft Month ends, I at least will be able to organize my stamps. I'm slow in organizing coz there's so much in my head and so many things to attend with here at home. Oh well, I guess that's part of married life ... being a mother and step-mom ... being a wife to one of the most wonderful man in the world. I say "one of the" coz I know your own husbands are wonderful, too, hehehehe.
OK enough with the blabbering .....here's what I did with few of my rubber stamps. Few because as I have said I have no intentions of unmounting all my rubberstamps hehehehehehe.
These are the stamps I want to un-mount :D

Some rubber stamps are so easy to remove from the wood, so you're lucky coz you don't have to go to the process. In my case, not all were easy so the trick is one rubber stamp is equals to 5 seconds in the micro oven with full effect. Which means, if you're not patient enough and wants to put more than 1 in the micro, let's say 3, then it has to be inside the oven for 15 seconds regardless of the size. If ever, it's still difficult to remove then another 5 seconds will do. But I assure you, 5 seconds per rubber stamp works just fine :-)
See the result of what I did:
To show you an example of not using the micro oven and unfortunately your rubber stamp is difficult to unmount :( I did this in purpose so you will see how sad it looks like hehehehehehehehehe. As compared to the left wood block, I'd rather choose the right side block coz it's cleaner. Don't worry, I used an extra rubber stamp :-) Remember don't force it when you feel that it's hard to remove. Use the micro oven instead :-)
Ok, now some rubber stamps they have a sticker like cover design on top, right? Some are really painted onto the wood like most of my rubber stamps from Panduro. Let's not force that coz it's painted hehehehehehe. Let's deal with those rubber stamps that has an easy cover design hehehehehe.
You can actually gently peel it off and save those .... stick it to clean white cardstock so you'll have an easy reference of your unmounted rubber stamps.
See the sample :
Now, how I organized my unmounted rubber stamps? Can't tell you yet coz I'm not finish hehehehehehe. I have an idea and I have actually started organizing both the acrylic and unmounted rubber stamps. Wait and see hehehehehehhehe
OK guys, it's all up to you if you want to unmount some of your rubber stamps to save space. Hoping that the idea I shared with you all will be of big help :D
Have a great day everyone!
See you all maybe later or tomorrow :D
Altering Tea Candle Holders Into Mini Lampshades
For this 25th day, I altered tea light holders that is so plain and transformed it into mini lampshade. When we went out last Sunday to look for craft storages, one thing I looked for are mini lamp shades that will fit my tea light holders. The tea light holders has never been used and was just stored in the basement. Luckily at one lamp store, we were able to find the perfect size. I heard that one can actually buy mini lampshades but it's normally out of stock.
When we got home, i took out the lampshade cover Maryann gave me made of parchment and she intricately designed it in pergamano way. if you don't remember, click here. The measurements were not exactly fitting to the "lampshade" I bought but I was able to fix it by just adding 2cm.
I made 6 lampshades by decoupaging then added bands/ribbons and it will given away as birthday gifts. We have 2 great family friends plus my dearest mother in law who will each be having a big party come 1st week of April and each of them will get 2 pieces (1 set) :D
It was indeed very nice to take a break from organizing my craft room hahahahahahahaha. Decoupage Day it was for me!!!!!
Restoring the Stickiness of Clear Stamps
For this day, I will share with you all important Tips and Tricks in restoring the stickiness of your clear stamps.
You see, While I was sorting and organizing all my stamps today, I found 2 packs of discolored set of stamps plus the stickiness is gone :( Oh my poor babies!!! They need love and attention from me and I will do my best to nourish them with all my might. The picture below makes me sad but I'm crossing my fingers that I will be able to use these set of stamps once again.
- Clear stamps will perform better the longer they are used. To speed up the conditioning process, you can rub a white eraser over the surface of the stamp, then give it a good cleaning on your stamp rubbing pad. The eraser helps to remove any residue that may have been leftover from the manufacturing process.
- To clean your stamps after use, a stamp scrubber misted with stamp cleaner is the best bet but an unscented baby wipes works just fine.
- Once in a while your clear stamps may benefit from a "spa treatment". Fill a small bowl with warm soapy water. Submerge each stamp under water and rub it gently between your thumb and index finger. This helps to remove any build-up from extended use. When you are done, rinse the stamps thoroughly and allow them to air dry before using.
Sort ... Organize ... Clean
Ok, what did I do yesterday for the love of crafting this 23rd day of National Craft month?
Would you believe that I started organizing my craft space? hahahahahahahahaha I finally got to know the meaning of ORGANIZE hahahahaha. While my DH was spring cleaning at the living room I did my share by doing same at my craft space. My DH calls my room The BLACKHOLE hahahahahahahahahahahahahaha.
Since I love you all, I want you all to laugh by looking at the pictures of my room I have taken while I was cleaning. It was really in a mess hahahahahahahahaha NO ORGANIZATION at all hahahahahahahahaha. But, I know where to get my things hihihihihihihihihi that's the most important part hahahahahahaha.
It took me the whole day to sort and organize but the truth is IT IS STILL in the process of organization. However, one of my favorites is my collection of flowers and that I can show you how I organized it. I still need to organize more of the flowers but you can see how I made use of the empty CD cases :D I have to get more at the basement!
Now, to see my BLACKHOLE in a mess,
click here :D
Bouquet of Flowers (13 Cards)
When we got home, I told everyone that I will be very busy coz I have to deliver the cards tomorrow. Luckily they all understood hahahahahahahahahaha and that includes my son :D While I was conceptualizing my cards, I was restless so I tried making a Sour Cream card using an ordinary transparency, as I have promised. It looks so plain so I used one of the foam stamps Joan gave me and my panduro foam stamp plus Staz-On stamp pad. Oh bhoy! It sure looks nice using transparency :D
Now as for the cards I made this 22nd day of National Craft Month is something cute and unique. I got a call early this morning from a kind lady and says she saw my works at www.scrapbookingwithjerosha.tk and was happy to know that I'm from Uppsala, Sweden. She ordered 12 Thank You cards. We talked a little so I can have an idea what she likes. It's just a thank you card for her group of friends who helped her in many ways and they all love flowers :D With her order, I decided to make it as my entry for the day :D I actually made 13 coz I really like keeping one copy for my portfolio :D
Materials Used:
Mandy's Zoo stamp for the stem and leaves
Stampendous for the flower
CTMH stamp pads
Martha Stewart Punchers : Scallop and Embossed ZigZag
Tack rubber stamp by Slöjd-Detaljer
Unbranded plain cardstocks : Mint Green, Chocolate Brown, Dark Pink and Baby Pink
Stampin' UP Scallop Punchers
Panduro embossing Powder
Panduro Baby Pink satin ribbon
Cuttlebug Embossing Folders : Swiss Dots and Swirls
stickles
cellopane - from my kitchen hehehehhehehehe
Posted by