Showing posts with label Christmas. Show all posts
0

Upcycled Pringles for Kids Advent Calendar

Last Christmas marked the last time for my son to have and to open an advent calendar.  He is now 11 years old and he understands that we will not be preparing a kiddie advent calendar for him.  He is sad but at the same time he feels like a real big boy.  Oh yeah, he still want to have a box of chocolate advent calendar one can buy in groceries but the problem would be is that he wants one pack a day which in turn serves as his advent calendar.  I don't think I will approve of that request - too much sweet for him =)

Anyway, last Christmas 2013 I gathered all the empty pringles canisters which I have been saving for 1 whole year.  Obviously we love Pringles hehehehehe.  I chose some funky and bright Christmas lightweight cardstock and wrap each canister then accentuated with heart and round doilies, using gliittered gold wrapper I punched gingerbread border using EK Success then numbered clips =)   He enjoyed opening each one everyday for 24 days and loved the items found inside, too =)  The upcycled canisters served as decors at our kitchen window =)

Simple, easy, and sparkly!


 Thanks for dropping by!


0

Easy Peasy Ornament for Kids

Need a simple DIY Christmas ornament?

Have a bunch of empty tissue rolls?

Your kid or kids would like to help decorate the tree and thus would love to create their own ornaments?

Well, here's a very simple idea my son created last year for our Christmas tree to complement the Angel-like ornaments I did which by the way you may find it here =)

All you need are empty tissue roll, wrapping paper or perhaps Christmas theme cardstock or aluminum tape like what my son used for this project.  He knows I collect empty tissue rolls and since he saw that I have excess embossed aluminum tape - left overs from the other ornaments I did, he kindly asked me if I can cut each empty tissue roll into 3 parts like what I did for the Easter Baskets years ago =)

Once all has been cut, cover each with your choice as I have mentioned above.

Add mosaic glass on every wrapped roll.

Glitter glue is perfect to add on top and bottom of each wrapped roll.

Don't forget to add whatever strings you have in hand for hanging purposes =)

Hang!


Easy, right?

until then.....


0

Tip: How to Add More Sparkle for your Christmas Tree

Christmas is just around the corner we all know that and I am pretty sure that in some countries as early as September plays Christmas songs in malls or stores .... some I bet started decorating their homes and even the front and backyard BUT not here in Sweden .... not yet.  Normally the bang starts December 01 and as for me I normally start setting up decorations by the last few days of November since my husband birthday falls on 1st of December.  I also wanted to start feeling officially the Christmas season on his birthday.

In every house the Christmas tree is the center of all decors and that's were my tip comes in for me to share with you all.  When I was a kid I saw my mom decorating our tree with love, patience, and joy.  She would create simple things to hang in our tree then gets busy with her sewing machine for all the curtains in our house.

Anyway, one of the tips she taught me when it comes to decorating a Christmas tree is to first add the lights and/or small mirrors at the body stem of the tree.  It will triple the effect of sparkles one would want to achieve.  For many years I have been using lights but few years ago I was so thrilled to find a pack of mirror inchies or mosaic glass and yes I had one thing in my mind - for our Christmas tree!!!

Oh don't think that we have a Christmas tree as early as now because this was taken last 2013 =)  Yes, I will still be using the glass mosaics year after year =)

just adhere each glass on a band back to back =)

Hang each starnd at the inner part of the tree =)

Ooooooohhhhhh it sure made a big difference!  This shot was taken without flash and the whole room glowed with gladness =)

I do hope one of you will try this tip =)

Thanks for reading!


0

Turning Empty Tissue Rolls Into Angel-like Ornaments


Life for me for the past years have been very very busy that I just have no time to update my blog which is a shame ... I know :(  Most of the time if I can I just create things during my free time then time passes so quickly that I have to do other chores or busy at work that I had no energy anymore to sit and dwell in my craft site.  What I will be posting is one of the Christmas ornament set that I created way back 2013.  It has been a habit of mine to collect empty tissue rolls because I know that I will be able to upcycle it to something cute or useful plus my son normal uses few when he is creating something.  This project i would say is not easy due to details but I'm proud to say I did get the flow so everything went smoothly =)


MATERALS:

Aluminum Tape
various Embossing Folders
Mirrors in 1 inch
Empty Tissue Rolls
Christmas Theme Cardstock
Eyelash yarns
various bands
Black Acrylic Paint
Sizzix (Angel Wings) Die

PROCEDURE:

1. Aluminum Tape comes in a roll at about 2 inches in width.  Cut strips and emboss for the body of the empty tissue roll =)  Then spread some acrylic paint and let dry =)


2.  Wrap each empty tissue roll with your choice of Christmas theme cardstock.


3.   Wrap the embossed aluminum tape and decorate according to your liking.  I added the mirror inchies to add sparkle when hit by the Christmas lights =)

4.  As for the wings :  Adhere strips of aluminum tape on any cardstock preferably A5 in size then emboss each cardstock then use the Sizzix Angel Wings die.  Adhere wings at the back part of each decorated empty tissue roll.  Hang and enjoy the sparkle =)


Honestly, I have no idea what I will be making for our Christmas tree this year.  My whole family is looking forward to my decorations coz they that every Christmas I have a theme =)  I know time goes so fast and I definitely have to come up with a theme this week =)

Thanks for viewing =)


0

Burlap Christmas Cutlery Holder

Just two days before Christmas I went to a Flea Market and there I bought vintage silver-gold cutlery which was perfect for our planned Christmas Äretun gathering.  I got vintage silverware from my DMIL.  It was hers given during their wedding day and the whole set was super elegant - white with gold sidings and gold small flowers on the side.  Anyway, when I got home I hurriedly looked for my green burlap and started sewing cutlery holders.  I accentuated each holder with poinsettia which I patiently removed one by one from an old wreath.  Aside from the vintage cutlery I bought at the flea market, I bought different colors of band with tassel effect but for this particular project I used the white one.   I'm not really good in sewing but what the heck! I love how it turned out given that it was a last minute project.


 Here's the process:


 Yup, that's our very old dog, Kasper.  He always wants mamma =)

Fray the edges =)

Adhere the plastic poinsettia flowers using a glue gun =)

That's it!


0

Christmas Napkin Holders (Upcycle)

Accessorize your table napkins!  

Don't throw those empty tissue rolls but instead SAVE each as much as you can.  I have been doing that for more than a year now because there are so many things to do and re-use the rolls.  If you will go over my Upcycle/Recycle page I know you will see some projects wherein I used empty tissue rolls.  

Last Christmas I did use almost all the rolls I saved because I made few batches of Christmas projects for said material.  Here's one of those:


This oh so simple project can be used in lots of different occasions =) Btw, you might wondering what I used for the silver effect.  Well, first I cut strips of aluminum tape then embossed it with one of my favorite embossing folders then to add shine I used glitter on the edges.


0

Colorful Christmas Owls (Upcycle)

Finally I found my camera charger and it will take an hour to be fully charged then I can show you on of Becky Higgins Core kit.  While waiting let me show you one of the Christmas ornaments I did for Christmas 2012.  I love owls and that's a secret no more.  I collect owls that I find really really really cute and my collection is slowly growing.  Normally I buy one whenever we go to other countries coz it's more expensive here in Sweden.  Being a fan of owls, I made few pieces for our Christmas tree.  Isay only few coz I made use of well-pap soft boards when I get a package.  Sometimes, inside the package the items are wrapped with well-papp and I save those.

It's very easy to make coz you cut the width to your liking then roll and secure.  Afterwards you just decorate it.  I mainly used what I have in my stash like the eyelash yarn, 3D eyes, did cut randomly beaks using leftover yellow cardstock and halfmoon in black cardstock that serves as eyebrows then added stickles.  I made use of the different feathers I have and I found some plastic hats, too =)  So easy indeed!


 A close-up look:

Aren't they cute? 


 As for the back, I punched round scallops to cover the messiness of the feathers and punched and adhered 2 small circles before securing the ribbon to hang.  yes, I did use well-papp to make it stable.

A sample of one of the owls hanged in our Christmas tree.

Thanks for viewing =)

Have a great week-end and happy crafting!


0

If The Shoe Fits! (Ladies Paper Shoes)


.... of course it's handmade with love! I made these 41 pieces of hybrid paper shoes last Christmas, 2011, for a vintage store and for our staff at Specsavers but unfortunately I got sick the day I had to deliver. Each shoe is unique since I don't make duplicates. I still have few pieces but don't know where I kept it hihihihihihi.

Each shoe pattern was cut manually then embossed using assorted embossing folders. I printed out digital pictures from The Graphics Fairy (under the Christmas Category) then highlighted with stickles before adhering to each shoe. I used lots of edge punchers ... some flowers were handmade by me, too, which you may find under Flower Making Category!
What to do with these shoes?  Use it for gift-giving purposes coz the shoe itself is a beautiful way to pack your small gifts.


Next time maybe I'll make some using fabrics or felts.

Thanks for viewing =)


2

A Simple Christmas Wreath Assembled by My Son

One thing I'm so happy about .... proud actually is that my son has creative juices in his brain.  Since he was 2 years old I noticed he is good in doodling ... drawing ... creating anything he can find at home or sometimes uses my left-over scraps.  There are moments when he is lazy to create hinself he would sit by my side and tell me what he wants to creat BUT the hitch is that he tells me then I execute it.

Last year, after staring at all the snowflakes I cut using Winter Lace Cricut Cartridge, he whispered in my ear that he wanted to make a Christmas wreath. And so he did!

Here's what he made - a very simple one but for an 8 year old I think it's awesome!


 I wonder if my son has any idea for our wreath this Christmas.  As for me, NO IDEA yet but it will come I know =)

0

Advent Calendar in the Making

More than a month from this day starts the Advent season and yesterday, my short free hours I decided to start creating for my son's Advent calendar.  He usually has a lot from relatives and friends ... you know the usual advent box filled with chocolates plus an Advent Calendar I created.  While at work yesterday, I had a clear picture in my mind on what I will create for him this year.  I was not able to go home straight because I needed to buy his birthday gifts.  Yeah, he will turn a year older tomorrow.  When I got home, naturally I have to wrap all his gifts first then started creating his Advent calendar.

Here's a sneek peak:


The numbers are made out of felt which by the way one can easily print out from own computer then trace, cut, and adhere using s super glue.  Afterwhich you may add stickles in every number and if you're still up to it then you may add shadows by using a gold stickles =)

I wonder if you can guess the final look of my son's Advent calendar?

Anyway, thanks for dropping by!  I'm sure everyone is super busy creating Christmas items =)


0

Ginger Bread Cookies? Nope!


Nope, these are not gingerbread cookies because these are gingerbread couples for my son's teachers which we gave away last Christmas.  Just a Christmas decoration for them to hang in their homes.

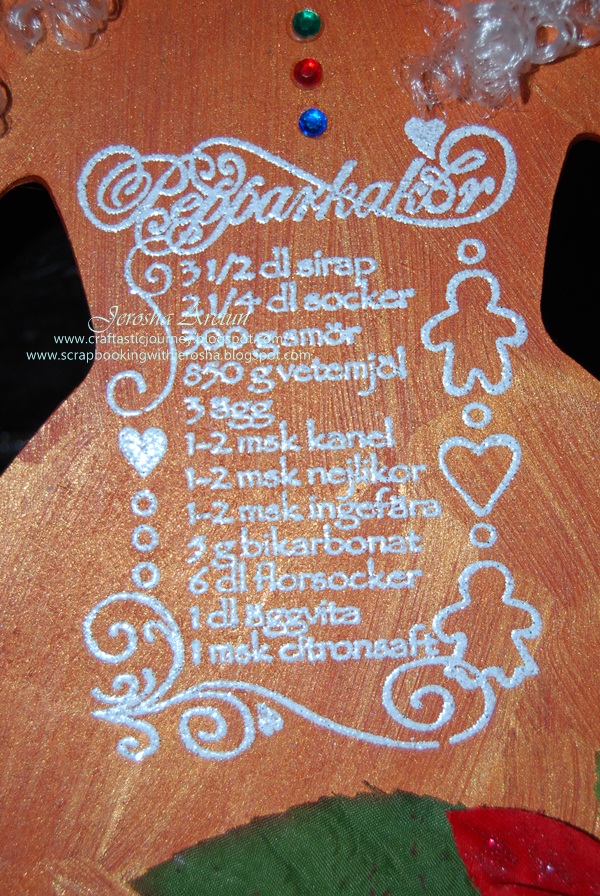
When I saw the wooden jumbo (nearly 12 inches each) gingerbread man and woman at Panduro last year, I simply adored it and bought a lot of it but played with only a few.  I simply painted it with glittered gold acrylic paint then stamped with the Gingerbread cookie recipe, also from Panduro.  I embossed the stamped image with embossing powder then decorated it with different embellishments.


 Here are the details of each couples:


Here's the stamped image of the recipe:


Here's the bare wooden gingerbread man and woman:


 I think I will be making more this year ... to sell =)

Thanks for viewing!

Happy crafting :)

Back to Top