Showing posts with label Altered Art. Show all posts
0

Ginger Bread Cookies? Nope!


Nope, these are not gingerbread cookies because these are gingerbread couples for my son's teachers which we gave away last Christmas.  Just a Christmas decoration for them to hang in their homes.

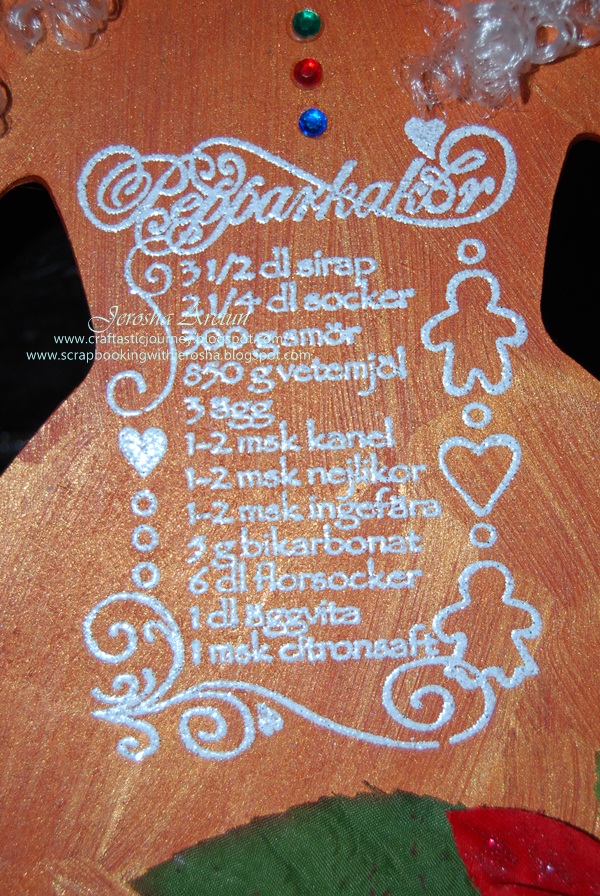
When I saw the wooden jumbo (nearly 12 inches each) gingerbread man and woman at Panduro last year, I simply adored it and bought a lot of it but played with only a few.  I simply painted it with glittered gold acrylic paint then stamped with the Gingerbread cookie recipe, also from Panduro.  I embossed the stamped image with embossing powder then decorated it with different embellishments.


 Here are the details of each couples:


Here's the stamped image of the recipe:


Here's the bare wooden gingerbread man and woman:


 I think I will be making more this year ... to sell =)

Thanks for viewing!

Happy crafting :)

0

Homemade Juggle Balls (Tutorial)

Looking for something that kids can play with during autumn and winter?

Figuring out what to include in goodie bags for kiddie birthday give-a-ways?

Well, read on and maybe you will like what I created a year ago for my nephew's baptism celebration.  It was part of the give-a-ways I made for his guests during the said event.  It was my second time to make juggle balls because the first time was during my son's 7th birthday and both events the juggle balls were a BIG hit for the kids!

It's very easy, I promise =)  I assure you kids will enjoy squeezing and throwing then catching these balls.


Let's discuss the materials you'll be needing for this project:

balloons - preferably the thick ones and medium size
5th class rice or small beans or porridge rice like what I have used
small plastics
transparent tape
scissors
measuring cup

 Please be informed that the porridge rice I used is long been expired!


PROCEDURE:

Add 3/4 cup of rice or beans in a plastic.  Twist the plastic to secure fillings then cut plastic at least leaving 2 inches from the twist.

After twisting and cutting the plastic, fold the flap and secure with transparent tape =)  It will not form a ball shape ... yet ... just so you know.


Once you have secured all the plastics, then get the balloons and cut!  Cut each ballon as shown in the picture.  I can't give you the exact size because some balloons have long necks.


Now you're ready to insert all the plastics filled with fillings inside each balloon =)


As you can see we need to cover more the filled balloon.  So get another cut balloon and insert it one more time.  It's best to use different colors of balloons coz it makes the children smile or better yet if you have printed balloons so much the cuter!


All you have to do now is just add a juggle ball or 2 in every goodie bag for give-a-way =)

If ever you tried my tutorial for this day, please let me know and I would love to see it.

Thanks for dropping by!

Happy crafting =)


2

Draw and Color on White Kiddie Shirts


This T-shirt project was done few days before our trip to Parga, Greece, of September 2008.  My son got a dozen of plain white shirts given by his Godmother from the Philippines but I only used 11 shirts for this project.  Instead of buying more shirts for the trip, I took the plunge of drawing cutie on every shirt then used fabric pens for coloring.  Of course my son has the say on what to draw =)

It turned out cute and just last week I'm trying my best to find all the shirts down the basement but sad to say I found only one piece.  Will find the rest of the shirts some other day coz I have another project in my mind on what to do with those cutie shirts.


 So next time you have plain white shirts try to doodle or draw then color =)

Thanks for viewing!


2

Altered Glazed Stones

wwwwwwwwwwwaaaaaaaaaaaaahhhhhhhhh  what a frosted morning we had 2 hours ago and I was so glad that it melted fast!  The sun is shining really bright and no frost anymore!!!


Good Monday everyone!  How was your week-end?  Hope all is well and we're all starting a week filled with fun, laughter, and most of all creativity =)

My week-end was awesome!  Saturday, I attended a party without hubby and my little boy ... yup, I was single that night.  It was Erika's 30th birthday and she invited us at her place with a big plan for us making fresh pasta together. I offered to bring chicken in sticks and since it was already half-prepared I  was spared from messing around at the kitchen.  We had fun and it was really nice just hanging out with them.  You won't see me in any pictures because I was the one taking pictures ....what else is knew, right? hahahahahhahaha. I went home bloated ....stomach filled with delicious food.  I got home safe and unharm - bhoy! it was a long ride indeed and the only horrible thing happened is that I forgot my wallet at Erika's place.  But we were able to get it the next day at Cristina's place who was kind enough to bring it with her instead so I can just get it from her who lives within the city.


That's the birthday celebrant =)  I gave her my gift while we were eating our desserts =)  To see the details of the necklace, just click this and to see the details of the shoe case I made you may click this =)

And the dessert:  cheesecake by Cristina, something made by Jan, and although I was drunk I couldn't resist to take a shot of Bailey's (my forever fave!) =)

Sunday (yesterday), I tried to avoid creating anything to rest and relax.  Joseph and I went to watch a movie "Journey to the Mysterious Island" down the city.  I had a headache afterwards coz I never like watching 3D movies coz one has to wear 3D glasses but the most important is my son truly enjoyed the movie.


Anyway, let me show you the stones I altered =)  It's kind'a cool because it's a great centerpiece on any table whether dining area or the living room.

These are the basic materials I used and transformed the glazed stones into this:

I added heart beads at the last minute =)

Well that's it for now....

until then......
0

The Letter R

Yesterday I got busy altering jumbo monograms R for 2 cute little boys Rayner and Ryan =)  The size of the letters are 12" in height so I've got lots of room to play with.  I enjoy playing with Ranger Distress Crackle Paints ... actually all TH products, don't you?  Then I used colored twines, chipboards, and alphabet charms plus the cute magnets I have in stock.  It was a relaxing Monday yesterday even at work although clients came all at the same time during lunch break but we managed to handle each one of them.  I decided not to go to the gym and hubby got sad but I promised him I will be back in my toes at the gym tomorrow, Wednesday, and will do that part every other day.  It's a promise I have to fulfill not for hubby's sake but for me.  Getting old is not easy and if I want to prolong my life so I can grow old with my son then I have to take care of my health by keeping fit and trim, haist!

Here's what I did yesterday:


0

Muffin Cup Flowers

My muse is gone for vacation ... i guess :(  No matter what I do I just can't create any cards lately.  Hubby says maybe because I got so tired and still needs rest after creating so many things at the same time during the month of October.  I say, I believe I have to clean and organize again my main craft room and down the basement.  I need to pull out all Christmas related tools and materials so I can focus more.

Anyway, as I was searching for some popcorns to pop I found pretty baking cups for muffins.  I remember I bought few packs in different prints a year ago during one trade fair here in Uppsala.  Since I don't bake muffins often .... or I should say I only bake muffins once in a blue moon, I decided to try and make few flowers.  As I've said I'm just not in the mood of creating anything so I only made four.  The result is so cute!


Just flatten out each paper cups then cut strips but not all the way through then add something at the center, that simple!
0

Baptismal Candles

How are you guys?  It's almost 8pm here and I have so many things to do particularly in updating my craft sites.  It's pay time for me :(  As I have checked it's been 5 months that I have not shared anything in the world of crafting and that's bad.  In my previous post I have mentioned that friends and relatives are wondering what I have been up to as far as crafting is concerned.  Who says being a wife and a mother is easy????  If this this is a paid career then we all would be earning to buy more and more crafting tools and materials hahahahahahahahahahha.  Speaking of buying, all these months I hoard and they're all stack-up in both my craft rooms waiting to be played.  I can actually hear each one of them calling for me.  And so I really promised myself to create anything each day no matter how simple it is.  First on my list is to use all my unused stamps side by side with my cricut cartridges.

Anyway enough of my blabberings .....

I did something cute for a darling and chubby baby for his baptism.  Once again I did stamping on candles.  The stamps I used are from Panduro Hobby, a Swedish brand.


And here are all the candles to be distributed to his Godparents as well as his parents =)


 If you haven't tried "stamping on candles" here's a tutorial for you, click here.

Christmas is around the corner and for 2 years now I sell stamped candles like hotcake.

Thanks for viewing =)
6

C is for .....

* candor
* caring
* caution
* charity
* chastity
* citizenship
* cleanliness
* commitment
* compassion
* confidence
* conscientiousness
* consideration
* contentment
* cooperativeness
* courage
* courteousness
* curiosity
* CREATIVITY

But most of all C is for Cecil, grand-daughter to a very dear friend of mine.   I altered this wooden alpha for her as a Christmas gift last year.  She's the only one I was not able to meet when I went to visit them in Denmark last summer.

Procedure:

  1. Painted the base with shimmering Pink the let dry.
  2. Painted the very front with shimmering green and let dry.
  3. Covered the alphabet with artist crackle paint and let dry.
  4. Applied Tim Holtz distressed crackle paint - broken china, and let dry.
  5. Added ribbons, flower with ladybug, and felt butterfly.
0

Altered Wooden trays (Decoupage)

Hello everyone! Just a quick note to all of you ....

sharing some trays I made last year, December, a very quick project I made for some special people. I was desperate to find something in the city but opted instead to find something in our basement that I can alter.

These are plain wooden trays at first then I painted with gold or white after I decoupaged with Christmas papers and table paper napkins. I just accentuated with gold rikrak bands around to add glitter effect.

Pictures were taken while it's still wet hehehehehehehehehhee.


Back to Top