Showing posts with label Craft Recipes. Show all posts
0

Wood Burning : Kiddie Racquet and a Ball

Officially in Sweden Christmas celebration is over.  All trees were thrown and all plastic trees were packed.  The only remaining one will see in every house and garden are tiny lights to brighten the cold winter nights.  Before it was officially and celebrated the ending of Christmas season, I gave Joseph and his dearest friends a surprise toy each.  It was a last minute project because I wasn't sure if I have time to do each racquet ball.  Luckily, our little dog Kasper didn't crave for my attention and he instead just want to be in bed and sleep.

The materials I used of course I had to buy the kiddie wooden racquet and started drawing some funny faces that will somehow reflect each boy's personality.  I know for some they don't have to draw before wood burning but in my case I really want NO mistakes.  Anyway, the kids LOVE the surprise toy I made for each of them but sad to say two of them were nowhere insight that night when I picked up Joseph from his friend's house. . . . . . . and here it is:


 And here are few of the boys that night!


0

Homemade Juggle Balls (Tutorial)

Looking for something that kids can play with during autumn and winter?

Figuring out what to include in goodie bags for kiddie birthday give-a-ways?

Well, read on and maybe you will like what I created a year ago for my nephew's baptism celebration.  It was part of the give-a-ways I made for his guests during the said event.  It was my second time to make juggle balls because the first time was during my son's 7th birthday and both events the juggle balls were a BIG hit for the kids!

It's very easy, I promise =)  I assure you kids will enjoy squeezing and throwing then catching these balls.


Let's discuss the materials you'll be needing for this project:

balloons - preferably the thick ones and medium size
5th class rice or small beans or porridge rice like what I have used
small plastics
transparent tape
scissors
measuring cup

 Please be informed that the porridge rice I used is long been expired!


PROCEDURE:

Add 3/4 cup of rice or beans in a plastic.  Twist the plastic to secure fillings then cut plastic at least leaving 2 inches from the twist.

After twisting and cutting the plastic, fold the flap and secure with transparent tape =)  It will not form a ball shape ... yet ... just so you know.


Once you have secured all the plastics, then get the balloons and cut!  Cut each ballon as shown in the picture.  I can't give you the exact size because some balloons have long necks.


Now you're ready to insert all the plastics filled with fillings inside each balloon =)


As you can see we need to cover more the filled balloon.  So get another cut balloon and insert it one more time.  It's best to use different colors of balloons coz it makes the children smile or better yet if you have printed balloons so much the cuter!


All you have to do now is just add a juggle ball or 2 in every goodie bag for give-a-way =)

If ever you tried my tutorial for this day, please let me know and I would love to see it.

Thanks for dropping by!

Happy crafting =)


0

Dyeing Plain "Sidebands"

Spools of ribbons here in Sweden are unbelievably expensive so when I go shopping anywhere in the world I would look for pretty spools of ribbons especially when I visit Philippines coz it's really cheap there.  One thing that frustrated me was when we went to Thailand .... rare to find ribbons.

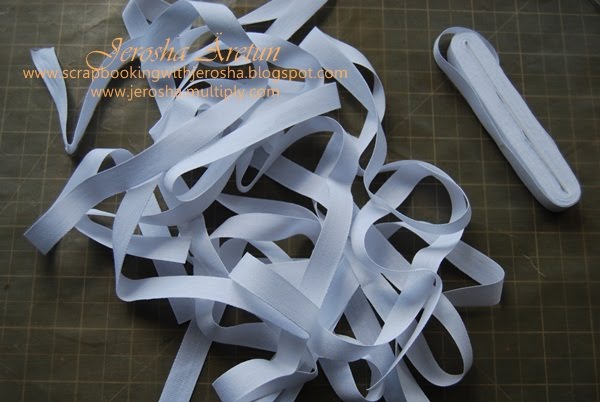
My DMIL gave me packs of white cotton bands used for creating extensions when making curtains and the like. I was so happy and I knew exactly what to do with the bands.  A year ago I came across a tutorial on how to dye bands using glimmer mist well then of course I put the idea aside coz glimmer mists are just too expensive to buy here and to buy different fabric dye coloring is also expensive.   Since I'm so happy and content with my 2nd experiment in making my home-made glimmer mist, naturally I tried dyeing the bands this time.

If you haven't seen my latest home-made glimmer mist you may read it here at blogspot at
http://scrapbookingwithjerosha.blogspot.com/2010/09/another-way-to-make-home-made-glimmer.html or at
http://jerosha.multiply.com/photos/album/249/Another_Way_To_Make_Home-Made_Glimmer_Mist_  if you have multiply account.

It shimmers, too, but hard to see from the picture. maybe I will lightly dab stickles when I plan to use it in any of my creations =)

Here's how I did it :

This is the sideband I was talking about ... plain white in cotton and very very cheap to buy =)

1.  Spritz your branded or home-made glimmer mist ....

2.  Sqeesh and squeesh to evenly spread the color ....

3.  Let dry =)

 4.  If you want to achieve a "batik" effect then you just don't have to squeesh too much.

5.  You may also spritz different colors of mist to achieve a multi-color effect.


0

Another way to Make Own Glimmer Mist !!!

Ok, one of the things I got during my birthday last August was a bulk of paint. DH showered me with packages supposedly for 8 days and all boxes were filled with craft goodies hehehehehehehehehehehehe. Although some boxes arrived late which in fact I'm still waiting for 2 more, I'm so happy and thrilled that he took so much effort of ordering such craft materials just to make me happy. It was fun receiving notices to claim packages almost everyday but the sad part is 2 notices I got says that I have to wait for a week or so :(

The bulk of paint I was talking about are of different kinds but all acrylic. The paints that made me so happy like a little girl are those that are pearlescent coz when it dries on a paper either it sparkles or give a shimmer effect.

Realizing that it gives a shimmer/sparkle effect, I then experimented if it will be a success in making glimmer mist. You see, to make a spray paint, one has just to mix water and the paint so no need to buy those expensive spray paints ... in my opinion.

So, I gathered all my empty spray bottles - the ones we use when we go on travels ... then the pearlescent and metallic paints plus a strong white glue and a stick.

Having all these materials in-hand, I started making my own glimmer mist for the second time around. I say the second time around because if you remember I made my first batch of glimmer mist which you can read at http://scrapbookingwithjerosha.blogspot.com/2010/05/my-home-made-glimmer-mist.html


Now, forget about my first experiment coz this second experiment is a big hit for me. Besides, I am aware that most of you can't find perfect pearls, right? Forget about perfect pearls on this tutorial.

One mistake I did in this latest experiment was in one bottle I tried using Glitter Acrylic Paint :( it's a big No-No because it will ruin your spray bottle due to the glitters. It will stuck on the tiny hose of your pump :( It was a waste but I learned my lesson =)


These are the colors I was able to make but a new batch will be made soon.


Can you see the shimmer effect inside the bottle?  yummy, right?


It really shimmers ... glimmer ... and shines =)


Materials Needed:

White Glue
Stick
Water
Empty Spray bottles
Metallic / Pearlescent Acrylic Paints

Procedure:

1. Fill your spray bottle about 3/4 of water.

2. Then with your stick dip it in your glue and put it in your bottle filled with water. I say dip not scoop, ok? The glue will act as the binder.  Mix it very well.

3. Drop paints in the bottle. I have no measurement for this because the more paints you use the darker the mist will be. Besides, your bottle is already filled with 3/4 water so you only have 1/4 space to fill in, right? Now, don't fill in too much paint because it would be difficult to pump your bottle. Either you lessen your water or simply follow this tutorial.

4. Mix well as in mix well using your stick.

5. Try spraying on a cardstock and decide if you're happy with the shade of your mist.

I'm so happy with my second experiment in making home-made glimmer mist and it's even more shimmery than the branded ones. With this experiment I was able to save a lot of money.

All I have to do now is come up with a name on each color i made hehehehehehehehehehehehehe =)
I hope you will try this experiment of mine. Should you have any questions, please feel free to ask. Lastly, if ever you try this recipe, please acknowledge my effort and time of sharing my experiment.

Have a great week-end!
6

My Home-Made Glimmer Mist

I have always wanted to buy home-made glimmer mist but it's expensive especially if you buy different shades.  I was so determined to buy few bottles but a fellow crafter here in Uppsala informed me that she makes her own using perfect pearls and water.  Instead of buying I opted to try but first I bought those empty traveling spray bottles then took out my one and only perfect pearls from my drawer which I bought few weeks ago.

Before starting my day project, I browsed at internet and check out exactly on how to do it.  All the same - just mix it with water but then I have to bear in mind that perfect pearls don't have binder as compared to pearl-ex.  With the binder, the glitter will not brush off.  Darn!  I can't find pearl-ex here in Sweden :(  Alas!  I read that one can use the hairspray itself or use a glue which once again the brand is not available here in Sweden.  I don't even remember the brand right this moment.

Anyway, since I'm taking few minutes break from the birthday invitations ordered by a sweet client, I decided to make glimmer mist one in water and one using hairpsray.  This way I will know the difference and check which I like most.

Procedure:
Prepare all the materials needed
Fill bottle spray with water (half-filled or less)
Few drops of reinker or food coloring (depending on the brightness of the color you want to achieve)
Using an ice cream stick, take a scoop of the perfect pearls
Blend well by shaking side-to-side


Let's talk about using the water first :

Empty traveling spray bottle half-filled with water
Perfect Pearls - Gold
Reinker - midnight blue

Hhhmm, I added 10 drops of reinker and the shade is lightest blue I've ever seen but the glitter is visible

Now let's see the effect using hairspray:

Mind you I had to open the top of the hairspray just so I can get the liquid.  I don't use hairspray but I got this accidentally several months ago and I've never used it.Since I don't want to use my few reinkers, I used food coloring instead. I added 6 drops of food coloring.

Ooooohhhhhh  I love the visibility of the color blending with the gold glitter effect from perfect pearls


And here are the first batch of my home-made glitter mist.  Both effects I like but if I ran out of hairpsray I can always use water in making my own glimmer mist.  Before using your home-made glimmer mist, swirl it first.  Will do more glimmer mist when I'm done with the invitations I'm making for a client =)

2

Step-by-Step Guide on Paper Napkin Transfer

As I have promised, here's the simple tutorial on Paper Napkin Transfer but before I start view the projects I made after doing the transfers http://scrapbookingwithjerosha.blogspot.com/2010/04/entry-90-to-93-ncm-2010-layout-toppers_21.html  so you have an idea on what you can do with it.

Now, let's proceed:


Gather all the supplies (Glad Kitchen cling wrap, iron, drawing pads the cheapest one, scissors, colored cardstock(s) and of course your choice of paper napkins.  Remember that different colors of cardstock will give different effects.  I started experimenting with white first.

If you spread your paper napkin it's big, right?

Cut the paper napkin according to the size that you need.  But if you plan to cover a 4 x 6 or 5 x 7 cardstock, it's best to cut 1/4 of the paper napkin.

Every paper napkin has 3 layers.  Remove the 2 layers from the bottom.

Open your cheap drawing pad ... I did open mine after 2 sheets.  Then lay your plain colored cardstock first followed by glad cling wrap then the paper napkin. Be sure that that the paper napkin is bigger than the size of your cardstock. Be sure that the glad cling wrap is bigger than the paper napkin.

Then cover ... still using the cheap drawing pad.  
See, I opened mine after 2 sheets and that served as the cover.

Set your iron to medium and when it's hot begin ironing for about 20 seconds or more. It really depends which iron you are using.  With my craft iron it took 30 seconds as compared to the usual house iron which took about 20 seconds. This is how the back should look like.    Check if you were able to adhere successful. If not, do iron again =)  Afterwhich, trim the excess and you'll have a covered cardstock =)

Back to Top