2

Laser Game Party Invites and Giveaways


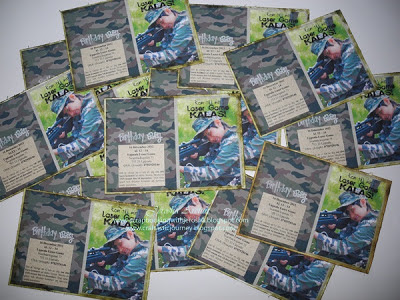
A very unusual thing happened to me.  My son didn't have a party during his birthday last October simply because the Laser Game is fully booked and the next available date is 1st week of December but then we will be out of the country by that time to celebrate hubby's birthday for a week.  And so we booked it for 2nd week instead, which was last Sunday.

When we arrived from Gran Canaria, I was totally exhausted then come Monday, the 10th, I suddenly remembered that I haven't done the party invitations yet!!!!  How can I forget that, right?  I have barely a week!!!!

The whole morning of Tuesday, the next day, I created something fast (20 pieces) plus stamped images on every envie then the same day before getting my son from school I mailed all the invitations.  The next day I created the packaging of give-a-ways, too, and bought all the goodies for the give-a-ways!  Yeah, I made spaghetti for the kids ... ordered a cake since I can no longer make my own .... and the special request of my son :  homemade ice cream =)  Whew!

The party was a success!


2

A Colorful Summer Travel Journal

I love colors!  I just love playing and getting messy with colors!  Ask my son what I collect most in my crafty world and he will give you a firm answer:  Colors!

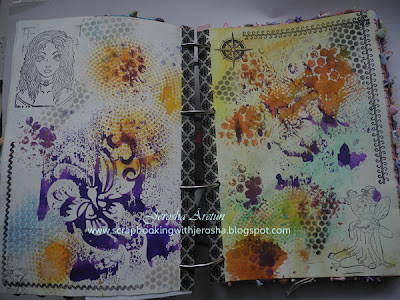
A week before we went for a month long vacation in Spain last summer, 2012, I began creating my own travel journal.  I literally used different coloring mediums like Pan Pastels, Craft Acrylic Paints, Pebeo Iridescent Studio Acrylics, Derwent Inktense Watersoluble Pencils, Dyslusions Spray, Caran D' Ache NeocolorII to name a few.  I played with almost all my washi tapes, Dylusions and Balzer Designs Stencils/Templates.  I even used gift wrapping high-quality papers, cut-out from magazines, and of course stamping =)  Yeah, I did apply Gesso on ever page before anything.  I used 3 inches binding rings and as you can see I added beads using yarn on some pages.

The whole summer travel journal is not finish yet coz I have to fill it with pictures from the trip .... add more colors, journaling, and tokens/receipts =)  I'm so in-love on what I have made and will find time filling it up as soon as 2012 holiday is over.  Here are some of my favorite pages:


Thank you for viewing =)


2

A Simple Christmas Wreath Assembled by My Son

One thing I'm so happy about .... proud actually is that my son has creative juices in his brain.  Since he was 2 years old I noticed he is good in doodling ... drawing ... creating anything he can find at home or sometimes uses my left-over scraps.  There are moments when he is lazy to create hinself he would sit by my side and tell me what he wants to creat BUT the hitch is that he tells me then I execute it.

Last year, after staring at all the snowflakes I cut using Winter Lace Cricut Cartridge, he whispered in my ear that he wanted to make a Christmas wreath. And so he did!

Here's what he made - a very simple one but for an 8 year old I think it's awesome!


 I wonder if my son has any idea for our wreath this Christmas.  As for me, NO IDEA yet but it will come I know =)

0

My Inkadinkado Stamping Gear DeLuxe has Finally Arrived!

A fellow crafter several months ago informed me about this and I really want one.  Patience is a virtue indeed because I have to wait a very long time to get hold of my gear because either it's sold out via internet or still not available here in Sweden.  I literally contacted all my suppliers here in Sweden and requested for one.  And so last Friday, it was delivered, yipee!!!!  I am so much in awe when I got it coz I know a lot of designs can be made using this tool in my art journals, layouts, packaging, etc., etc., etc.

I bought the Deluxe Kit so I have a complete set.  I've seen that one can buy by parts, too =)


What exactly is it?  Well, according to Inkadinkado's press releaase, it says:


Create beautiful, symmetrical patterns with Inkadinkado's Stamping Gear. Create endless designs for cards and papercrafting, home décor, fashion and more. This Stamping Gear Deluxe Kit is designed especially to maximize the design potential of Stamping Gear with a great collection of tools and stamps!


What is included in the Deluxe Kit?

The Stamping Gear Deluxe Kit includes:
• Circle wheel
• Oval wheel
• Circle cog
• Oval cog
• Clear paddle for mounting your stamps
• Four 4" x 4" sheets of cling stamps, 18 stamps total


How do you use it?  Here's an overview by Inkadinkado:

To use, mount a stamp onto the Stamping Gear clear paddle, then stamp the image around your choice of the circle and oval cogs and wheels. A variety of illustrated techniques and helpful information is available in our downloadable General Tips and Techniques. Take your stamping to a new level with our unique Stamping Gear!

Here's a video clip, too!


 I'm so excited to play with my gear =)


0

Advent Calendar in the Making

More than a month from this day starts the Advent season and yesterday, my short free hours I decided to start creating for my son's Advent calendar.  He usually has a lot from relatives and friends ... you know the usual advent box filled with chocolates plus an Advent Calendar I created.  While at work yesterday, I had a clear picture in my mind on what I will create for him this year.  I was not able to go home straight because I needed to buy his birthday gifts.  Yeah, he will turn a year older tomorrow.  When I got home, naturally I have to wrap all his gifts first then started creating his Advent calendar.

Here's a sneek peak:


The numbers are made out of felt which by the way one can easily print out from own computer then trace, cut, and adhere using s super glue.  Afterwhich you may add stickles in every number and if you're still up to it then you may add shadows by using a gold stickles =)

I wonder if you can guess the final look of my son's Advent calendar?

Anyway, thanks for dropping by!  I'm sure everyone is super busy creating Christmas items =)


0

PaPer Dolls Teen Scene Cricut Cartridge Review

When I saw the cartridge Paper Dolls Teen Scene, I knew right away that I have to have one.  Few years from now my son will be a teen-ager and it would be appropriate to have this cartridge.  Besides, he is now at the stage so-called "in-betweeners" - you know, cant say he is still a baby nor a toddler but he is in that stage that he acts and thinks like a big boy and at the same time a baby when mommy is around =)

I got my cartridge 2 weeks ago and timely my son will turn 9 before this month ends.  We had plans for his birthday - an all boy celebration .... his classmates.  Sad to say we have to reset his party and it will be come December instead.

If one will search for the said cartridge, this is what you'll ever get to read and nothing more::
"Create stylish and trendy projects with the Paper Dolls Teen Scene cartridge. This cartridge has three girl dolls and two boy dolls, and each doll has ten hairstyles and twenty outfits. The clothes and hairstyles are interchangeable for dolls of the same pose so you get just the look you want. The versatility of the cartridges will surprise even the most imaginative crafters"  The description is all true and one will find all the dolls superb but here is what I have discovered:

 As I was about to start making some cuts, I got confused and actually did a mistake on pressing the button.  Looking closely at the overlay, you will just see blackout figures and for me it all looks the same :(   I had to remember the page of the figure and put a mark on the overlay button.  I believe this is one overlay that I have to write numbers on each button because I end up having a headache that I had to pause for an hour.


Also, one has to cut all the required layers.  In my case I ignored one layer so my cut look like a browned-eye Chinese teen hahahahahahahahahha.  Oh well I can just use my black pearlmaker for the eyes or better yet the 3D eyes instead.

As for the shoes, I did made some cuts but at the end I just threw all the shoes because it was difficult to find the right angle before adhering.  I can perhaps use stickles or acrylic paints instead.

But all in all, I'm very happy I bought this cartridge for after all I have The Paper Dolls Dress Up and Everyday Paper Dolls cartridges =)


 Thanks for dropping by =)

0

Ginger Bread Cookies? Nope!


Nope, these are not gingerbread cookies because these are gingerbread couples for my son's teachers which we gave away last Christmas.  Just a Christmas decoration for them to hang in their homes.

When I saw the wooden jumbo (nearly 12 inches each) gingerbread man and woman at Panduro last year, I simply adored it and bought a lot of it but played with only a few.  I simply painted it with glittered gold acrylic paint then stamped with the Gingerbread cookie recipe, also from Panduro.  I embossed the stamped image with embossing powder then decorated it with different embellishments.


 Here are the details of each couples:


Here's the stamped image of the recipe:


Here's the bare wooden gingerbread man and woman:


 I think I will be making more this year ... to sell =)

Thanks for viewing!

Happy crafting :)

Back to Top