2

Halloween Lollipops (Issue #18 : TDS Lifestyle 2009 )

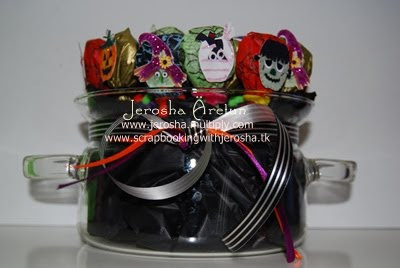
The last batch of the pops were long been gone ... eaten by my son, Joseph hehehehehehehhe. The first batch was packed and shipped to a dear friend. One thing nice about the lollipop pack I bought is that it expires after 3 years =)

The theme was Halloween naturally and I made this for The Daily Scrapper now TDS Lifestyle last October and was published October 9 to 23, 2009. You may still see the article on the archives which can be seen here http://www.thedailyscrapper.com/2009/issue18okd/Hybrid.html

Halloween in Sweden is not a busy time of the year since it’s not a very popular event to celebrate. I would normally accept an invitation from the International School just so my son would have an idea how it is. Also, during this week my son celebrates his birthday and naturally it falls on a school break but before the break we’re going to give candies to each of his classmates as a halloween treat. With Helena Monteiro’s Felt Halloween Kit, I created lollipop wrappers that will give a trick or treat feeling amongst the kids.

Supplies Needed:
• Digital Kit by Helena Monteiro
• Tissue Paper or Silk Paper
• Kodak Double Sided Matte Paper
• Halloween Set Stamps by Inkadinkado
• Versacolor Stamp Pad - Black
• CTMH Stamp pad –White Daisy
• Stickles
• Kiddie Craft Pipe Cleaners
• 3D Foams
• Glass Witch Pot
• Styrofoam or Floral foam
• Ribbons – Black, Orange, Violet

Instructions:

1. Open your editing software and choose the elements from Helena Monteiro’s Felt Halloween kit that you want to use and print.
2. Prepare the tissue papers by cutting different colors at 5 ½ x 5 ½ inches.
3. Stamp Halloween images on each prepared tissue papers.
4. Begin wrapping your lollipops gently.
5. Secure each lollipop using kiddie craft pipe cleaners around.
6. Cut each halloween elements you have printed out.
7. Highlight each element by adding stickles.
8. Adhere the elements using 3D foams.
9. Arrange your lollipops in a glass pot using floral foam but don’t forget to cover the inside of the pot with black tissue paper.
10. Tie ribbons around the glass witch pot.


Table Top Wreath (Autumn) - Issue #17 TDS Lifestyle 2009

I have made this simple wreath that fits the autumn we had at The Daily Scrapper now TDS Lifestyle. This was published last September 25 - October 9 of 2009 and you may still view it here http://www.thedailyscrapper.com/2009/issue17axn/hybrid_wreath.html

Supplies Needed:
• CBR Autumn Hues Digital Kit by Rachel
• A4 Matte Canon Paper
• Plastic Autumn Vines
• Styrofoam
• Plastic Plant Cup
• Clay Plant Pot
• Ribbons (Orange, Brownish Gold, Yellow – at 2 yards each)
• Autumn Leaf Mega Puncher by Easy Punch
• Scallop Circle Puncher by Stampin’ Up
• Black cardstock (250g) – as base mat for the tree embellishment
• Pictures of Family Members
• Piercing Tool by Making Memories
• Stickles (black, golden brown, lime green, yellow)
• 3D foams
• Jumbo Ice Cream Stick
• Power Tape 1/8 thick

Instructions:

1. Begin by twisting the vines creating a wreath.
2. Secure the wreath on a Styrofoam.
3. Place the finished wreath on a plant plastic cup
4. Choose 2 papers from the kit as your bases/mat and print out (base/mat for the family individual pictures and for the autumn leaves)
5. Print out the tree embellishment, A5 size, from the kit.
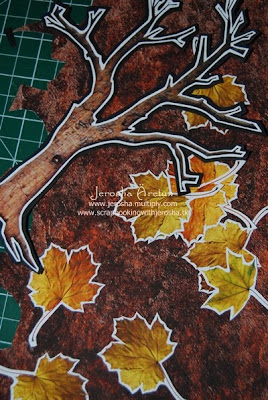
6. Print out 12 autumn leaves from the kit according to the size you prefer.
7. Cut out the tree embellishment and mat it using the black cardstock
8. Cut out the leaves and mat each using one of the printed digital paper from the kit.
9. Add stickles on each embellishment and let dry.
10. Once you have all the family pictures ready in round shapes, begin punching scallop circles from the other digital paper.
11. Pierce each scallop using piercing tool.
12. Adhere each photo on each scallop circle using 3D foams.
13. Assemble and adhere each photo onto the tree.
14. Adhere the tree onto the jumbo ice cream stick and secure it in your wreath’s styrofoam.
15. Adhere each autumn leaves on the plastic wreath using the power tape.
16. Tie your ribbons on the clay plant pot.

There you have it, a family table top wreath that will surely brighten up the look of your home.

6

Family Keepsake Bag - (Issue #16: TDS Lifetyle 2009)

This project of mine was published exclusively for The Daily Scrap now TDS Lifestyle last Sept 11 - 25, 2009. The theme was simply heritage which you may still all view here http://www.thedailyscrapper.com/2009/issue16est/hybrid_canvasbox.html

I grew up in a very close-knit family filled with love and laughter so it was a big blow when both my parents died in my arms. My son would ask a lot of questions about his grandparents and naturally I have so much to tell. One of the things he requested was to show him pictures of my childhood especially my parents. With “Every Which Way” Digital Scrapbook Kit designed by Kathryn Balint and Velma Balint, it truly shows the reflection of my childhood.

Supplies Needed:
• Digital Kit by Kathryn Balint and Velma Balint
• A4 Canon Matte Photo Paper
• Canvas Frame 9 ½ x 7 inches
• Metal Hinges
• Wooden Door Handle
• Snap Lock
• Screws
• 2 Ring Binder
• Metallic Gold Acrylic Paint
• Stickles
• Pearl Maker
• Brad
• 3D Gloss Touch by Pebeo

Instructions:
1. Paint all the sides of the canvas as well as the inner rims with metallic gold paint and let dry.
2. While air drying, begin creating digital layout using “Every Which Way Kit” and print.
3. Assemble the canvas box by attaching the hinges, the snap lock, the 2 ring binder, and the wooden handle creating a box-bag.
4. Adhere the layouts both front and back.
5. Highlight the layout by using stickles, pearl maker and 3D gloss touch, and let dry for 30 minutes.
6. Create a spinning wheel (free-hand) as the main focal point of the box-bag.
7. Now the box-bag is ready to be filled with memorable pictures.

0

A Big Help From My PRYM Flower Loom

While everybody was celebrating Mother's Day last week, I on the other hand got busy nursing my son from Sore Eyes.  It was really a bad week coz it hurts when you see your son suffering especially when a child can't see clearly.  It drove me nuts coz he just had his chicken pox for a week then he was able to go to school for one week and then the sore eyes for one week.  Alas!  He is well and he's back to school =)

Joseph is a kind of boy that when he is sick he wants mamma 24/7.  When I say he wants mamma, it means I have to be with him ALL the time plus he wants mamma to hug him while he's sleeping or watching TV.  I get to ecape only when I have to go to the toilet or be in the kitchen and of course when he is really deep in his sleep.

DH knows that I'm trapped and he knows that I have to do something while I'm beside Joseph.  So he got home one day and bought me a Flower Loom.  When I saw his gift, I literally dropped my crochet hook and check the gift.  Yeah, I was crocheting during the first day Joseph got his sore eyes.  But the rest of the week, I got busy with my Prym Flower Loom.

Let me inform you about Flower Loom.  First of all Flower looms are a simple way of making many different types of flowers which you can use singly or join together to to make clothes and accessories or to decorate anything.  In my case I plan to use the flowers to decorate packages, summer hats, purses, scarves, paper crafts and many other things. Check out Joan's latest handmade card coz she embellished her card with a flower using a flower loom.  I have no time to create anything as far as paper crafting is concerned but will do that when my hands are not full here at home.

The most common looms are round plastic with one or two sets of pegs, one set on the outer edge and one around the middle and we don't have that here in Uppsala.
There are many varieties and brands; Ronco, Prym, Knifty Knitter, Studio Twelve, Crazy Daisy wheel. The looms come in different sizes so you can make large or small flowers. Larger looms have double sets of pegs. You can use the outer set of pegs only or both the outer and inner set of pegs. Mine is from PRYM and it's a round loom with interchangeable pegs so I can create different designs in different sizes. Although it's round I can still make square flowers.  You simply wind yarn around the pegs of the loom and then stitch through the yarns on the loom to tie together.

Using different materials like chunky or thin yarn, fluffy or variegated yarn, thread, ribbon, string, wire or straw in different colours is a blast.  Beads can also be added as you make your flower but was not able to do that during my first try. To create a fringe edge one just have to cut the loops. 

There are few sites about flower looms but it all depends on which brand you have or you plan to buy.  To give you an idea how my Prym Flower Loom looks like:

Here are the flowers I made while nursing Joseph:

These flowers are the biggest size I can make using my Prym Loom. 
Size 10cm in diameter

These are about 6cm in diameter and I used double pegs ... 3 rounds of looping and 2 rounds for the inner flower

My Square Flowers ... 6cm .... 4 loops

Using 3 layers of pegs .... using different weight of yarns looped 2x.... also size 6cm

My version of pompom flower hehehehehehehehe looped 7x to achieve the fluffiness

My mini flowers ... size 3.5cm .... double looped

Hehehehehehehehehe my latest batch of crocheted flowers which I did on the first day Joseph got his sore eyes.  It's not so pretty but I love the blending of colors =)

4

Class Door Sign (TDS Lifetyle Issue #14)

A month from now schools will be closed for 2 months here in Sweden and I haven't think of any plans yet on what my son will be doing this summer vacation.  So far, it's confirmed that we're going to Denmark and meet for the first time a fellow dear crafter I met through Multiply.  Then we plan to go to UK and visit my brother for a week.

Anyway, last school year, I made this project for my son's class door and was published at TDS Lifetyle
( http://www.thedailyscrapper.com/2009/issue14tds/hybrid_classdoorsign.html ). 

Supplies Needed:
• Back To School Kit by Stacy Molter of Kalo Designs
• A4 Matte Photo Paper
• Pieces of Wood
• Wood Driller
• Beads
• Thread
• Color Box Pigment Brush Pad (Black and Copper)
• Sandpaper
• Wooden letters
• Pearl Maker
• Dimensional Magic
• Wood Glue


Instruction:
1. Gather all the pieces of wood and drill 2 holes on each side (top and bottom).
2. Use a piece of sandpaper to smoothen all sides of the wood.
3. Using a nylon thread, begin creating a sort of a necklace using your choice of beads. But this time once you achieve the handle part of the door sign, insert a piece of wood.
4. Then every after one bead, insert another piece of wood until you achieve the desired length of the door sign.
5. When at the end of the beading, add a curtain tussle. You can create your own tussle like what I did.
6. Cut the printed papers according to the size of the wood and adhere onto the wood (front and back).
7. Distress the paper and ink the sides freely.
8. Add the printed and cut-out embellishments that you prefer to remain flat.
9. For embellishment that you want to highlight, add dimensional magic and let dry before adhering.
10. Adhere the word “open” at the top part of the door sign then add pearl maker and let dry.


0

My Fairytale Book ( 2009 TDS Lifetyle Issue # 13)

"Life Itself Is The Most Wonderful Fairytale of All"
Yup! That's the title of the book I created for The Daily Scrapper now TDS Lifestyle. I enjoyed so much making my fairytale book coz even at this age I still believe in fairytales hehehehehehehe. My love story is actually a fairytale so how can I not believe on such thing.

I created this book for TDS and was published last July 2009. In this book I shortly documented my life ... how my Prince Charming came .... and a little Prince was born ... and they all lived happily ever after.

Aside from this fairytale book, I was also tasked to write the cover article for TDS and you may read it here http://www.thedailyscrapper.com/2009/issue13mlk/index.html

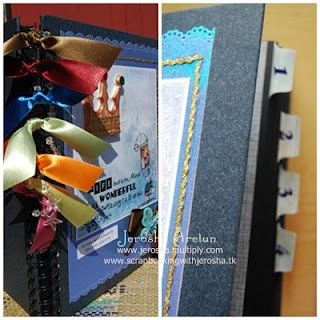
The book is divided into 4 parts, namely:
Part 1 - Meet The Princess
Part 2 - The Search for Love
Part 3 - A Love Filled With Magic
Part 4 - Then Came The Little Prince

I am also providing the captions I've wrote on each page coz I think it would be difficult for some to read what I wrote in the book .... a lovely story from the beginning till the end .... a true story but applied in the fantasy world =)

Before I show you the whole book, I want to let you see which kit I used for this project:


Now, sit back and relax ... grab a coffee and read the book.


Part I :  Meet The Princess

Once upon a time in not so far a way kingdon, Aftonbladet, there lived a princess. She lived in a simple castle with simple things. Her parents and brother adored her very much that protecting her with all their might from goblins, naughty trolls, and mischievous dwarves was a MUST.


 The family itself is well respected and loved by everyone - rich or poor - people would always enjoy their presence. The home is filled with love, compassion, understanding, peace, and prayers. The little girl can never ask for more because she has everything that a family should have.

 There is one thing that the little princess loves to do - and reading fantasy and fairytale books about angels, fairies, dragons, princesses, and magic. She can spend day after day reading her books over and over again. Oh how she loves the endings of each story - Prince Charming comes then both lived happily ever after.


 As she grows, a lot of things were happening around her - scray, happy, victory, sorrow, anger, pain, and joy. She knew that her love ones may never be able to protect her all the time. So, instead of hiding or getting scared she opted to be brave, strong in dealing with life and made friends to everyone.


 Going through the winding roads of life she encountered a lot of difficulties. She got bruised and heartbroken few times in the name of LOVE. She stood up with grace and always wear a big SMILE on her face.


Part II :  The Search For Love
Love for her was unconditional. In her mind, she knows and believes without a doubt that someday her prince will come. Although she has been in a relationship 4 times, she felt that there was no magic each time - a magic that will make her tummy flutter & her cheeks turning red and butterflies & fairies with the angels making a lovely tune.


She prayed very hard more than 10 years for her right Prince to come. Right from the beginning, she knew each human race has a special someone planned by God but it's up to them to find and feel the magic in the air. Some were lucky to find but some were not. And so, she promised that she will have an open heart, an open mind, and with a clean spirit so she will feel those magical things when the right Prince comes along.

 She never stops daydreaming about so many things in life while she waits for the right Prince. She dreams that one day she will continue to live in a castle filled with patience, peace, joy, understanding, sorrows to make her stronger, defeats so she will know more how to get up and live, travel to different kingdoms filled with wonder, but most of all to continue trying to live with LOVE that God has been teaching mankind.


 She never stops daydreaming about so many things in life while she waits for the right Prince. She dreams that one day she will continue to live in a castle filled with patience, peace, joy, understanding, sorrows to make her stronger, defeats so she will know more how to get up and live, travel to different kingdoms filled with wonder, but most of all to continue trying to live with LOVE that God has been teaching mankind.


 Part III : A Love Filled With Magic


A Prince from a far away kingdom, Morgonlandet, took a lot of courage for him to search for the right Princess almost everyday. Along the way, he met fellow princes and told him the secret place to find such special princess. He searched for her and failed once. He never gave up and was so determined to try searching once more. The Prince travelled far and wide and oh the angels and fairies must have helped him for one night he found her.
The Prince was love struck - it was love at first sight. He then tried to find a way to win her heart. With more magical dust along the air, the letter he sent had a response the next day. And that was the start of a special love between the princess and the prince.


 The Prince traveled thousands and thousands of miles... swam the deepest oceans & moved mountains... trek the winding roads just to reach his beloved's kingdom.


 It was such a beautiful moment. Birds were singing in the air... star dusts blowing all around... busy fairies with their magical wands were non-stop in scattering magical potions everywhere and angels were making sure no harm from witches and evil dwarves get in the way.


The Prince and the Princess were both very happy to find each other after all those years of searching and waiting. Now, they can build their own kingdom and make their fantasies come true.
They had a simple wedding fully blessed by the Earth Queens and Kings from the North, South, East and West. The Queens of the Seasons were rejoicing too, for such a wonderful celebration of love. Both heaven, earth, and middle earth blew trumpets of joy for it was no doubt a match made in heaven.
Part IV : Then Came The Little Prince

Love was so strong & Passion was so intense and they only have eyes for each other. God was just so pleased. It's time to bless the Prince and Princess for a special gift. Once again all the kingdoms in the earth rejoiced! A little Prince was born!


No words can explain how the new parents felt as they look at their bundle of joy. Queens and Kings, fairies, white witches, angels, kind-hearted trolls and goblins, and even all the animals in the earth celebrated the joy as long as they live.

Materials and Tools I used are endless but if you will look at the details you will have an idea what I used for this Fantasy Book =)




0

2010 TDS Lifetyle Issue #5 : Urban Chic

Woo Hoo the latest issue of TDS is out and TDS Blimp goes to Moscow!

Our theme for this month is Urban Chic and that really drove me crazy coz my mind was out of order hahahahahahhaha plus I have no exact idea on teen-agers nowadays except for gadgets and the like.  To play safe, I created something for teen-agers : Girls and it turned out great.  I was able to adapt the urban chic in my project and thanks to the digitla kit I used.  This is the kit I used
 

You may see my project here http://www.thedailyscrapper.com/2010/05May01s/Hybrid1.html

Now don't forget to read Joan's article coz once again we will all learn about a lot of her tips.  You may read her article here http://www.thedailyscrapper.com/2010/05May01s/tinkerplanet1.html
 

Lastly, I was blown away with the freebie for this month.  The sweet owner of TDS Lifetyle is actually a digital kit designer and finally she will be launching her designs soon.  

You may grab her awesome kit here http://www.thedailyscrapper.com/2010/05May01s/freekit.html
22

My Second Blog Candy

First and foremost (belated) Happy Scrapbooking Day!!!

Here I am again to give you some treats!  Claire Langan, Joan Switalski, and I are conducting each a blog candy.  This is my second time to host such so to all fellow crafters join us in celebrating this special occasion for the whole month of May by joining our blog candies.  Don't you miss making a scrapbook layout?  I do :(  Your first time?  Then hop on to our blog candies and find inspirations.  Now is really the perfect time for us to start preserving those memories.

Here are the RULES (Read and understand carefully) :

1.  Create a scrapbook page.
  A TRADITIONAL and HYBRID (single or double page layout) is worth 3 entries.  A DIGITAL (single or double page layout) is worth 1entry.  A Scrapbook mini album is worth 5 entries.


2.  Leave a comment in this blog entry including the link to your scrapbook project. The link/entry should be dated May 1st to 31st 2010
Please type your comment/entry this way so it will be easier for me to see and count the worth of each of your entry:

     * Day 1 or 2 or 3, etc.  and state if it is traditional, hybrid, digital or mini-album project
     * LINK of your day project

      (Note:  This time you don't have to attach the link of every page you created for the day especially if it's a mini-album coz that will confuse me.)

3.  There will be 3 winners for my blog candy.  It doesn't matter where you are from.  If you get picked your prize will be mailed to you by me =) 
Entries will be drawn on June 1 at 9am (Swedish day and time).

The main goal for this month of May is to preserve all those special memories.  I really hope that you have time to join us by scrapbooking away.

Happy Scrapbooking fellow crafters!

If you have any questions don't hesitate to ask me.  Now don't forget to hop in at Claire and Joan's blog candies coz who knows you might win all the prizes.  Remember, the more entries you make the more chances of winning. 


First Prize : a scrapbook album that fits 12 x 12 cardstocks


Second Prize : Spring Kit + Summer cardstock pack


Third Prize : Winter Kit


Back to Top