Showing posts with label Halloween. Show all posts
2

Halloween Birthday Banner

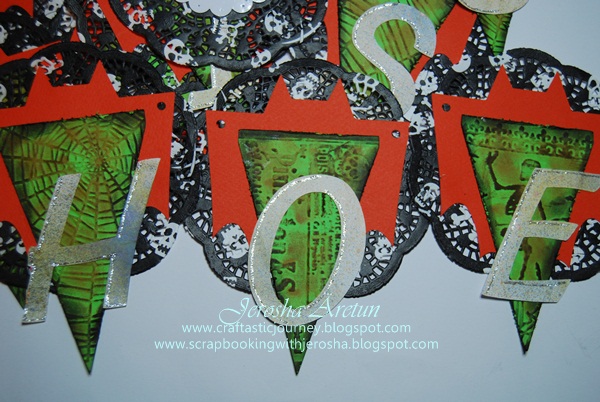
Another creation I made during my son's birthday Halloween party.  A must have in every kiddie party is a birthday banner, right?  It adds spark in any given occasion, too.  Without much further ado here's my son's banner =)


Details of the banner =)

How it looks like when we hanged it before the party =)

 And here it is with all the trimmings =)

Materials Used:

Tim Holtz Halloween Embossing Folders -
Cuttlebug Embossing Folder - Spider Web
Ranger Distress Ink Pads - Walnut Stain, Dried Marigold, and Black Soot
Ranger Mists - Peeled Paint, Broken China, and Wild Honey
Halloween Cake Doilies
Silver Stickles
Cricut Cartridges :  Batman the Brave and the Bold for the orange bats cut at 5", Sports Mania for the banner cut at 5", and Printing 101 for "Grattis Joseph" cut at 3"
0

Welcome to Our Halloween

I know Halloween is over but I just want to share a very simple Welcome sign I made for my son's Halloween Birthday party last 30th of October.  The story behind is that when I finally realized that all decors are done and packed ... ready to be set up for my son's Halloween Birthday Party, it dawned on me that I don't have at least one decor for outside door of the venue and so I hurriedly grabbed my failed cupcake holder which I made using Happy Haunting cartridge.  I removed the stand coz that's where I made a mistake and simply transformd it into a WELCOME sign (layout).


Materials Used:
All the stamps I used are by Hella Bella Designs
Happy Haunting Cricut Cartridge
Sentimental Cricut Cartridge - "Welcome" cut at 3 1/2" (fit to page)
Mini Monsters Cricut Cartridge - Streetsign/Lampost cut at 7"
Copic combined with Pro Markers
Reprint, DCVW, and Papper Cardstocks
0

Witches Broomstick (My Version)

Last year I saw Martha Stewart's witch broomstick and I had to bookmark it coz I so love it and hoping that one day I'll get to make few.  Lo and behold!  I did it!!!!  First check out MS broomstick here.  

Now here is my version:


As expected both kids and parents fell in love with these broomsticks to the point that they don't want to open it regardless if there are candies and toys inside (lol).  Too bad I was not able to take pictures of the kids with their broomsticks :(  Well, I only have 2 hands and 1 body ... can't be at all places at the same time.


until then .......
0

Halloween Treat Bags

Last minute project!!!!

About 8pm in the evening on the night before my son's Halloween Birthday party, a mom called and she's very very sorry for not informing me that her daughter would love to come to the party.  I set a deadline and it was written on the invitations we sent out.  I always make extra give-a-ways .... about 3,  just in case someone shows up without enlisting but in this case all extras have been properly labeled.  So what do you expect - of course I said yes to her then after putting down the phone I was in total panic.  I had to go out and take for a short walk that night just to think on what to do.

With an idea in my mind I discussed the situation with my hubby.  So here's the plan:  there will be 2 toddlers coming over and I have to make 2 special give-a-ways for them instead just so I have 1 more extra kiddie give-a-way and the other extra will be given to the little girl, a classmate of my son.  All is settled =)

Here's the 2 give-aways I made for 2 little boys/toddler =)


Aside from toys and candies inside the treat bags, I also included 2 teddy bears.  The treat bags were made using Mini Monsters Cricut Cartridge.

until then.....
4

My 3D Haunted House

Whew!  this haunted house was 1 week in the making.  It could have been less but I had to manage creating different things all at the same time just to beat deadlines.  I'm happy how it turned out and it was a big hit during my son's Halloween Birthday party last October 30.


here it is with the spider web =)


Materials Used:

Old box cover as base of my scene
Acrylic paints : Black and Green
Spider Web(s)
Acrylic Stamp for the bricks effect at the chimney
Halloween vellum by Panduro
Battery operated tealight
Ranger Distress Stains : Fired Brick, Peeled Paint, and Vintage Photo
Adirondack Acrylic Paint Dabber - Silver

Cartridges:
Happy Hauntings - The 3D house (fit to page - 7")
                              Fence with bird - 3"
                              Ghosts - 2"
                              Gate - 5"
                              Bats - cut at 4" and  at 1"
                              Gravestones - 2"
                              Trees cut at fit to page

Mini Monsters - Fence cut at 3"
                          Gravestones cut at 2"

Country Life, Straight from the Nest, and Zoobaloo - Grasses 


My Review:

Lots of great things to say about HH cartridge but to sum it up I should say AWESOME!  I believe that every Cricut user should have one.  So many cute things to cut and the 3D Haunted House is one of the best.  Although it entails tons of patience at the end one will feel fulfilled. 

I would like to thank my son for firmly deciding that he will have a Halloween Birthday this year ... and yes he did!  Otherwise, I don't think I will choose to cut and assemble the 3D Haunted House this year.  It was an awesome experience step-by-step, all the way through.  One thing has to be remembered:

The first cut if you look at the handbook, you have to cut it "fit to page" then look what size it's equivalent - and that should be 7".  From second cut till last do not use fit to page button but adjust to 7" instead.  Otherwise, your house will not be in perfect shape when assembled.  Be sure to cut all the cuts required and this part drove me crazy hahahahahahahahaha.

Lastly, PATIENCE and PERSEVERANCE mixed with joy and laughter - a must!!!! 


until then......
0

My Version of Jack-O-Lantern

Halloween is in the air!!!

For some reason squash/pumpkins here are very very expensive.  The price is just too much that I have to have an alternative of the famous jack-o-lantern.  The truth is Halloween is not being observed here so in effect it's not a big thing like some countries around the globe.  One can still buy decorations but not much really.  Oh yeah one more thing - I don't know how to carve pumpkins hehehehehehehehe but I know how to cook it with coconut milk and stringbeans with shrimps or meat =)

Anyway, as I have mentioned I need jack-o-kantern and I want one so badly as part of my Halloween Birthday party of my son, Joseph.  So here's what I did with the paper lanterns.  One can buy very cheap at IKEA or Rusta.  I bought mine at IKEA and they sell in different sizes.  I used decoupage technique with the paper lanterns .... you know sticking those orange silk paper then painted a face =) 


It's a big hit this day during the party =)

Thanks for dropping by!

until then......
2

Batman Half-Belt Halloween Tags

As of this day the 2nd give-away items for my son's Halloween birthday party are all done but I really have no idea how I will do the packaging of the items.  Since my mind is totally blank since last night, I just played with the Batman and the Bold Cricut Cartridge.  I decided to make some cuts ... the belt ... but afterwhich I cut each into half and make it Thank You tags.  Then I have a ghost acrylic stamp by Panduro and I find it so cute coz it looks like an adult and a child ghosts and it kind'a represented me and my son under a blanket all set for a halloween costume party.  After stamping all the images with CTMH white stamp pad, I took my gold pen and wrote "TACK!" a Swedish word which means Thanks.


Interested to see the first batch of Thank You cards I made for my son's party?  Click here or here =)  As I have said I am giving away 2 special give-away items for every kid during the party so don't be confused or wonder why I made another set of Thank you cards/tags shown above.


Oh well I'd better take a short walk to refresh my mind ...... ah I think I'll just lie down coz it's so cold and foggy outside..... then of course make my card for the day

Thanks for coming here =)


until then......
7

Thank you (Halloween Cards)

At last the Thank You cards for my son's birthday party are all done.  But maybe will add few things inside when I feel like doing it.  Kids in his class are very excited for his party because it will be an amazing experience for them to watch a magician exclusively for them.  I'm hoping that everything will go as planned.

There are so many things I have yet to create for the party but I take things one day at a time.  There are days I have to re-conceptualize a lot of things and there are days that I'm just working like a machine in my craft room.  Oh well, invitations were out since Friday last week and now the thank you cards are done ....banners ... give-a-ways .... decorations are just in the process .... my costume and the celebrants are all ready so I guess I'm right in schedule. Of course I still have to finalize the food we're gonna serve.

Here are the bunch of Halloween Thank You cards =)


Materials Used for the Front:

Happy Hauntings Cartridge for the Witches Hat and the orange oval you see are left-over cuts from the invitations I made which you may see here.
Spider Embossing Folder
Ranger Distress Ink Pads : Walnut Stain and Brushed Curduroy
Gold studs I bought in Denmark when I visited a dear friend who is also a fellow crafter


Materials Used for the Inside:

Just Rite Rubber Stamps - Times New Roman 95point
Color Box Petal Point Ink Pads


And here's one more look at the cards =)


Thanks for the visit.

until then.....
12

BOO! (Halloween Invites)

As the saying goes "Time Goes So Fast!"

My son will turn eight this month and year after year we have a party for him but all those years it was mostly playing time with his classmates ... boys only ... in a private and rented adventure land.  As early as March my son and I talked about some plans for his birthday this year.  he was having a hard time choosing between Superman or Batman or Spiderman (again) or Dinosaurs or Monsters.  When he realized that his birthday falls very near All Souls Day he firmly made a decision to have a scary Halloween party instead.

Yipee!  How I long to have a Halloween party for his birthday especially knowing that they are big enough NOT to be really scared when it comes to scary costumes.  He chose his costume and of course I have one,too =)

What so special about his birthday this year is that we hired a magician, yipee again = )  Oh I can't wait to that part on his party but I'm sure I will be missing lots of episodes that day because I have to go around and take pictures ... then be a host to the parents and the teachers.  Yes, we invited the parents as well as ALL the girls in his class, too.  I'm crossing my fingers that everyone will be able to come and celebrate with us a scary magical Halloween party.

Now that I'm finish with all the invitations ...32 pieces, I'm now at the start of creating the decorations .... thank you cards ... and the give-a-ways.  So, for this day I would like to share with you all the birthday invitations.


Materials Used:
(Front)
Happy Hauntings Cricut Cartridge - the 3D frame was converted into a card instead ... cut into 5"
Mini Monsters CRicut Cartridge - the words "Boo!" cut at 3", and the spiders at 0.3/4"
Tim Holtz EF - Halloween Night and Posien Set
Tim Holtz Distress Ink Pad - Barn Door, Peeled Paint, Bruch Curdory, and Vintage Photo
Inkadinkado Acrylic Stamp - Ticket
Stickles
3D eyes
Zig Writer - Brown
Cardstocks - Reprint and Kuretake

(Inside) - for this part I'm sad to say I was not able to take a picture before adding all the party details.  I refuse to show it now due to security reasons but I did use combinations of Stampendous, Panduro, and Hot Off the Press acryclic stamps.

Thank you for viewing =)

PS.  Guess who helped me in making the cards ... click here.

until then.......
Back to Top