2

A Simple Christmas Wreath Assembled by My Son

One thing I'm so happy about .... proud actually is that my son has creative juices in his brain.  Since he was 2 years old I noticed he is good in doodling ... drawing ... creating anything he can find at home or sometimes uses my left-over scraps.  There are moments when he is lazy to create hinself he would sit by my side and tell me what he wants to creat BUT the hitch is that he tells me then I execute it.

Last year, after staring at all the snowflakes I cut using Winter Lace Cricut Cartridge, he whispered in my ear that he wanted to make a Christmas wreath. And so he did!

Here's what he made - a very simple one but for an 8 year old I think it's awesome!


 I wonder if my son has any idea for our wreath this Christmas.  As for me, NO IDEA yet but it will come I know =)

0

My Inkadinkado Stamping Gear DeLuxe has Finally Arrived!

A fellow crafter several months ago informed me about this and I really want one.  Patience is a virtue indeed because I have to wait a very long time to get hold of my gear because either it's sold out via internet or still not available here in Sweden.  I literally contacted all my suppliers here in Sweden and requested for one.  And so last Friday, it was delivered, yipee!!!!  I am so much in awe when I got it coz I know a lot of designs can be made using this tool in my art journals, layouts, packaging, etc., etc., etc.

I bought the Deluxe Kit so I have a complete set.  I've seen that one can buy by parts, too =)


What exactly is it?  Well, according to Inkadinkado's press releaase, it says:


Create beautiful, symmetrical patterns with Inkadinkado's Stamping Gear. Create endless designs for cards and papercrafting, home décor, fashion and more. This Stamping Gear Deluxe Kit is designed especially to maximize the design potential of Stamping Gear with a great collection of tools and stamps!


What is included in the Deluxe Kit?

The Stamping Gear Deluxe Kit includes:
• Circle wheel
• Oval wheel
• Circle cog
• Oval cog
• Clear paddle for mounting your stamps
• Four 4" x 4" sheets of cling stamps, 18 stamps total


How do you use it?  Here's an overview by Inkadinkado:

To use, mount a stamp onto the Stamping Gear clear paddle, then stamp the image around your choice of the circle and oval cogs and wheels. A variety of illustrated techniques and helpful information is available in our downloadable General Tips and Techniques. Take your stamping to a new level with our unique Stamping Gear!

Here's a video clip, too!


 I'm so excited to play with my gear =)


0

Advent Calendar in the Making

More than a month from this day starts the Advent season and yesterday, my short free hours I decided to start creating for my son's Advent calendar.  He usually has a lot from relatives and friends ... you know the usual advent box filled with chocolates plus an Advent Calendar I created.  While at work yesterday, I had a clear picture in my mind on what I will create for him this year.  I was not able to go home straight because I needed to buy his birthday gifts.  Yeah, he will turn a year older tomorrow.  When I got home, naturally I have to wrap all his gifts first then started creating his Advent calendar.

Here's a sneek peak:


The numbers are made out of felt which by the way one can easily print out from own computer then trace, cut, and adhere using s super glue.  Afterwhich you may add stickles in every number and if you're still up to it then you may add shadows by using a gold stickles =)

I wonder if you can guess the final look of my son's Advent calendar?

Anyway, thanks for dropping by!  I'm sure everyone is super busy creating Christmas items =)


0

PaPer Dolls Teen Scene Cricut Cartridge Review

When I saw the cartridge Paper Dolls Teen Scene, I knew right away that I have to have one.  Few years from now my son will be a teen-ager and it would be appropriate to have this cartridge.  Besides, he is now at the stage so-called "in-betweeners" - you know, cant say he is still a baby nor a toddler but he is in that stage that he acts and thinks like a big boy and at the same time a baby when mommy is around =)

I got my cartridge 2 weeks ago and timely my son will turn 9 before this month ends.  We had plans for his birthday - an all boy celebration .... his classmates.  Sad to say we have to reset his party and it will be come December instead.

If one will search for the said cartridge, this is what you'll ever get to read and nothing more::
"Create stylish and trendy projects with the Paper Dolls Teen Scene cartridge. This cartridge has three girl dolls and two boy dolls, and each doll has ten hairstyles and twenty outfits. The clothes and hairstyles are interchangeable for dolls of the same pose so you get just the look you want. The versatility of the cartridges will surprise even the most imaginative crafters"  The description is all true and one will find all the dolls superb but here is what I have discovered:

 As I was about to start making some cuts, I got confused and actually did a mistake on pressing the button.  Looking closely at the overlay, you will just see blackout figures and for me it all looks the same :(   I had to remember the page of the figure and put a mark on the overlay button.  I believe this is one overlay that I have to write numbers on each button because I end up having a headache that I had to pause for an hour.


Also, one has to cut all the required layers.  In my case I ignored one layer so my cut look like a browned-eye Chinese teen hahahahahahahahahha.  Oh well I can just use my black pearlmaker for the eyes or better yet the 3D eyes instead.

As for the shoes, I did made some cuts but at the end I just threw all the shoes because it was difficult to find the right angle before adhering.  I can perhaps use stickles or acrylic paints instead.

But all in all, I'm very happy I bought this cartridge for after all I have The Paper Dolls Dress Up and Everyday Paper Dolls cartridges =)


 Thanks for dropping by =)

0

Ginger Bread Cookies? Nope!


Nope, these are not gingerbread cookies because these are gingerbread couples for my son's teachers which we gave away last Christmas.  Just a Christmas decoration for them to hang in their homes.

When I saw the wooden jumbo (nearly 12 inches each) gingerbread man and woman at Panduro last year, I simply adored it and bought a lot of it but played with only a few.  I simply painted it with glittered gold acrylic paint then stamped with the Gingerbread cookie recipe, also from Panduro.  I embossed the stamped image with embossing powder then decorated it with different embellishments.


 Here are the details of each couples:


Here's the stamped image of the recipe:


Here's the bare wooden gingerbread man and woman:


 I think I will be making more this year ... to sell =)

Thanks for viewing!

Happy crafting :)

0

Winter Lace: Snowflakes (Review)

Ever wondered what snowflakes you can cut using Winter Lace Cricut Cartridge?  I was and that's why last year I spent few hours cutting all the snowflakes in the said cartridge.  Due to intricacies of most of the snowflakes, I suggest you cut each at least 3 inches.  Otherwise, you will be frustrated cutting it in smaller sizes like what I've experienced.  Hhhhmmmm or maybe my cutting blade was not too sharp anymore so check and change the blade.

All in all I would say it's a must to have Winter Lace cartridge because the snowflakes are too darn cute!  Besides, Sweden has a winter season and oftentimes around January, we have a snowstorm so it's kind'a cute to have snowflakes around the house or on your decorations during Christmas season ... or winter season I should say.


Here are some of my favorites among the cuts =)


 Showing you 2 cuts I've made smaller than 3 inches:


Thanks for reading my review =)


2

Christmas Tags (Ornaments)

Have you guys visited The Graphics Fairy?  I'm sure you did and maybe an avid follower =)  To date, the blog has over 3,000 graphics free for everyone. I admire all her graphics and sometimes I grab and that's what I did last year.  I grab all the birds I find so cute and I just can't resist.

At first, I don't know what to do with the birds but then after making and hanging all the 3D birds I've made for our Christmas tree last year, I decided to use the graphics as our added ornaments.  Although I've made 60 3D birds it wasn't enough BUT after adding the tag ornaments, it made our tree a beautiful and happy one.

I cut all tags using Tags, Bags, Boxes and More Cricut cartridge.  Sprayed some home-made glimmer mist using Distress inkers with a dash of Perfect Pearls.  Oh yeah, stamping is essential and I mostly used Kaiser Kraft clear stamps among others.  After adhering all the birds from Graphics Fairy, I applied silver stickles around the image. To hang the tags, I first made a mini Christmas wreaths inspired by Tim Holtz and used a silver star bunting as the loop to hang the tags.

I will definitely keep these tags as long as I live and pass it on to my son someday when he has his own family.

All the tag ornaments I made =)

 A sample of the tag hanged on our tree =)

Hanged tag ornaments but without the 3D birds yet =)

There's the tree with balls, 3D birds and of course the Tags =)


0

Homemade Juggle Balls (Tutorial)

Looking for something that kids can play with during autumn and winter?

Figuring out what to include in goodie bags for kiddie birthday give-a-ways?

Well, read on and maybe you will like what I created a year ago for my nephew's baptism celebration.  It was part of the give-a-ways I made for his guests during the said event.  It was my second time to make juggle balls because the first time was during my son's 7th birthday and both events the juggle balls were a BIG hit for the kids!

It's very easy, I promise =)  I assure you kids will enjoy squeezing and throwing then catching these balls.


Let's discuss the materials you'll be needing for this project:

balloons - preferably the thick ones and medium size
5th class rice or small beans or porridge rice like what I have used
small plastics
transparent tape
scissors
measuring cup

 Please be informed that the porridge rice I used is long been expired!


PROCEDURE:

Add 3/4 cup of rice or beans in a plastic.  Twist the plastic to secure fillings then cut plastic at least leaving 2 inches from the twist.

After twisting and cutting the plastic, fold the flap and secure with transparent tape =)  It will not form a ball shape ... yet ... just so you know.


Once you have secured all the plastics, then get the balloons and cut!  Cut each ballon as shown in the picture.  I can't give you the exact size because some balloons have long necks.


Now you're ready to insert all the plastics filled with fillings inside each balloon =)


As you can see we need to cover more the filled balloon.  So get another cut balloon and insert it one more time.  It's best to use different colors of balloons coz it makes the children smile or better yet if you have printed balloons so much the cuter!


All you have to do now is just add a juggle ball or 2 in every goodie bag for give-a-way =)

If ever you tried my tutorial for this day, please let me know and I would love to see it.

Thanks for dropping by!

Happy crafting =)


0

Washer Necklace(s)

Tingga is what we call it in the Philippines =)  

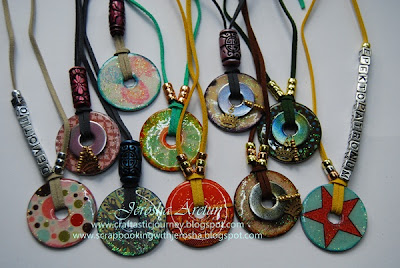
Washer necklace has been popular once in the world of crafting and since I have few at home ... actually down the basement at my hubby's workshop, I took it and played with each last year, 15 July 2011.  I had fun (as always) making this project in one sitting.  I took advantage while my son is busy creating something with his Lego bits and pieces.


Materials Used:

Large and Small Washers
Beads
Leather Strips
Stickles
Cardstock - leftovers
Dimensional Magic
Alcohol Inks


 Thanks for viewing =)


Back to Top