2

Heirloom Bauble Ornaments

One of the things I would like to share with you all before this year ends is a project I made for Joseph. When I told him that it's his forever and in which he can pass on to his children someday, he was totally wide-eyed and proud.

I'm sure many of you if not everyone have seen such project called bauble ornaments. There are many ways to play with this kind of ornament like:

1. adding liquid glue inside and add lots of glitters like this http://randomcreativity.wordpress.com/2010/11/29/glittered-christmas-bauble-ornament-tutorial/

2. some filled each bauble with left-over yarns like this one http://www.craftycrafty.tv/2008/12/christmas_craft_yarnfilled_orn.html

3. some painstakingly crocheted to cover each bauble like this one http://www.urbanfaunastudio.com/index.php?mact=Calendar,cntnt01,default,0&cntnt01event_id=360&cntnt01display=event&cntnt01lang=en_GB&cntnt01detailpage=&cntnt01return_id=53&cntnt01returnid=53

4. some used stickers and stickles then accentuated with papers like this one http://murdocks.typepad.com/polishedtoperfection/2007/11/more-outlines-o.html

5. some also stamped images on transparencies then colored like this one http://embellished-dreams.blogspot.com/2007/11/christmas-ornaments.html

Well there are actually many ways to fill your baubles which by the way comes in different shapes. I have seen some they filled each bauble with left-over cardstocks by rolling each. One can also just fill it with small cuties.

Now, in my case, I started stamping an image just for the sake of trying. I don't have the exact materials as stated at Splitcoast Stampers site tutorial http://www.splitcoaststampers.com/resources/tutorials/glass_ornament/.

For a day I tried finding substitutes and so I gathered the materials that I have then when one bauble was finished filled with a stamp image, it dawned on me that I can actually make ornaments that my son can have forever.

Just go over each pix for a simple tutorial using whatever substitute I can find just to complete this project =)

I actually sold 2 sets of this and had to turn down few coz i have other things to do. I promise myself that I will sell more personalized sets like this for next Christmas =)

When hubby and I are both gone and Joseph has his own family, he may tell his children who they're ancestors are.

I printed pictures of both clan on a transparency for colored printing. At Splitcoast Stampers tutorial it says it has to be heat tolerant. I don't have that so I just used what I have and thank God it did work very well.

 Cut each picture on a size that will fit in your bauble.
Again at Splitcoast Stampers tutorial they used white embossing powders but since I have no stock of that so I opted to use the snow pen I used for the  mini mailboxes I made. 

I used my heating tool so the snow pen will puff like snow =)

 I filled each bauble with snow after pouring a teaspoon of beads.
Don't over do the snow. I made a mistake during my first 3 baubles so I ended up removing some. Why? Because once the picture is inside the snow will cover the pictures.


Punched the picture on the top most part and tie a silver thread.
Roll the picture and insert it but make sure you are holding the silver thread.


The picture will automatically spread once inside. You may use a tweezer just in case the thread falls inside hehehehehehehehehe. It happened to me heheheheehehehehehhe.

Secure the end of the silver thread with a glue dot as seen on the picture.

Secure the bauble with the lock.
Cut the excess silver thread you secured with a glue dot.
Each lock of a bauble has already a silver thread and that's for hanging the ornament.


0

Mini Mailboxes

Christmas is over and I bet all of us are bloated with so much food and drinks during the celebration. I have been a constant visitor in our toilets haahahahahahhahahahahahahahaha, are you? Need to prepare my tummy for the coming New Year celebration =)

I still have food hang-over so my body is literally lazy but hubby went to work this day. Me? Oh I'm free from work until January 11 all because of Joseph. I did not sign him in at school for this holiday plus I really refuse to go and get him from school due to deadly weather here hehehehehhehehe. My body is not made for such freezing and freaking weather.

Anyway, I just want to share with you all what I made for all our staff this year. It has been 3 years now that we just give each one of them a shopping card. Here in Sweden, as part of Christmas gift law for staff, there is only a certain amount. Hubby and I would rather give them a shopping card so they can just buy what they want.

This project was completed 18 December of this year but due to the fact that Joseph and I got sick plus lots and lots of things to do here, I only get to post it this day.

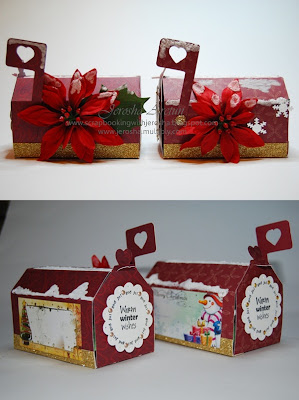
The snow effect you see on each mailbox is actually made of a snow pen. Joseph enjoyed blasting each with a heat gun coz it puffs and it sure gives a snow effect. I have no idea if you can see it clearly and closely. Oh few of the cut images were done using
Winter Woodland Cricut Cartridge ... then some were ready made ornaments then used some stickles on it ... 2 mailboxes were accentuated with fabric poinsettia then on one mailbox I used my handmade scrunched flower. All side tags you see are acid-free and I was really glad to find those in a grocery store. As for the opening side, I used SU scallop puncher then stamped sentiments by slojd-detaljer then created pearls using pearl-maker.

The mailboxes were cut using
Love Struck Cricut Cartridge =)

Thanks for viewing!


2

Last Minute Handmade Christmas Ornaments (Recycling)

Project Completed : 12 December 2010

Is it full moon? I'm asking coz Joseph is not exactly in a good mood since I got him from school this day. On our way home he has been grumpy and even cried. Oh well, I'm pretty sure he will be normal again tomorrow.

Anyway let's talk about ornaments...... Snow-covered evergreens standing in the woods are merely trees. Once decorated, they become Christmas trees. Over the centuries people have adorned their Christmas trees with many different kinds of objects. The very earliest ornaments tended to recall the religious significance of the holiday. At one point people decorated their Christmas trees with good things to eat and gifts for one another. In more recent times Christmas ornaments have served primarily as pretty decorations for the tree. A Christmas tree without decorations may not be called a Christmas tree that's why even long ago people from all walks of life would decorate their trees of anything as in anything they have or can find or afford to buy.

For our Christmas tree it's Joseph turn to decorate it as I have mentioned in my blog 2 weeks ago. I thought he would hang transformers or bionicles or lego bits hahahahahahahahaha. I was even expecting he would make his own decorations hihihihihihihihihi. I told him he can hang anything he wants and I was caught off-guard when he asked for all decors we have for a Christmas tree.

As I watch him choose and hang I couldn't control myself by asking him why those decors. You know what he told me that touched my heart? here's what he said .... "Mom, I will hang these things because each piece has a story". A very simple answer that touch the very core of me.

You see, every decor he hanged has indeed a story like the clay ornaments I did .... the angels my mom owned .... the mushrooms his farmor (grandma on father side) owns .... the angels given by Maryann .... the big woodies, etc. I can't tell you the story completely coz it will really be a long blog entry hahahahahahahahaahahha. When he said he is finish I thank him and off he went to play in his room.

For few days I felt that something is lacking on our tree even if I filled it with lights. I asked Joseph if he noticed it, too, and he said yes. We stared on our tree for a long time and then

Joseph : " I know what's lacking mommy ... it's your magical touch".

Jerosha : I don't think so coz you already did magic on our tree plus the fact that you decorated the tree this year is already beyond magic.

Joseph : I know that mom but our tree needs you. You have to make it colorful. Every year you do that so do it again this year mamma.

How can I disappoint my son when his eyes were filled with spark and belief that his mamma has magical touch.

So my dear friends and fellow crafters, I now present to you our Christmas tree this year. Please be informed that this kind of handmade ornament is not acid-free so I don't expect that it will last a very long, long time. All I can do is preserved each piece as long as I can then throw someday when it's discolored and unpleasant to see.

Just go over the pictures to get the step-by-step guide on how I made the ornaments. Yup, I recycled once again =)


Once on this stage, fold the top part of crepe paper then crumple a piece of craft tissue paper of contrasting color.


Then hang!

Our lighted Christmas tree for 2010 =)


0

Kids Craft Day with Me : Dinosaurs

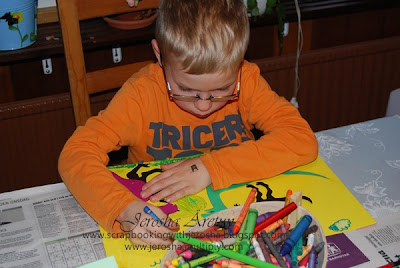
Last November 3, Joseph's good friend / classmate came here coz I promised them that we will do crafting.  they were free to choose what they want to make.  Their decision is to make dinosaurs =)

The night before the scheduled date, I was busy cutting different dinosaurs in 2 sets and thanks so much for the dinosaur cricut cartridge that I bought months and months ago.

I had a great time guiding and watching these 2 kids coz they love to craft and how they enjoyed playing with colors.  Thanks to my dear friend Hershey who came by to help me manage the 2 kids.  At the end, one more kid came and he used to be in Joseph's daycare and he really adores my son very much that from time to time he would ring the doorbell and declares that he wants to play with Joseph.  Yup, the word is declare coz he would literally say "I want to play with Joseph".  Sometimes this cute little boy is lucky but sometimes Joseph is still in school so he leaves very sad.

Here are the boys .....


Oh on this part of the day I rewarded them with candies
and popcorn and ice cream while watching a kiddie program.


Joseph's art work #1


Joseph's art work #2

Joseph's art work #3

Note:  All Joseph's artwork has been packed and will be sent to Denmark.  A girl friend of his is in dire need of dinosaurs.

0

2010 Christmas Stamped Candles

Project Done : 02 December 2010

In past centuries families throughout the British Isles, Ireland, France, and Scandinavia observed Christmas by lighting especially large candles. Home Christmas celebrations took place in the glow of these enormous tapers. Some families lit the candles on Christmas Eve, in which case custom called for the candle to burn until morning. Others lit their candles on Christmas morning and
kept them burning throughout the day. Large candles of this sort were also used in Christmas church services.

People interpreted the meaning of these Christmas candles in several different ways. Many believed the large candle served as a natural symbol for the coming of Jesus Christ, “the light of the world.” Others said it represented the Star of Bethlehem. Many folk beliefs suggest that people commonly viewed the home Christmas candle as representing the family’s future in some way. Denmark people lit two candles, one representing the male head of the household, the other the female household head. Whichever burned out first was said to foretell which of them would die first. Scottish folklore claimed that if the Christmas candle burned out before midnight the family would soon experience some kind of calamity. Scandinavian tradition agreed that bad luck would surely visit any family whose Yule candle burned out during the holy night, possibly the death of a family member. While the flame burned,
however, many Scandinavians believed that the light of the Yule candle conferred a blessing on all it touched. Families brought good things to eat and drink, money, clothing, and other desirable goods within the circle of candlelight in the hopes that they would be blessed with more of these things in the coming year.

Some peoples believed that the remains of the candle retained their power to bless and protect even after Christmas had passed. In Sweden people rubbed the stub of their Yule candle against their plows or used it to make the sign of the cross over their animals. In other parts of Scandinavia people fed the candle stub to their barnyard fowl or saved it as a charm against thunder and lightning.
In Estonia, Germany, and Lithuania people light candles at family grave sites on Christmas Eve. This practice may be linked to old folk beliefs concerning the return of the dead at Christmas time.


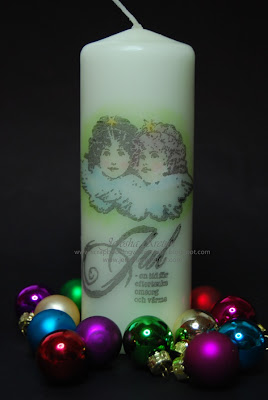
I truly believe that I will always be making stamped candles every Christmas time. A great gift for anyone plus a unique gift for any given occasion.

To learn how to stamp on candles you may visit my other craft site entry http://jerosha.multiply.com/photos/album/225/Tutorial_How_To_Stamp_On_Candles_Re-Post?replies_read=18


Back to Top