2

Simplicity At Its Best : Wedding Invitations

Client is sssssssssssoooooooo happy with her invitations and that's what matters =D

Remember those proposed wedding invitations with summery colors I made last month? Well, forget about those hehehehehehe. Change of mind for short!

Client's dilemma is that she wants few of my proposals but then we had to compromise. We had to consider their age and inputs of her hubby-to-be.

No frills .... no swirls .... just plain and simple =D

Just a simple love stamp which I embossed then added a rose which is the in-thing right now. Made few Finnish version and lots of Swedish version as far as the wedding details are concerned. The inserts are 2 pages but the main insert where the announcement is stated is printed on a light tan glistening cardstock and the second page is in off-white cardstock. Cardstocks used for the envie/case and inserts are semi-glistened cardstock by Reprint.

Cards were delivered yesterday morning through the kindness of DH since I can't go anywhere co my son has chicken pox.


0

My Son's Baby Milestone Album : 0 to 12 Months

This is an album created 2006, where I included every detail of my son's development per month. Also, I do believe in angels so in every page I have included different angel prayers. Inside the small pocket in every page is a colored copy of his picture. I decided to enlarge and print his every picture in B&W so as to balance the layout filled with different colors.  I remember very well how limited my materials were that time but survived anyway =)

To read more about my son's development which I painstakingly documented every detail, click this
http://www.aretun.tk/


NEWBORN

1 Month
2 Months

3 Months

4 Months

5 Months

6 Months

7 Months

8 Months

9 Months

10 Months

11 Months

12 Months / 1 Year

2

Remembering My Very First Creation : Mini Matchbox Inspiration

As I sit here in my craft zone and tryin to figure out when I will have the mood to organize my external hard drive files, I'm looking at all the folders and every album brings so much memories.  If you have read my introductory on this blog site, you are then aware that it was only in the begining of 2006 that I started to become serious in paper crafting.  It took months for me to find stores here ... actually still in search hahahahahahaha.

Anyway, I started as a digital scrapper and when I tried paper crafting I did enjoy every minute of it utilizing on what i have.  During that year, I met a fellow Filipina.  She is not a friend of mine ... just an acquaintance.  She's suffering from cancer every now and then.  With such condition, I was inspired to create something for her that will give her inspirations in her everyday needs.

2

Baptism Card Invitations (Military Theme)

A simple invitation card(s) I made for a little boy who was baptized last June 2008 here In Uppsala, which by the way I'm one of his God-Parents =)   The parents just requested me to make invitations for their son. After I got the pictures they want to use, I then started conceptualizing the card. Oh yes, they got so very very happy when they saw the card(s).

Btw, Inbjudan means Invitation :)

0

Recycling A Plastic Lace : Card

There are just too many things I can find here at home when I do cleaning especially at the basement or just at the ktichen.  I found a roll of plastic lace which is beign used for adding accent to vinyl tabelcloths.  As far as I know it is also being used for curtains or decorating a cake base.  As for me, I used it by cutting few inches as part of my all occasion card.  Added some mini flowers and band and stickles around the edges.  This card is actually an order from a client last 2009.

0

All Occasion Card : Butterfly Theme

I'm not really into card making but dear fellow crafters helped me get on my feet.  I really feel claustrophobic when my base is so small but slowly I get the hang of it.

This butterfly card was given to my son's English teacher last 2009.  I so love the butterfly I added onto this card.  At that time a friend who is a fellow crafter from Michigan gave me the Swiss Dot embossing folder and I so love it and thankful.  Everytime I look for it here in Uppsala, it's always out of stock so when I got the package from her I was so thrilled!  I also used Bloom Dots embossing folder by Cuttlebug.  The cardstocks were actually left-overs.  Both the flowers and butterfly were bought in the Philippines during our short visit.

0

Waterproof Travelers Keeper (TDS Lifestyle project- Issue #12, 2009)

Another hybrid scrapbooking tutorial for everyone.  I have created this project for The Daily Scrapper now TDS Lifetyle and was published for Issue #12 of 2009. You may still see my project at TDS http://www.thedailyscrapper.com/2009/issue12deo/hybrid_luggagetag.html  but be warned that the introductory text is totally wrong.  I think they misplaced mine :(

Traveling can sometimes be irritating when you have to hold bags and at the same time check-in.  It's even stressing when you have kids around.  I only have one kid but I have to divide my attention when checking-in and at the same time eyes on my son especially when DH can't join us for a trip.  I would normally pit everything inside my shoulder bag which by the way is big but it doesn't help at all.  Yes, I do prepare in hand all the things needed when I fall in line for check-in but it's still stressing :(

With such a "hate-situation", I was inspired to create my very own travelers keeper and it's even waterproof hehehehehehhe.   Now, let me show you how I did it and maybe you'll be interested to try.  Of course will share with you the templates I made so you will not have a problem with the sizes.  In fact, to understand my instructions you really have to download the file found at TDS and here's the link http://www.thedailyscrapper.com/2009/issue12deo/hybrid_luggagetag.html
Once you are at the page you will find "Click [HERE] for more image details including patterns."  Or there is another option, get the patterns at http://jerosha.multiply.com/photos/album/153/2009_TDS_Project_Issue_12_Waterproof_Travelers_Keeper


Supplies Needed:
• Digital Kit by Joanne Brisebois
• A4 Matte Photo Paper - Canon (150g/m2)
• Scrap Board or Illustration Board
• Natural Rope
• Crop-a-Dile II
• Scor-Pal
• Power Tape
• ATG scotch 700
• Acetate or Ordinary Transparency (2 pcs)
• Velcro

Instructions:
1) Cut illustration board creating 2 panels measuring (a) 5W x 7L (b) 5W x 9L

2) See patterns for scoring guide. (image A and B combined)

3) Open your scrapbook software or any editing software

4) Open Lost in Translation Folder and create layouts for front and back panels, and cover flap using the 5 x 7 layout size.

5) Print your layouts and cut.


6) Using your ATG scotch, adhere your layouts at the front, back, and cover flap.


7) Prepare the first acetate with the same measurements stated above and adhere it using the power tape.

8) Punch all the sides of the panels except the cover flap using crop-a-dile II. For the bottom part punch holes at one side only.


9) Use the rope to secure the bottom part of panels. (image C)

10) Prepare the second acetate by creating a clear box without top and bottom with the measurements of 5 3/4 L x 11W. See pattern as your guide. (image D)

11) Use power tape at both sides to adhere the clear box onto the unfinished keeper. (image E)

12) Use the rope by looping through every punched hole thus securing all side panels. Make sure that the rope is not too tight neither loose. (image F)

13) Punch 2 holes at the top part of the cover flap.

14) Insert and make a knot at both ends of the thick shoe string which serves as the handle or strap. I personally used a long shoe string so I can hang the keeper around my neck to free my hands.

15) Adhere velcro that serves as lock of the waterproof travellers keeper.

Viola! Ready to travel with easy access every check-in and boarding!

Don't forget to get my patterns (http://www.thedailyscrapper.com/2009/issue12deo/hybrid_luggagetag.html)   so you have a guide just in case you will try it someday =D
0

Lucky Winner of My First Ever Blog Candy =D

First of all I'm very thankful for those who joined my very first blog candy at my Multiply site.  I was in awe how dedicated each one of them in creating almost everyday (if not everyday) projects that gave inspiration and fun to everyone.  Craft goodies here are limited and quite expensive but I have few extras that I'd rather share than forever keep it at the basement or sell it to fellow crafters here in Sweden.  Although my craft goodies are very simple, I am deeply touched that they spent time and effort in joining my blog candy.

How I wish I have more extras so I can give more and give each one of the participants but someday I know I can do that.  Let me save some more hehehehehehehehehehe.

Was I a good host of my very first Blog Candy?  I know as a host I should visit each one of you and leave some love and kindness but if I miss to see or comment on a project of yours please shout out and I will surely appreciate that.  I think somewhere along the way due to some unexpected circumstances here at home I missed out a few but please bear in mind that I tried all my best hahahahahahahahahaha.

Rest assured that this will not be my first BC but hoping that the next play we're gonna have you will still all join.

How did I draw the winner?

Please be informed that I used the Random Number Generator.  You may check it out here http://www.saccenti.com/randomnumber/randomnumber.htm

Midnight of 31 March 2010, I used Excel Spread Sheet to one-by-one list all the names of entries starting from the first one who submitted up to the last - cut-off-time. 

I asked my son to click the button from the Random Number Generator and it's #126.  Sorry but he refuse to be taken a pix - he's not actually in a good mood due to pre-empted nice dream hahahahahahhaha.  But with all honesty we did not tamper in getting the winning number.

A little Story behind:

Actually the first number Joseph got was #204 and that number is equivalent to JOAN.  But, prior to raffle drawing, Joan told me that eventhough she loves the goodies in my BC especially the flowers from Thailand, she requested that she'd rather not win and let the others win.  She knows very well that countries outside US (yeah that includes Sweden hehehehhe) has very limited or hard to access craft goodies.  She lives In US and she can easily access all the yummy goodies we all wish for. She still joined my blog candy to have fun =D  Also, for those who are wondering why Claire did not join my BC is the same reason as Joan's.  Aren't these 2 ladies angels on earth?????

0

My First Ever Blog Candy

It's my very first time to hold a blog candy at my Multiply Site and it was done in conjunction to the National Craft Month celebration last month, March 2010.  The whole month I was creating and creating for I also joined 2 blog candies sponsored by my 2 fellow dear crafters.  We all had  a blast for it's the time fo the year where we all inspire each other on a maximum level.  The lucky winner was also drawn 1st day of April but that's another story hehehehehehehe.

I have not much goodies but I do have duplicates and I decided to give it a way than sell it here in Sweden.  Here are my humble goodies:

Bubble Stickers
Rolls of Ribbons ( blue checkered is 12 meters, both hearts ribbons are self-adhesive)
Prima Flowers from Thailand (3 per kind)
Cuttlebug Embossing Folder - Happy Birthday)
Foil Stickers
Charms ( 4 of each kind)

Alphabet Doodles - a book showing you step by step on how to draw and color freehand alphabets.
Jumbo Foam Stamps
Brads
Scrapbooking 12 x 12 Stencil
Mini Scissors

and added more as I've promise to all participants:
Bubble Stickers and Embossed Stickers

Rub-On Stickers

Stickers

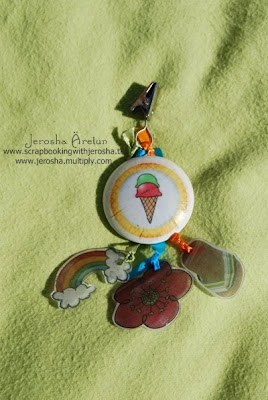
Tablecloth Weights (TDS Lifetyle Issue #11, 2009)

Summer is just around the corner and time to have parties at the garden.  One thing that irritates me is when the wind blows and the tablecloth goes with the wind hahahahahahahahahhaha.  This project I made side-by-side with the Kiddie Placemats I created both for The Daily Scrapper now TDS Lifetyle.  I created this for Issue #11 at TDS Lifetyle which you may still view at http://www.thedailyscrapper.com/2009/issue11afc/hybrid_tableclothweight1.html


It's not my first time to alter stones but will show you later if time permits.  For now, will tell you more about this weights.

Supplies Needed:
• Digital Kit Hot Feet Cold Treat
• Alterable Plain Tablecloth Weights by Panduro Hobby SWE (6pcs)
• Craft White Tissue Paper
• Masking Tape
• Decoupage Glue
• Soft Bristle Paint Brush
• Shrink Film/Plastic
• Satin Ribbons
• Oven or Heating Tool
• Scrapbook Factory DeLuxe V.3

Instructions:
  1. Open your Scrapbook Software or any editing software and choose the embellishments from the Hot Feet Cool Treat kit you would like to use. You may also play with different shapes effect if one is interested to use specific digital papers from the kit. Cut craft tissue paper into A4 size and use a masking tape to secure the tissue paper on all sides onto the plain A4 white paper. This will avoid displacing the tissue paper when printing.
  2. Print mode must be on High Resolution otherwise the ink will bleed.
  3. Let it dry. Once dry cut it into desired size.
  4. Apply decoupage glue gently before and after adhering the tissue paper making sure that a soft bristle brush is being used in spreading the glue. Start on the middle part then onto the sides.
  5. Let it dry at least overnight.
  6. While waiting to dry, print embellishments from the kit using shrink plastics. A high resolution mode will give a darker effect once it shrinks and that’s just exactly what we want to achieve on this project.
  7. Let it dry for few minutes. Cut each shape/embellishment leaving a white space around and punch holes.
  8. Follow the instructions as stated on the package because it varies in every brand. With the shrink plastic that I have, it says 130degrees and bake for 3 minutes. Using a heating tool, one has the control over the shrink plastics but using an oven like I preferred will make it curvy in a slight way.
  9. Tie ribbons and it’s ready to use. 


Back to Top