This card went missing for a day but now found, yipee!
One of my wishes every year ... never-ending hope and dream is STOP WAR / NO WAR!
I believe making music and not war is the best everyone can do. With music we get to express our feelings and our thoughts. Would you believe hubby has composed 2 songs already and he plans to sing it while playing his electric guitar on our 10th wedding anniversary which hopefully our 2nd wedding will push through - should I say renewal of vows (that's better).
Materials Used:
BRATZ digital image
"Make Music Not War" - cut using Rock Princess Cricut Cartridge
"Wish, Hope, Dream" - stamps by Just Rite
Checkmarks - highlighted with SPICA pen
Pearl Beads in Green by Panduro
Stickles : Crystal mixed with Candy Cane
Left-Over cardstock (printed)
Plain cardstocks by CCHobby
Copic Markers:
Skin - E00, 93, 95 and R00
Hair - E33, 35, 53
Tongue - R22
Lips - R29
Eyes - B05
Blouse - R05
Shoes and Cap - Y11, 00, 15
Sole of Shoes and Loud Speakers - C3, 5
Denims - B93, 12
Barcelet - B45
0
9th Card - Christmas 2010
This card was made with my mind thinking that someday I will be able to skate like a swan. Few more months and I'm so sure that hubby will ask us to go ice skating and crossing my fingers that I will not fall and fall and fall and hurt my butt hahahhahahahhahahaha. Oh yeah, I BELIEVE i can do it with lots of practice. The problem is that how I "hate" cold weather and freeze like a dead bird hahahhahahahahhaha.
Materials Used:
BRATZ digital image
Cake paper
Lots of stickles with the shade of blue, lavander, and green
SU photo corner punch
SU Scallop Trim edge punch
left-over plain cardstocks by Kuretake
printed cardstock by Tilda - Frosted Bluegreen pack
Blue crystal beads by Panduro
Transparency
Sentiment stamp "Believe" by Heidi Grace
Copic markers:
V12, 15, 06
G00, 02
BG01, 05
3D glittered snowflakes by Panduro
Laced Ribbon bought in the Philippines
8th Card - Christmas 2010
First and foremost I found the missing card I made last 27th of October. It fell behind my desk covered with mess hehehehehehehehe.
Yesterday, I just did 2 cards coz it's my son's birthday and spent time with him at home. I got him from school early than usual and we just had bonding hours together. He likes it when I tell him the day I gave birth to him .... then he continued coloring the magnets Tascha gave him for his birthday which was sent by none other than the sweet grandmother, Maryann =)
Here's my 8th Christmas card for this year. The focal point is the poinsettia which I assembled using the Sizzix Flower petals and Centers die.
Materials Used:
Sizzix Die - flower petals and center
Cuttlebug Embossing Folder - Asian Bundle : Plum Blossoms
Cuttle Bug Embossing Folder : Swiss Dots
Ranger Distress Ink Pads: Barn Door, Fired Brick, Aged Mahogany, Peeled Paint, and Pine Needles
Yellow 3D Pen for the dots
"Seasons Greetings " - cut using Beyond Birthdays Cartridge
Stickles : Crystal and Christmas Bloom by Panduro
Left-over cardstocks
7th Card - Christmas 2010
The last card I made yesterday is one card I had a hard time assembling. I had no definite layout for the card ... I just went with the flow for short. The stamp image is an unmounted rubber stamp. I scanned the packaging and printed out my desired size. I did not color the whole image coz I believe it will stand out more if a little highlight is only added and I was right =)
Materials Used:
Inkido stamp
Peace On earth was cut using Beyond Birthdays cartridge
Christmas Tree ribbon - unbranded
Layered flowers were punched using the set by Panduro
Candy cane and Crystal Stickles
Center flower accent was something I made. You may get a hint on how I did it by reading my blog entry.
Copic markers: Y11, E00
6th Card - Christmas 2010
The second to the last card I made yesterday is also a fave of mine all because of the adorable owls. I also got to play with my Cricut Expression and the cartridge I got from a friend in Denmark =) Thanks Maryann =)
Materials used:
Hero Arts acrylic stamp for the owls
Season's Greetings cut using Beyond Birthdays cartrdige
Ribbon -unbranded
Christmas bloom stickles by panduro
Pumice Stone distress ink pad for the background of the owls
Heart gold flat back beads by panduro
Copic Markers:
R02, 35
E47, 57, 43
Y28, Y17
YG67
G21
B00
BG23
5th Card - Christmas 2010
Mid-afternoon the postman came and gave me 2 packages. I did not open the first package coz it's for son. he got a birthday gift from a little girl in Denmark, the grand-daughter of a very dear friend of mine who is also a crafter. I was so excited to open MY parcel coz it's a gift from my DMIL. I love the sizzix die "flower petals and center", Sanrio rainbow die, sizzix strawberry die plus 2 christmas rubber stamps. One of the stamp is actually the stamp I used on this 5th card. The said stamp will also be great for making inchies =)
Sad to say I was not able to write down the copic markers I used for the stamped image :(
Christmas Ornaments rubber stamp by Slojd-detaljer
Christmas ribbon - owned by mom =)
Mini flower beads by Panduro
Sad to say I was not able to write down the copic markers I used for the stamped image :(
Christmas Ornaments rubber stamp by Slojd-detaljer
Christmas ribbon - owned by mom =)
Mini flower beads by Panduro
4th Card - Christmas 2010
This 4th card is my favorite coz of the simplicity and the tulle =) I think I'm getting hooked with BRATZ digital stamp image - they're just so gorgeous!!!!
Materials Used:
Left-over cardstocks
White Tulle
Red fluffy heart
small flower beads by panduro
BRATZ digital stamp image
Copic Markers:
Skin - E00, 93, 95, R00
hair - E33, 35, 53
Jacket & leggings - R35, 27, 02 + spica
Lips - spica
Skates - metallic silver pen, spica red & silver
Blouse - R14, 07
Skirt - Christmas bloom stickles by panduro
3rd Card - Christmas 2010
The 3rd card I made yesterday was to play with one of my BRATZ digital stamp image.
Materials Used:
Bratz Digital Stamp Image
Swedish Sentiment by Slojd-Detaljer
Left-over cardstocks
Cuttlebug embossing folder - Asian bundle "Plum Blossoms"
Flower punchers by panduro
Clear Crystals
Copic Markers:
Skin - E00, 95, 93, R00
Hair - E33, 35, 53
Lips - Spica Red
Blouse - G05, 07 + spica
Skirt - R29, RV 29 + spica
Boots & Belt - W7 and spica
2nd Card - Christmas 2010
Once again this Christmas card is so easy to make. I love the effect of the embossed snowflakes accentuated with stickles.
Materials used:
Sentiment stamp "Merry Christmas" by panduro
Cuttlebug Winter Bundle - Large Snowflakes
Crystal Stickles
Left-over cardstocks (again)
Mini ribbon bought in Thailand
Mini flower beads by Panduro
Materials used:
Sentiment stamp "Merry Christmas" by panduro
Cuttlebug Winter Bundle - Large Snowflakes
Crystal Stickles
Left-over cardstocks (again)
Mini ribbon bought in Thailand
Mini flower beads by Panduro
1st Card - Christmas 2010
Oh well, better start making Christmas cards while I'm sick and just at home. That's what I actually did the whole day yesterday. Although I had to get my son at school very early than usual coz he is not also feeling well, I managed to make cards while he fell asleep. Good thing he is not totally sick =)
For this first Christmas card, I played with the owls. I received set of Owls by Hero Arts from a very dear fellow crafter. Thanks Claire! (Puss o Kram, forever!)
All cardstocks used in this card are just left-overs so I have no idea anymore which brand :(
Sentiment stamp "God Jul och Gott Nytt År) by Slojd-Detaljer
Scallop punches by SU and EK Success
Copic markers: Y28, E43, BV23, BV00
A very simple card indeed =)
Cards of Thanks
There are so many reasons why I have to be thankful everyday ... we all are, right? Although I'm in a bad shape right now ... it got worse on the night of Joseph's birthday party. But like all performers say "the show must go on". I don't have a voice literally yesterday and so I had to settle for sign languages which made my boys laugh so hard. Today, I feel better but still got chills and weak body but happy to say they can hear my whispers now hehehehehehehehehehehehehe. I didn't go to work as advised by hubby and so I had a great reason to stay in my craft room even for few hours and make cards.
Joan has been giving away cuties every week in celebration of cardmaking day. I vowed myself and promised her that I will do my best to make cards for her blog candy. It's the last week and I want to join.
Hubby allowed me to work on my cards for the whole morning then I was nagged to go to bed and get some sleep heheheheheheheehehehehehehe. yup, I did sleep that's why it's only now I have the time to post my creations for the day. Oh, I didn't sleep that long ... I had to eat late lunch .... clean the kitchen a little .... take a shower .... take a short walk for fresh air .... prepare dinner ... load pictures of Joseph's give-a-ways .... eat dinner ... and now I'm here to share with you all what craft I did this day.
The theme of my cards for the day is simply THANKS =)
My heart is filled with gladness ... overflowing with gratefulness. What am I thankful for?
1. My son will be turning 7 this Oct. 28
2. His early birthday party was a huge success.
3. I'm the one who is sick and not my son nor hubby.
4. I've got 2 new toys: Pagoda and Rock Princess Cricut cartridges.
5. I have great, supportive, kind crafty friends around the world that inspires me over and over again.
6. I have loads of clothes to wash in the laundry this week hehehehehehehe.
For the basic materials, I used:
printed carstocks by My Mind's Eye "Bella Bella" by Carina Gardner
Yellow Ochre and Olive Green Plain cardstock by Reprint
Base cardstock by CChobby
Flowers by Artemio
Crystal beads by Panduro
Crystal Stickles
Note: The word "Thanks" and the labels are left-overs from my previous projects. I also used the same with Joseph's give-a-way packaging.
I used the same printed and plain cardstocks for this batch =)
Let's take a look at the cards individually ......
The stamped image is a digital image of BRATZ
Copic Markers:
Skin - E00, E93, E95, R00
Lips - R22
Hair - E33, E36, E53
Eyes - YG57
Clothes - BG10, BG23, YR31, YR32 plus Promarker Olive Green
Skin - E00, E93, E95, R00
Lips - R22
Hair - E33, E36, E53
Eyes - YG57
Clothes - BG10, BG23, YR31, YR32 plus Promarker Olive Green
Stamped image is a rubber stamp by papermania PMA1029
Colored flat back beads by Slojd-Detaljer
Copic Markers:
BG10, 23
YR23, 31
Colored flat back beads by Slojd-Detaljer
Copic Markers:
BG10, 23
YR23, 31
Picket Fence Edge Punch by Martha Stewart
Scalloped Scallop by EK Success
BRATZ digital image
Copic Markers:
Skin - E00, E93, E95, R00
Lips - R22
Hair - E33, E36, E53
Eyes - YG57
Clothes - BG10, BG23, YR31, YR32 plus Promarker Olive Green
Skin - E00, E93, E95, R00
Lips - R22
Hair - E33, E36, E53
Eyes - YG57
Clothes - BG10, BG23, YR31, YR32 plus Promarker Olive Green
Thanks for viewing =)
Packaging of Joseph's Give-a-ways
Joseph and I were able to finish the last project for his birthday give-a-way which is of course the main packaging. The day of the party we were still both busy with the project. We actually finished doing it at exactly 4pm. Joseph was worried that we will not be able to do it coz the whole morning up to 2pm we spent with his grandparents.
The word "thanks" were cut using Wild Card Cricut cartridge.
Lables "Marquee" were cut using Storybook Cricut cartridge.
Look closely and you will see my mistake :( I stamped "Happy Birthbay" in 15 packs and I noticed it too late that only 1 out of 15 stamped correctly.
Materials Used:
Monster Foam Stamps by Panduro
Forest Moss Ranger distress ink pad
Feathers
Cricut Cartridges - Storybook and Wild Card
Making Memories Acrylic Paints
Just Rite (Font) Stamps - Bayton and Times New Roman
My son tasked to stamp monsters =)
I stamped the third monster coz my son got tired on stamping ... he prefers to sleep.
Joseph put in all the give-a-ways in each package. There should be 5 items inside and he did it without forgetting a single item.
What's inside?
1. The Pokemon Coloring cards which I made.
2. Twistable pencil
3. Pokemon Toy (figure)
4. A special handmade ball made by me =)
5. Blow and curl trumpet.
1. The Pokemon Coloring cards which I made.
2. Twistable pencil
3. Pokemon Toy (figure)
4. A special handmade ball made by me =)
5. Blow and curl trumpet.
If you see the name "ALBIN" - that's for a 2 1/2 year old kid (our neighbor) and also for my Godchild Vincent who was not able to come due to flu. Both small kids have different items as compared to the big kids.
All set and ready to be given away =)
Joseph's Birthday (Pokemon) Give-a-way
A mother will do everything for her child and over and over and over again I was in said situation. Regardless if I feel unhealthy I was determined that the planned give-a-ways will be done and over with. Right after work last Thursday and Friday, I went straight to my small craft room and started doing the main give-a-way for all the kids.
They are all crazy when it comes to Pokemon that the school declared that it is forbidden to bring any toys unless it's a ball or a jumping rope. That was a good declaration coz I really don't like Joseph bringing all his pokemon cards plus a pokemon binder in school.
I was torn betwween buying Pokemon cards or I will just make my own. The price of cards are just too much that I ended up creating Pokemon coloring pages for each kid. I requested Joseph to choose from Pokemon coloring pages found at internet for free and printed the images. Since Joseph will turn 7, each kid will receive 7 pages of Pokemon images that they can color.
I almost gave up on this project coz not feeling well combined with time pressure but it dawned on me that my son is expecting lots of give-a-ways for his party. before going to school ... on our way home .... and at home ... after dinner ... before going to bed, he would ask me if I'm done with the project.
Anyway, both parents and kids were astonished to have such a wonderful gift from us.
A closer look on this project:
Embossed the crayola case using the asian bundle.
The handmade crayola case using Tags, Bags, Boxes and More Cricut Cartridge can hold 7 pieces of caryons.
Yes, I created the case smaller than the length of the crayons because the colors from the crayons will add gladness in the whole package.
The case that holds the coloring pages are cut using Tags, bags, Boxes and More Cricut Cartridge. Embellished with Argyle Edge Punch by EK Success, RikRak band, stickles, and the handle was punched using SU Puncher. The crayola case was highlighted with Broken China distress ink pad. The last was adding the printed Pokemon picture =) To personalize each pack, I wrote the names of each kid.
Here are the images of the 7 sheets Pokemon coloring pages.
POKEMON 7th Birthday Invitations
Joseph is very very happy with his invitations and proud to say we both worked hard on this project. We sure had a grand time together and I made him decide on what embossing folder ... colors of ink pads ... where to put the digital image. He got sad along the way coz he can't help me in every step of the way - torn between cartoons and cardmaking hahahahahahhaha.
In the invitation, it says there that if you cannot attend call NLt 17th. Everytime a parent calls my heart pounded coz I want all his classmates (boys) to attend. It made me and Joseph (especially) when it's just a call to say how awesome the card is and they will not miss the private party.
Materials / Tools:
Different B & W pictures of Pokemon printed on Laser printer and used one image as digital stamp. The other Pokemon pix will be used for coloring books which will be one of his thank you gifts to all the guests (kids).
Tim Holtz Embossing Folder - Rays
Ranger Distress Ink Pads
Hot Off the Press Acrylic Stamp for the "You're Invited"
Cardstocks from CCHobby
Handmade Papers as the base card
Clay machine
Cricut Cartridge - Create A Critter
Copic Markers and ProMarkers
Heide Swapp Edge Distresser
Zig Marker (black) for doodling
Daler Rowny FW Pearlescent Liquid Acrylic - to color the Pokemon clay accent as well as to give highlights on the digital image.
Paper Clay (white)
Procedure:
Joseph embossed the green cardstock with TH embossing folder - rays. I distressed all the edges both the green and blue cardstocks. Highlighted the edges with Ranger distress ink pad - peeled paint for the green cardstock and broken china for the blue cardstock.
Swish some Mustard Seed and Spiced Marmalade ranger Distress ink pads to give a sunny rays effect.
After printing out the Pokemo digital image, I colored the image(s) with Copic makrkers and Promarkers.
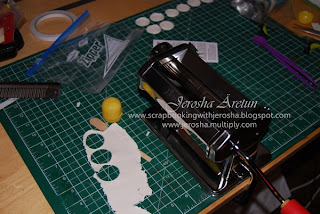
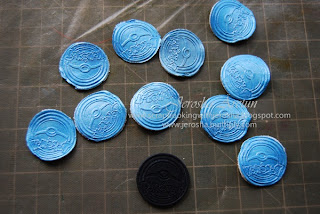
I borrowed Joseph's Pokemon chip and played with paper clay.
Joseph colored each clay chips with pearlescent acrylic paint.
Although the mass produced Pokemon chips are reverse, Joseph was very very happy.
Used Create A Critter cartridge to die-cut the words "Let's Play".
Printed out the given Nikki's invitation card. Nikki's Adventureland is where Joseph will have his private party =)
Operation Desperation with Gypsy to Cricut
Hello everyone! Long time no visibility for me hahahahahahahhahahahahahhaha. That's life when you're back to working - less time for crafting unless necessary. I'm still adjusting with my current state now but I believe very very soon I will be back on my toes. For now, my creativity is ZERO especially my imagination. I have tried sitting here in my craft room since this morning but all I got are too many blurry ideas and hoping of all hopes executing such ideas will manifest.
Hhhmmm, hubby says it's simply because my mind is everything about Joseph's 7th birthday party that all doors to my brain shuts-off until his party is over. Can you imagine the long creative list that I have to tackle once his birthday is over? Just looking at my list makes me sick .... wondering if I will be able to beat ALL the deadlines.
I have actually decided and told my hubby that I refuse to work starting the month of November and will be back in helping him in our business by January 2011. So far, he has no clear answer yet hahahahahahahhahahahahahahhaha. he was shocked and speechless when I seriously declared a new "presidential" directive at home hahahahahahhahaha.
Speaking of Joseph's 7th birthday party, all his invitations were mailed 4th of October. I finished all the invites 26th of September but had the hard time to decide if we're gonna rent the whole Nikki's adventure land exclusive for Joseph's party or just have it the regular time which means parents will not be able to have quality time chatting together and it means also that we will get dizzy looking for our kids making sure no accidents will happen. At the end, hubby and I decided to rent the whole place so no outsiders/uninvited will be able to get in. Besides, it's his 7th birthday and it has been a tradition in my family to give the best when a child turns 1, 5, 7, 12, 16, 18, and 21.
Going back to the invitations .....
I was so tired while I was making the invitations and naturally patience doesn't work best during such moments. I have a lot of new cricut cartridges and one of them is Create a Critter. The overlay pads together with the booklets will be arriving late so I have no choice but to use my Gypsy. Duh! Gypsy played tricks on me that I can't comprehend how to use it again. See, that's the effect when body and mind are both exhausted but still trying the very best to beat a deadline. So, what I did is I placed "Graphically Speaking" overlay but used a Create A Critter cartridge. I just had to go to Cricut site and open their online booklet and from there I was in a way guided which buttons to press. It took all my last effort to concentrate and accomplish what I wanted to die-cut. After that I left my craft room and laid down to sleep. Before falling asleep I laughed and laughed with the fruitful craziness I did.
Look closely and you will see that the overlay and cartridge are not the same hehehehehehehehehe
Paper Laced Flowers using Border / Edge Punchers
I'm 100% sure all paper crafters has a border edge punch. We're all crazy about the lovely edge punchers from all brands. I remember very well I started having only 3 kinds when I started paper crafting here in Sweden and it's from Fiskars. As years go by I was able to acquire different kinds from Martha Stewart and my favorite EK Success.
Acquiring such tool(s) was not easy fro me but I really thank God for blessing me to have a very dear friend who is one of the greatest I have known in paper crafting especially card making. She would always remember me when it comes to tools that now my wall is filled with different kinds of edge punchers.
hahahahhahahahahahahhahahahaha DH declared a new decree at home that I control myself in buying edge punchers coz he is tired of adding new system for my punchers and there's actually no more vacant space on my wall. If only I have a bigger room, right?
To date, I'm so glad that it's easy to buy edge punchers now here in Sweden but I'm not adding new in my collection coz I know I have enough and I can live with what I have .... for now hehehehehehhehehehehe.
Here's what I have created last week using some of my edge punchers from Martha Stewart, EK Success, and Fiskars. These kind of tools can be used in creating flowers. Who says that Edge Punchers are just for creating borders? Definitely NOT ME =)
Materials for this Project:
Procedure:

1. Punch cardstocks using your favorite edge puncher.
2. Cut into strips minimum size of 1 inch in width x 12 inches in length. Please be aware that the smaller strips you make your paper laced flowers will be small BU more than 1 inch in widht your paper laced flowers will be kind'a bigger.
3. Punched round or scalloped shapes as base of your flowers. Freehand is also ok.
4. Starting from one end of your punched strip, begin to fold around your base. Cut the extra at the end of your fold if there's any.
5. Add your prima or fabric flower or even handmade flower at the center.
6. If you want to add tulle and/or feather before the flower then do it.
7. Secure the very center with brad or button or anything if needed.
8. Tap some stickles all over if you like.
Hope you enjoyed my tutorial. If I have inspired you to make these kinds of flowers please be kind enough to give credit as a sign of respect.
Happy week-end everyone!
Acquiring such tool(s) was not easy fro me but I really thank God for blessing me to have a very dear friend who is one of the greatest I have known in paper crafting especially card making. She would always remember me when it comes to tools that now my wall is filled with different kinds of edge punchers.
hahahahhahahahahahahhahahahaha DH declared a new decree at home that I control myself in buying edge punchers coz he is tired of adding new system for my punchers and there's actually no more vacant space on my wall. If only I have a bigger room, right?
To date, I'm so glad that it's easy to buy edge punchers now here in Sweden but I'm not adding new in my collection coz I know I have enough and I can live with what I have .... for now hehehehehehhehehehehe.
Here's what I have created last week using some of my edge punchers from Martha Stewart, EK Success, and Fiskars. These kind of tools can be used in creating flowers. Who says that Edge Punchers are just for creating borders? Definitely NOT ME =)
Materials for this Project:
- any Border / Edge Punch that you have
- cardstock cut into 12 inches x 1 inch or more after punching
- any kind of flowers ( prima or handmade)
- different colors of tulle (optional)
- glitters or stickles
- brads or buttons or woodies
- feathers (optional)
- round or scalloped punch - as base for the flowers. you may also freehand cut the base =)
- and lastly PATIENCE in freehand folding the strips of punched cardstock
Procedure:

1. Punch cardstocks using your favorite edge puncher.
2. Cut into strips minimum size of 1 inch in width x 12 inches in length. Please be aware that the smaller strips you make your paper laced flowers will be small BU more than 1 inch in widht your paper laced flowers will be kind'a bigger.
3. Punched round or scalloped shapes as base of your flowers. Freehand is also ok.
4. Starting from one end of your punched strip, begin to fold around your base. Cut the extra at the end of your fold if there's any.
5. Add your prima or fabric flower or even handmade flower at the center.
6. If you want to add tulle and/or feather before the flower then do it.
7. Secure the very center with brad or button or anything if needed.
8. Tap some stickles all over if you like.
Hope you enjoyed my tutorial. If I have inspired you to make these kinds of flowers please be kind enough to give credit as a sign of respect.
Happy week-end everyone!
Subscribe to:
Posts (Atom)


 Posted by


