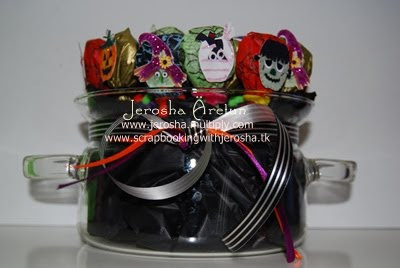
The theme was Halloween naturally and I made this for The Daily Scrapper now TDS Lifestyle last October and was published October 9 to 23, 2009. You may still see the article on the archives which can be seen here http://www.thedailyscrapper.com/2009/issue18okd/Hybrid.html
Halloween in Sweden is not a busy time of the year since it’s not a very popular event to celebrate. I would normally accept an invitation from the International School just so my son would have an idea how it is. Also, during this week my son celebrates his birthday and naturally it falls on a school break but before the break we’re going to give candies to each of his classmates as a halloween treat. With Helena Monteiro’s Felt Halloween Kit, I created lollipop wrappers that will give a trick or treat feeling amongst the kids.
Supplies Needed:
• Digital Kit by Helena Monteiro
• Tissue Paper or Silk Paper
• Kodak Double Sided Matte Paper
• Halloween Set Stamps by Inkadinkado
• Versacolor Stamp Pad - Black
• CTMH Stamp pad –White Daisy
• Stickles
• Kiddie Craft Pipe Cleaners
• 3D Foams
• Glass Witch Pot
• Styrofoam or Floral foam
• Ribbons – Black, Orange, Violet
Instructions:
1. Open your editing software and choose the elements from Helena Monteiro’s Felt Halloween kit that you want to use and print.
2. Prepare the tissue papers by cutting different colors at 5 ½ x 5 ½ inches.
3. Stamp Halloween images on each prepared tissue papers.
4. Begin wrapping your lollipops gently.
5. Secure each lollipop using kiddie craft pipe cleaners around.
6. Cut each halloween elements you have printed out.
7. Highlight each element by adding stickles.
8. Adhere the elements using 3D foams.
9. Arrange your lollipops in a glass pot using floral foam but don’t forget to cover the inside of the pot with black tissue paper.
10. Tie ribbons around the glass witch pot.


 Posted by


2 comments:
Just a quick note to let you know that a link to this post will be placed on CraftCrave today [17 May 02:00pm GMT]. Thanks, Maria
Thanks Maria =)
Post a Comment