Showing posts sorted by relevance for query silhouette. Sort by date Show all posts
6

My Silhouette Portrait Cutting Machine Has Arrived + REVIEW !!!!

Super elated!  that's how I felt when I finally got my Silhouette Portrait plus accessories last 10th of January.  I bought it at Scrapbruket, a Swedish on-line store.  One thing nice about my unit is that it's perfect for Swedish sockets since it has a cable for such. 

Oh yeah I did play with it as soon as I was able to set-it-up in my craft room.  Why I bought the machine when in fact I have the Cricut Expressions and 120 cartridges to date?  All because of one simple reason :  I will be able to use all the fonts I have in my PC, cool!  I'd rather invest on Silhouette than invest on font Cricut cartridges.  I really promise myself that I will refrain from buying cuts for my Silhouette unless of course a specific cut I can't do nor find in my Cricut cartridges.


Lessons learned:

Don't be too excited when trying out the machine for the first time hahahahahahaha coz you will end up making few mistakes!


*  I actually tried one of my fonts and I was in awe but remember:  Relax while removing the cuts coz you will get a kind'a rough result even if you used the right pressure in cutting =)

*  Read calmly the things you have to click before cutting.  I made a mistake by just pressing the cut button - forgetting that I'm using the inks.  See, I got lines!  I have to click some buttons for adjusting but was too excited!

So far I encountered only 2 mistakes which I will avoid next time.

See how compact it is beside my Cricut Expressions and it's not bulky at all :


My Silhouette has a cover so one of these days I have to make a cover for my Cricut, too.


0

(Week 10) - Journal 52 : Why Do I Make Art?

That's one question I never get at all!  But for the sake of argument ... or should I say explanation and justification for all the tools and materials I have I will gladly answer the question for this week's prompt.  But first let me orient you on the week's prmot which was given to us by no other than Chelle Stein of Journal 52 =)

Week 10 Prompt: Create for a Cause

"So often we make art, and ask ourselves? Why? What’s the point of this?
Well, art can be used for a number of wonderful things – for health and healing, for personal development, to bring people together, for raising awareness for a number of causes.
For this week’s prompt, create art that has a cause…why do you make art? Or, think about a cause you are passionate about that you could create a page about in your journal."

Now that's deep, isn't it?  I have no cause why I make art.  I do it for myself but maybe someday I will be involved in making art for a cause.  Well, every year I make cards or art works for Cancer month.  Normally a fellow crafter from around the globe will request us to make bunch of cards and send it to her in which she will be giving it to a hospital or an organization.

Anyway, I really, really, really reviewed deeply why I spend money and time/effort in creating crafts.  Most of the time I make for clients ... other times I make it for friends without any reason .... in some cases which is often I create items as gifts ... BUT I really do make art for the love of it and the fun that goes with it.

As I reviewed deeply I was able to summarized my justification et al explanation in 5 pointers:
  • God's Gift - I'm honing and using one of the gifts that God has given me.  I share it by creating and giving and teaching.
  • Balance -  I need to find balance in my everyday life in this crazy world.
  • Sanity - oh yes!  I'm a multi-tasking mom and it will drive me crazy to just do things under the title of a mom, wife, and homekeeper.
  • Enjoyment - I need to do things that makes me happy otherwise hubby and my son will suffer hahahahahahahahhahahaha if you know what I mean.  Plus doing art brings out the child-in-me, don't you?
  • Expression - I do almost all kinds of craft but in art journaling I really get to express what I feel.  There are many ways to express art but I enjoy most expressing my feelings through colors.  Most of all Art is an outlet fro me to express myself as an individual.
Here's my entry for the said week:


The Process:

1.  I sprayed the canvas with colors then used a corrugated board with white paint for some effect on the whole layout.
2.  I used a 3D paint on the stencil for the silhouette effect.  I love how this turned out coz it feels rubbery.
3.  I highlighted the silhouette with stickles thus creating a shadowy effect.
4.  Got some color chips from a paint store and opted to use ROYGBI (yes without the V)
5.  Grabbed my alphabet stamps and decided to emboss it, too.


6.  I had to use a black UNI pen to write the words so it will be readable then wrote my justification.


7.  I adhered each color chip using magic tape.  One just have to flip it to read what I wrote.
8.  Used Faber Castell Pitt Artist Pen (white) and Neon Pen by promarker to write my title question.
9.  Added an angel wing on the silhouette
10.  Last touch is adding question mark paper clips.

Have a great week!

Thanks for viewing =)


0

Entry #50 - NCM 2010 : Proposed Wedding Invitations ( 3 of 7)

For the 3rd proposed wedding invitation I made, I simply used the following:

Background is a stamp by Anna Griffin's Flora Collection
Tab Punch by Stampin' Up
Nellie Punch for the punched leaves
paper flower I bought in Thailand
You Do Pearl brad
Inbjudan rubber stamp by Panduro
Couple Silhouette rubber stamp by Slöjd-Detaljer
Satin ribbon with side trimmings bought in the Philippines
Kuretake cardstock
Recycled cardstock
Pearlmaker (gold)
Panduro Embossing Powder (gold)

Entry #51 - NCm 2010 : Proposed Wedding Invitations (4 of 7)

For the 4th card I used the following materials:

Kuretake Cardstock
Tilda Cardstock
55033 Designblock Silhouette Rubber Stamp by Hero Arts
MS Edge Punch - Heart Lattice
Wedded Couple Wood Accent by Panduro
Vi Gifter Oss Rubber Stamp by Slojd-Detaljer
Pearlmaker (gold)
RicRac band by Creative Hobby
Classic SU pad - Sage Shadow


0

Brother ScanNCut CM600 Images/Patterns

Ever wondered what images/patterns you will get or should I say built-in your machine?  I did!!!!!  I searched and searched for internet at least a glimpse of the images/patterns before I buy BUT to no avail.  I just took the risk of buying the unit.  All I know is that CM300 model means 300 built-in images and since I bought the CM600 en toto I got 600 images/patterns.  I believe that's enough for me since I have tons of images that I can scan and cut using this machine PLUS in the very near future all users will get free images from the Brother website ... if I'm not mistaken.  Also, I have 120 Cricut Cartridges  to date so definitely I will still use my Cricut Expressions from time to time.  Wondering what I will do with my Silhouette?  I use it for my PC fonts and dingbats.

Heniweys, as I have promised from my yesterday posts with regards to The ScanNCut machine, here are the images/patterns included at the CM600 model:


So there you go =)

Have a great week-end!

Entry #48 - NCM 2010 : Proposed Wedding Invitations ( 1 of 7)

March 19, 2010

Client : Swedish couple in their mid 50's
Event : Summer Wedding (Garden)
Request : Happy Colors

These are the only info I can give you guys coz that's just what I got!

Considering their ages, I have to be careful in designing the invitatoons for them. Altough they are both jolly people and full of humor, I still have to bear in mind that they are not young to enjoy those sweety or cutie stamps that I have. I also have to have a touch of elegance.

These are the first batch of invitations that I'm making for them. I can only make the concept for now coz they are still thinking on what exactly to write inside the card.

Since both of them are busy moving to a new apartment, our meeting was re-set. I will be seeing the bride-to-be next week and have a sit-down chat with her. I hope by that time they already have decided what to write and what exactly they want for their invitations.

Here's the first proposed wedding invitation I have made :

Materials:
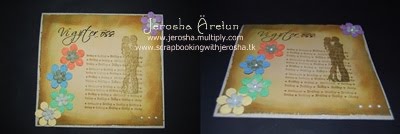
Vi Gifter Oss Rubber Stamp by Slöjd-Detaljer
Couple Silhouette Rubber Stamp by Slöjd-Detaljer
Wedding Background Rubber Stamp by Slöjd-Detaljer
Tim Holtz Distress Ink Pads ( faded jeans, vintage photo, spiced marmalade, tattered rose, peeled paint)
Cardstocks from Creative Company
Nellie Punch and Emboss
My handmade papers
Prima mini flowers
Pearlmaker (gold)


Entry #52 - NCM 2010 : Proposed Wedding Invitations (5 of 7)

The 5th card looks like this and I've used the following materials :

Handmade Paper from Thailand
Couple Silhouette by Slojd-Detaljer
DCWV Plain Cardstocks
Panduro Embossing Powder (black)
SU Ink Pad - Sage Shadow for the couple's background

0

Great Labels Cut from Small Talk Frames & Tags Cartridge


Ah, finally after 11 hours of sitting down and at the same time cutting images, printing pictures and chatting with my RAK group, I finished cutting all the label images in Small Talk, Frames & Tags Cart.  I only cut my fave ones and of course I will be sharing some to my fellow RAKers at our FB group.

I really really really love the said cartridge coz so many images ... if not all ... are just perfect for Smashing and PL pages.  This is one cartridge that I don't regret buying at all.   Well actually I have no regret in investing with the Cricut Carts.  I still believe that I can work with it side-by-side with my Brother Scan N Cut and of course my Silhouette.

Here are the all the cuts I have made for 11 hours yesterday:


 Here's a closer look


 I had to show the finger pointing under the white paper so you can see it clearly.

Aren't they cute?  So useful for any paper projects! 

Ok, gotta go ....

Have a great evening and happy week-end crafting to all!


0

(Week 13) - Journal 52 : How Does Your Garden Grow?

Are you asking me?  Are you sure?

Hubby and I were laughing tremendously when we read the prompt.  He has been teasing me about gardening.  We have a big front lawn and big back garden.  When we bought the house I was itchy to create an area where I can plant my own vegetables but it was put on-hold coz I gave birth and breast-fed my son for 3 years.  We actually tried planting and growing our own carrots but we got disappointed coz the carrots didn't grow to its normal size.

Our garden in some mysterious ways just grow beautiful flowers season after season.  I am so amazed that our roses can grow as big as a saucer - red and yellow.  We have a lot of typical Swedish flowers growing and flowers that give signs of a coming season.  We are now looking forward to the tulips in different colors.  Butterflies just love our garden during summer and they can come in batches, too.  I sometimes wonder why here in Sweden anything I plant it dies but back in the Philippines I really have a green thumb.  I guess when I gave birth to our son in a normal way, all my gardening powers came out with him hahahahahhahahahahahahhahahahahha.

Honestly, I feel very very sad whenever someone will give me a plants or flowers in a pot because it will surely die!  Hubby calls me a flower/plant murderer hahahhahahahhahaha.

Now, to ask me how does my garden grow, well it's simply wild and woolly!!!!!  Everything just grows and I just make sure once a year, ye only once a year that I remove unwanted grass so that the flowers can grow freely.  I really have no talent in creating an oasis garden BUT I really appreciate every flower that grows in our garden.  We also have trees:  green summer apple, red winter apple, plums, and cherries.  Our berry bush died a long time ago and in fact our cherry tree is dying and hubby and I can't save it at all but we'll see this summer if we get to harvest some cherries again.

Let's check out the prompt before I show you my journal page for the week.  It says that "

Week 13: How Does Your Garden Grow?

Spring seems to finally be arriving here in Pittsburgh, and we’re starting to think about one of my favorite things: flowers and gardening! Even though I don’t have much of a green thumb, there’s always much inspiration in gardens.

For this week’s prompt, create your own garden in your journal. It can be any type of garden (flowers, vegetables, rock gardens, etc. etc.) and you can either paint/draw or collage – make it realistic or abstract, whatever you’d like to do!"
Ok, for this week's prompt I played a LOT with my cricut.  I had to find a reason why I should buy the latest cricut machine :  Cricut Explore.  At this point I do feel that I need to buy the machine but how will I justify to hubby that I really need one when I haven't tried my Brother Scan N*Cut machine neither my Cricut Gypsy then my Silhouette Portrait I only played with it twice.  I think I will wait a little before I buy the machine.

During my cricut play for this journal page, I had a difficult time cutting the Tinkerbell Filigree in a smaller size.  Even when I cut it into 4" I was not at all satisfied (but still not enough reason for me to buy the Cricut explore hehehehehehe), maybe I should change the blade I really don't know ... yet.

Anyway, here's my journal page:

I opted to create the page using a card style =)

The Cricut Carts I used are:

Art Nouveau - the lady in yellow dress in 7"
Country Life - grass in 2,3, & 4 inches;  sunrise scene in 2";  apple tree in 3"; and "Wild & Wooly" phrase in 2"
Garden Soup - "Growing Garden" phrase in 3";  worm in 1 1/2"
Heritage - lamp post in 8"
Ornametal Iron 2 - the gate in 5 1/2"
Tinkerbell and Friends - tinkerbell in 3 3/4" (filigree)
plus lots of stickles and red crystal beads
double sided cardstock which I bought in a pack at Lidl years and years ago

Here's a closer look of the cover:

Closer look of the Inside Page:


Now, I have to conceptualize for the next prompt =)

Happy Sunday and Happy Crafting!

Thanks for dropping by =)


0

Polaroid Frames Cut from Cricut (RAK)

Good afternoon everyone!  It's a beautiful Sunday here in Sweden that I took a long walk 3x this day.  It would have been perfect if our dog Kasper is still alive.  This kind of weather he loves and would literally drag me for long walks.

Anyway, I still played with my Cricut today and once again made use of scraps and yes, I played with Small Tlak Frames & Tags Cratridge.  I just LOVE the cartridge coz everything is in it and perfect for Project Life pages.  Honestly, the reason why I am motivated to play with my Cricut lately is because I want to fulfill fellow crafters wishes.  Some of them don't have a machine and based on the wishlist they want particular cuts either from Cricut or Silhouette.  Going through the wishlist, luckily I have the carts to make some cuts =)

My project this day is just to cut some polaroid frames.  I did cut ALL the available said frames and will be packing it for mailing.  Here are the frames:


 Oh I even made some teeny weeny tags, too.  I had frustration when I cut these cuties so maybe I should buy the Cricut Explore so that small cuts are clean and crisp!


Here are the frames each laid down for easy viewing.  Something went wrong with the words but I did cut each of the same size.

Above frames were cut at 4" each

Now, the following frames were cut at 3 3/4" each:


I think I will be cutting more for my personal use =)  But now I have to cook dinner so no Cricut Play for an hour or so.

Happy Crafting =)


Back to Top