Showing posts with label Craft Organization. Show all posts
0

Mini Post-It On-the-Go Keeper

Follow my blog with Bloglovin

Don't you just love post-it notes?  Oh, well maybe I'm the only one who is addicted to post-its and it's really embarrassing to take a picture just to show you how many I have for now.  While I was cleaning one of my make-up drawers, I found hubby's I.D. card he had during one of his conferences in Stockholm.  Upon seeing it I knew what I'm going to do about it.  Surely it would be handy for me coz I love sticking post-its in my filofax, the Bible, my Project Life planner and the likes.

Here's what I did:


I think I will look for more plastic I.D. cards here at home and use it as my post-it keeper.  The next project I have to make is my washi tape on-the-go keeper so I don't have to take the whole bunch everytime I needed it.

Oh my!  Tomorrow is Valentine's Day and I know millions of people will be celebrating it tremendously.  As for me, I really do not dwell much on this event eversince I was a kid and luckily hubby feels the same way because for us EVERYDAY is really a Valentine's Day =)

 So to all of you celebrating the V-Day :  Have a great day with your love ones =)


0

Organizing my Used/Unused DMC and Anchor Threads

It has been more than a decade since I just kept my unused and used threads for cross-stitching in freezer bags.  The only effort I did was to segregate it by color then shoved it in a plastic container.  Not good!  You can't blame coz I have stopped cross-stitching when I moved to Sweden year 2001.  While I was in the Philippines I have done a dozen or more of cross-stitching projects but my interest changed after giving birth to my son.  In my mind I have planned and planned to sort and organized those threads but no effort exerted BUT finally I have done it, yippie!!!!


 For the unused DMC and Anchor threads, I opted to use left-over negative sheets and it works just fine.  Hhhmmmm my DMIL told me that she will give a lot of such threads next Saturday.  Oh boy!  I guess I have to think of another way how to organized those threads.  For now or should I say for this week I will let it be just as it is =)

2

Re-storing All My Embossing Folders and Brass Stencils

Really the problem of all problems for every paper crafter is storing all materials and tools.  With so much yummy goodies out there and never-ending newbies sold in the market we really can't avoid to change every now and then our craft storages.  The pain of organizing goes with it.  I truly neglected things that I have ...sometimes forgetting what I have which we all call hoarding!  As I slowly organize my items, I just have to deal with all my embossing folders and brass stencils.

This is how I store mine last 2010 http://scrapbookingwithjerosha.blogspot.se/2010/03/entry-19-ncm-2010-my-embossing-folders.html

During one of our lunch in the city months ago, the restaurant gave me a big wooden wine case and luckily it works fine for my purpose.  Yeah, I know, someday hopefully NOT soon I have to find another way to store my embossing folders and brass stencils.  But as long as I don't buy more the case I have for now serves its purpose.


 One of this days I will alter the wooden case because just now I'm not done with cleaning and re-organizing :(  Yeah, I did use the same tags from my previous storage =)

0

Hanging Storage for My Washi Tapes et al

Have you seen my previous storage for all my washi tapes?   It's what I used last 2008 for all my ribbons but my ribbons grew and so I stored my ribbons another way.  Well, since I have been buying washi tapes from time to time, my previous storage ain't useful for me anymore.  I prefer to just have one storage where I can instantly see what I have and what I can use.  In my heart I know washi tapes and the like will forever grow in my craft room, I might as well use a hanger.

Here's how it looks like now:


The rings which is 5" in diameter I bought during the flea market here in town and the next fela market is scheduled on September so I will surely buy a dozen by that time.  As for the hanger, I still have one not being used and I'm gonna save that for more washi tapes in the future.

How do you store your washi tapes and the likes?


0

Arranging My Craft Pins

Do you ever use craft pins in your paper crafting?  I seldom use it but I have few sets and it's just scattered somewhere in my craft room.  I was able to gather a few and so I took an antique coffee cup from the basement.  I believe the cup is from my husband's grandmother and it's the only one so instead of throwing it I might as well use it for this project.


 It's a very simple way for me to organize my few craft pins and I have to put it somewhere visible in my craft room.  Besides, I don't want to waste my money in buying a pin cushion ... I'd rather save the money and buy a craft tool someday.  Hoping to use it from time to time =)

0

MWTD : Washi Tape Organization


How do you organize all your tape like washi tape, paper tape, and printed masking tape?


While I was cleaning one of the kitchen closets, I found a great case for all my printed tapes.  It is originally for aluminum foil but since all my foils are XL, it doesn't fit at all.  Instead of just throwing it I tried putting my tapes and it works!!!!  The best part is that the case itself has teeth so I don't need scissors ... I just drag and cut =)

Hhhhmmm, I know I have 6 of these cases which I bought 3 years ago coz one can buy 2 in a pack and I know I bought 3 packs.  I wonder where are the 3 empty cases now .... I bet it is somewhere down the basement.  Well, I gotta go and find coz I still have tapes to store and organize =)


2

Organizer for My Die-Cuts

Good evening everyone!

My son is still sick but he did eat this day - in fact I had to order pizza (home delivery) coz he has been begging me to buy one.  He is asleep now and luckily I didn't fell asleep.  Not much real crafting has been done coz I watched films with my son almost the whole day BUT I did manage to organize the much neglected die-cuts I have accumulated over the years.  I really ought to use these cuties in some projects soon especially when I'm too lazy to cut anything using Cricut.

 Found this down the basement and if I'm not mistaken I bought this last 2010 at Clas Ohlson.


I categorized whatever die-cuts I found but sad to say I had no time to make/add dividers this day. AND I need to do something about the cover of the binder - it's just too plain for such cuties.  Oh well,  I just have to do it some other day =)

I really hope my son will be up and about tomorrow.  I miss his noise playing war wearing his soldier outift and all the gadgets that goes with it .... I miss his fingers tinkering on every lego bit he has creating something unusual .... most of all I miss his craft time with me - always curious and excited to borrow my paints and brushes :(

Good night everyone!
If time and situation permits tomorrow then I will be able to create something.

until then.....

0

How I Store My Cricut Cartridges

As of this hour I'm not finish yet with my laundry but somehow I'm half-way through ... hhhmmm the truth is it feels like never-ending :(  I was able to vacuum the whole first floor and let's just forget the basement hehehehehehehe.  The hardest part in cleaning is Joseph's room!  Geez! So many bits from his lego and when I looked under his bed, ha!, that's where he hide his mess everytime I tell him to clean his room while watching TV.  He is now down the basement at the music room under the protection of his dad ... crying a little bit because of guilt.

How I wish it's every week that the cleaners come here to clean the house but they only come every other week :(  I'm practically exhausted and hubby knows that I tired myself again in cleaning but actually it's a bad combination to clean then at the same time to do laundry....run down the basement to hang clean washed clothes then put new batch then go up again and continue cleaning.  I guess it's not in my system to understand what cleaning is all about hahahahahhahaha.

Anyway, in between chores I took some rests either by lying down or watch TV or just get out and breathe some fresh air.  Then I saw the real sign of Spring at our front yard :


So pretty, isn't it?  It's in full bloom now!

I did not stay long outside coz it's chilly eventhough the sun was shinging high and bright but I did manage to watch "The Tourist", starring Angelina Jolie and Johnny Depp while organizing my growing Cricut Cartridges.  It's about time I should say coz I recently ordered more cartridges and that means I really need to have a storage for the carts alone.  To date I have 110 carts and I know for sure that it will grow and grow and grow =)


Let me show you an idea how I started storing my cartridges before:


Then I acquired more cartridges in the long run so I made use of a pretty box I bought wherein I added dividers using an artist board:


And this is now my storing/organizing way for my growing cartridges:


For now all my full carts are in one case, alphabetical order while all the solutions, events, projects cartridges are in another case.  There's still enough space to fill up on both cases but months from now when the case for full carts are filled up, I will just arrange it alphabetically regardless if it's a solution or a full cart.

How do you store your cricut carts?

As for all the cricut booklets, well, that's another story =)

Here's the list of all of my acquired Cricut Cartridges ( a lot of playing must be done) =)

Good night everyone!  I'd better hang the last batch of washed clothes and call it a night =)

until then.....
2

My Stickles Organizer for 2012

Oh-la-la it's Tuesday and I'm free from work but it does not necessarily mean that I have the whole day to craft :(  In fact, my day started out by going to the dentist since my son has an appointment then I brought him to school so as not to miss all the lessons for the day then walked all the way home.  It was a relief when I got home but then I know I have a super HOT date down the basement to do laundry.  I should have done this yesterday or the other day but I'm too lazy but really I can't say NO this time.

Eeeeeeeewwwwww loads to wash!!!

Anyway, after work yesterday I decided to go around the city a little bit before heading the grocery store, to see what's the latest in fashion for spring this year but ended up checking what Boots has to offer.  Boots is very known in UK and they opened a store here in Uppsala months ago and it's just in front of one of our stores.  The first thing I saw was the make-up section.  How essential is make-up for women?  I never liked wearing make-up.  I only wear it when the need arises or when it's necessary.  I'm stupid when it comes to brands but I have tried L'Oreal, Isadora, Max Factor, Helena R., etc, etc, etc.  My make-up would end up dusty coz I never wear much.  I'm just happy with mascara and lipstick but other than that it will take a lot of prodding for me to indulge in blush-on, foundation, concealer, or eye shadows.  Ha!  Well, since my loose powder foundation is soon empty I decided to buy one ... then lipstick ... then... mascara.  Got a free concealer though =)  I like the smooth finish of the loose powder foundation but I'm not happy with the eye mascara and so-so with the lipstick so off goes to the dust bin hahahahahhahaha.  As for the concealer I don't have any idea how to use it!  I'll just buy a new mascara and lipstick tomorrow after work and maybe will even find glittered eye shadow hahahahaha.


Oh but there is something glittery that I truly love which I bet everyone does and it's called STICKLES and to some it's called glitter glue. If you still remember the altered box I did last NCM 2010, for my stickles, then that I don't use for my stickles anymore.  My stickles collection grew and I need to find a way to organize and at the same time admire the colors and this is what I came up with:

These are the main materials I used for this project =)

And this is how it turned out =)  Hhhhmmm I have a feeling that next year I will come up with a new way to store my stickles but for now I love what I made =)

I wonder what I will create this day ...... ......  .....  I'd better continue with my date down the basement - the laundry machine, haist!

until then......
3

Storage for My Distress Ink Foam(s)

Got a heavy date with the laundry machine this day and it started this morning about 8.30 and I bet this hot dte will last till early eveing (lo).  Lot sof things to do ... mind is full of creative things but executing is the hardest part this day :(  Looking at my main craft room it surely needs re-organizing and not to mention the horrible look of my craft room down the basement.  I have to pull out all Christmas related items and from there I have to conceptualize.  Look at me, I'm here on my comfy swivel chair and writing this blog instead.  It's so cold that every now and then I have to go to the bathroom, haist!  I know the heater is on but still.....

Down the basement I found lots of storages and one thing that caught my attention is an empty acrylic storage for beads.  It has 36 compartments and I remembered all my used foam pads for my distress ink pads are just hidden in one cookie container.  I did some labeling using word document in my coputer and printed it out =)

I need to find/buy the same acrylic case because I intend to buy whatever Ranger distress ink pads comes out in the market.  I just got the Seasonal Series yesterday and I'm waiting for the Ranger Fall collection which I hope will be delivered very soon.

Here's how I store the foam(s):


I just added labels in alphabetical way so I know where to put back each foam I use.  To see how I kept my foams before :

I wasn't sure how to organize and store my foam pads this morning and I was confused which type of foam to use.  At the end I opted to use the artist foam for now and I threw all the old and abused original foam.


I have a feeling I will change my mind soon but for now I'm happy with my acrylic storage ... I just need to find/buy one again =)

How do you keep your foam(s)?
0

Craft Mats et al ....Organized =)

Sharing with you all how I keep my craft mats.  When you say craft mats it's not only the cutting mat ... in my case.  I have to have easy access to the following:

Cutting Mat (Rubber)
Cutting Mat (Glass)
Cutting Mat (Magnetic)
Glue Mat
Piercing Mat
Embossing Mat (Foam type)
Cricut Mats

Then I have to have easy access also to the following:

Fiskars Cutting Tool
Envelop Maker
Shape Emboss by Fiskar
Scoring Board (Scor-Pal
Scoring Board (Martha Stewart

I have searched at internet for inspirations on how fellow crafters store crafting mats but I was unsuccessful.  Any site would just dwell on organizing and storing flowers, brads, cardstock, stamps, stamp pads, markers, punchers, spellbinders, etc, etc, etc.

For four years I kept my mats on a drawer but over the years I get to know other mats and each became essential to my crafting.

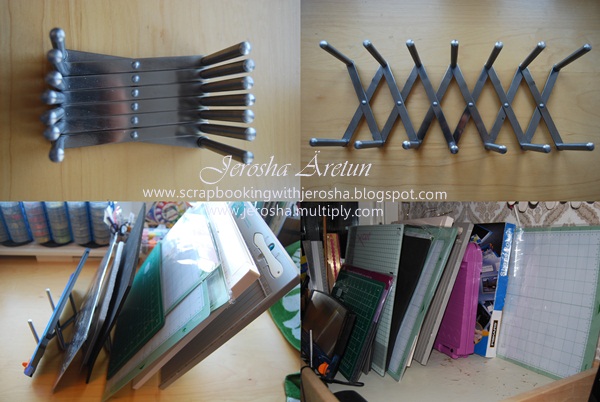
Once again while at IKEA, kitchen section, I saw an accordion type holder for casserole covers.  I bought one thinking it will hold all the mats and tools I mentioned above.

SUCCESS!!!!  (can you see me smiling from ear to ear?) heheheheheehehehe

May I know how you keep your mats?  I'm really curious =)


2

Storage for My Flower Soft and Embossing Powders

I have not much flower soft nor embossing powders but I can say that I have the colors that I like.  I rarely buy such items coz a small container goes a long, long way.  The reason why I bought these items is just to have a safe feeling that when I needed it I can grab anytime.

The original containers are just too small for me that everytime I use it rest assured I will spill some and an irritating feeling spoils my mood plus I will waste time cleaning the mess before I can continue with my work.

My first attempt to organize both the flower soft and embossing powders was just to transfer each on tupperwares.  It worked fine for me for a year but early this year I decided to upgrade my craft room to save more space since every quarter my tools and materials just grows and grows.  Who doesn't right?  With all those never-ending yummy goodies being introudced in the market all for the love of crafting.

Let me share with you all the then and now .......

BEFORE

My flower soft on mini tupperwares with labels last 2010.
The same way I kept my embossing powders but can't find the photo.
AFTER

These are magnetic spice cases from IKEA as well as the magnet plates.  
I still have to fill in 7 cases more.

For now I'm contented on how I store the embossing powders and flower soft but who knows a year or two from now I will decide to change it.

How do you store yours?  It would be great to have new ideas and maybe even better than mine =)

Thanks for the visit =)
0

My Yarn Keeper

Hi everyone!  A very very dear and true friend of mine in Denmark will have her back surgery this day or maybe it's done already this morning. I tried calling their home but still no one answers so maybe her husband is still in the hospital with her.  Will be calling again tonight and find out update.  Crossing my fingers that someone is at home when I call.

After spending hours of silence this day for her, I was still restless after making that call.  I ended up going down the basement in my extension craft room and try to find what I can organize.

Oh yes indeed, I found something that needed organization and that is organizing all my yarns I usually get from my Step-mom who is into all kinds of needleworks.  Over the years I accumulated different colors and shades of yarns and for many years I just kept each inside a bag. 

I remember I have a shoe case that has never been used and decided to try it as my yarn keeper/organizer.  The shoe case has compartments and handles on all sides so it's easy to grab anytime I want. It was a relief that it works fine for all my yarns and I think it will be like this for the years to come until I get tired of it hehehehehehehehhe.

BEFORE


AFTER


How do you keep your yarns?  New ideas will surely be appreciated =)
0

Embellishment Keeper

Yipee!  I have the perfect storage for my embellishments.  These acrylic cases are very very special because DH gave them to me.  DH literally saved it one by one for the whole year of 2010, everytime a specific eyeglass brand was delivered in our stores.  He told our staff to save it for me and they did.  Can you imagine my reaction when I got 150 pieces in one day?  I still have a lot at the basement but naturally I'm saving it for future use .... like .....more embellishments to come hahahahahahahhahahahahahah.

I'm ssssssssssssoooooooooooooo happy with these cases!

0

Prismacolor Storage Solution (temporarily)

See I told you I'm really slow when using my latest toys.  If I started using my Cricut Expression after nearly a year after I bought it then I honestly say that I haven't used my Prisma Colored Pencils for more than a year now since I bought it.

As long as I breathe there is a chance for me to try this brilliant tool, right? hehehehehehehehe  Top on my list is "Try using PrismaColor when coloring a stamp image!".  I will and that's a promise meant to be fulfilled.

Let me show you how I store my Prisma babies now.  I bought the case at IKEA and it's so far perfect coz it has 8 holders plus a storage for my cardstock exclusive for stamping.  The previous solution I had just occupies too much space and the bottles I used are kind'a big for each color/shade.


0

Alpha Chipboard Organizer

January 2011 is the month I solely dedicated my time in cleaning and organizing the whole house.  I'm happy to say that although it took 2 weeks for me to do such things in my main craft room alone, I, Jerosha Äretun, who is "allergic" and lazy when it comes to cleaning hahahahahahaha, was able to accomplish such project.  I will share with you my upgraded craft room as well as my craft room extension at the basement one of these days ...yeah the month of February 2011 not 2012 hehehehehehhehe.  But first I will be sharing with you one by one how I was able to organize successfully my bits and pieces inside my main craft room. 

Let's start off with Alpha Chipboard(s).  I seldom ... rarely use chipboard in my creations but surprisingly I have a lot of it scattering around.  It was painstaking to gather each one of it as I was cleaning my room.  I believe I was able to gather all and bought an organizer in a mens hobby section down the city.  So far it's the best solution for me =)


 Maybe you have a better way of organizing your alpha chipboards and I of course would like to know =)
0

Organizing My Distress Pads

I have to remember that I have to slow down a bit this day due to severe scolio attack early this morning but with so much things to do and upload at my sites, I can't help but do something in line with crafting while doing laundry ... thank God for whoever invented washing machine with dryer.  I just made my cabbage roses by following the video I found which you can see here.  After doing these cute roses, I decided to arrange my distress ink pads which I decided to use such pads most of the time.  Aside from the fact that I can buy it here in sweden it has refills, too, so investing on such pads in my case is cost-effective.

All my stamp pads like SU, CTMH, Memento, Staz-On, Versamark, and of course Ranger Pads are stored inside a drawer together with all stamping essentials.  It's very difficult for me to reach the pads whenever I want to use it.  I have plans of taking them out from the drawer and place the pads where I can see them easily.  Well, this noon I was able to do that.

As you can see I only have 34 ranger pads because "Brushed Curduroy" and "Milled lavander" are both out of stock all the time :(  I will keep on looking until I get to grab both shades hehehehehehhe.


First I made labels with corresponding shade and adhered to one side of each pad.  You may grab the ready-made labels at http://www.rangerink.com/labels.htm.   Oh please be informed that the ready-made labels are just plain labels ... you have to do the color guide yourself.


The last thing I did is to make guide tags so I have an idea on each shade/color.  I even added my SU and CTMH with Ranger pads so I have an idea how it blends when combined together during stamping.  Plus, at the bottom part of each guide tag, I also applied clear embossing powders.  I was amazed how the plain shade turned into another color after clear embossing.  Some got lighter and some got darker which gave me an idea how it looks like when using clear embossing powder.


Geez!  I have never experienced such pain again ... the last time I have this back pain was 12yrs ago.  It's so painful that I cried so loud and screamed for my mom.  Better lie down and rest for half an hour .....
0

My Ribbon Organizer last 2008

In the year 2008, this is how I organized my ribbons still in rolls.  I had not much ribbon that time so this kind of organizing is just perfect for me.  Finding the hanger with 4 layers was accidental and I know I bought 2 or 4 pcs in the Philippines.   I'm actually packing our spring and summer clothes coz it's time to prepare for the cold weather - it's really cold now but so far the grass, bushes, and trees are still green.  While packing I saw the hangers which once were my ribbon organizer.  With my growing ribbons this kind of storage is no longer applicable.  But, I still want to show you all how it looks like when I had very few rolls of ribbons on the year of 2008. 


0

Entry #22 - NCM 2010 : Review on MS Circle Cutter

While I was searching for a circle cutter, I stumbled upon Martha Stewart Circle Cutter and I had a feeling that it's just the kind of cutter that I need. I don't have any circle puncher but I do have few Coluzzle in which one has to use a 360 degrees craft knife - a knife that is flexible to move around. Sad to say I'm not comfortable with it but kept all the Coluzzle for Joseph's future crafting needs. I also have Fiskars hard plastic templates but then again a special tool designed for it needs to be used unless otherwise I prefer to trace and cut which for me is time consuming. The tool cutter al drives me insane since I just don't know how to use it hihihihihihihihihi. I tried a lot of times but I end up frustrated and mad looking at all those wasted papers. Lastly, I have the Spellbinders Nestabilities circle pack but oftentimes it's the right size (s) I need for a certain project. There are instances that I have to use compass but it ruins my project due to the sharp tip. I tried using coffee saucers hahahahahahaha or any circle object that I can trace but once I cut with using a scissor it does not give the smooth edge.

You see, circles for me are the hardest thing to cut. One wrong move it surely doe ruin the project. After much thinking I decided MS Circle Cutter is worth a try. A dear fellow crafter bought it for me since it is not available here in Sweden.

I am so happy and excited to share with you all that the cutter does works for me and it's so easy to use. I say easy because it took only a few tries when I finally found the right grip and effort on how to use it. Oh yeah, I wasted some papers but just scratch papers hehehehehehehehe so no hard feelings =D

Let's talk about this tool in details:


  • It is a round transparent disc made of acrylic.
  • It is marked in increments that range from an inch up to 5 1/2 inches which by the way is the largest circle it can cut.
  • In between there are additional marks every 1/4 inch so you can cut circles in many sizes.
  • In addition to the disc, it comes with a blade handle (cutting tool) and 3 extra blades.
  • The blades are double-sided and the disc turns clockwise and counter-clockwise so it works for both right handed and lefties.
  • The top of the cutting tool can be opened that serves as a storage for the extra blades.
  • The blades do have covers that one can easily slide it off and slide it back.
  • The blade has a flat triangular tip and the holes on the disc are not just round but also a slit allowing the blade to fully fit in and snap into place. In effect there is no chance of it slipping and accidentally cuts your finger.
  • Once the blade has been snapped in place, you simple cut around and that's it.
  • The clear center of the disc turns with the help of ball bearings that helps it to go around smoothly without jerking so in effect it gives you a nice clean cut like a breeze.
To summarize what I'm trying to tell you:
PROS - This circle cutter is lightweight, portable, and cuts circles in 1/16" increments ranging from 1 inch to 5 1/2 inches. The cutter tool fits comfortably in your fingers and holds a double-sided blade so you can cut clockwise or counter-clockwise.

CONS - Unlike a puncher, one has to practice a few times on scratch papers until one finds the right grip. It can't cut bigger than 5 1/2 inches circles so I guess I still need to use plates for making big circles hahahahahahahahaha.

BOTTOMLINE - This circle cutter cuts 73 different size circles in 1 !/16 increments. Compared to buying 73 circle punches the MS Circle Cutter is definitely cost effective.


Lessons Learned:

Problem arises when you have to cut circles from small papers. One has to always have removable adhesives on hand to hold small papers to your cutting mat. I use the blue painter's tape the same kind I use to my now abused cricut mat hehehehe.

The more pressure you exert on the tool itself the more frustrated you would be. Just let it glide like a butter with pulse and pressure steady =D

Some slits you will find difficulty in snapping the blade onto but a little wiggle will do the trick.

The durability of the disc kind'a worries me. When I was trying the cutter for the first time and due to ignorance ... eagerness... excitement .... hard pressure and too much effort, it has now very very few micro - as in microscopic cracks hahahahahaha but of course it may be nothing although time can only tell. I found out that it's not only me who experienced this but almost all first time users.

So there!

I have sshared with you all on what I think and what I can say about the MS Circle Cutter. My last hurrah is BUY ONE coz it's worth every penny =D

To show you all the circles I cut an hour ago :


These are all the 73 cut circles I made using the cutting tool

The biggest cut is 5 1/2 inches and the smallest is 1 inch

To show you the smoothness of each cut

Thanks for those who were interested to know more about this tool because with your interest I was able to make swatches of the circles it can cut that serves as my visual presentation hehehehehehehehehehe.
0

Entry #21 - NCM 2010 : Flower Soft Labels

I only have few Flower Soft and if you have the you know how a flower soft is packaged. It's in a small acrylic case that when you look at it one will think that not much per case. Well, I was wrong on that matter coz when I used one for the first time last year, each case contains a lot. I had to make sure I have a plastic hard case like lunch box of Joseph hehehehehehehe when I use one coz I don't want to waste even a small amount. I got tired of such procedure so I bought mini lunch box cases for each of my flower soft then labeled each on one side which I made in the computer. The problem was I find the covers too plain. Accidentally, I found out that the original labels from the original flower soft containers were removable and that made me happy. Why?

Simple Procedure:

1. I used the ever helpful MS Circle Cutter to make the right size of circles since nothing fits if I use my round nestabilities.
2. Used the scallop nestabilites as the outer layer of my labels.
3. Green stamp pad for the edges of the circles.
4. Assembled the labels using powertape.
5. Adhered each label also using powertape.

Back to Top