

Every paper crafter knows that cardstock is the most important material needed to create cards, scrapbook layouts, in some cases printing digital kits plus we are also aware how expensive acid-free cardstock can be, right? During our paper crafting, we naturally have left-overs bits and pieces, right? I save all my left-overs and arrange it in ROYGBIV in an expandable envelop because I have plans of recycling those and make my own acid-free papers. One doesn’t have to spend money in acquiring all the materials needed to make your own paper coz we all have it in our very own kitchen. This recycling can be done anytime of the year especially if you are blessed with all-year round sunshine. In my case I have to take the opportunity only on summer time.
Supplies Needed::
- Left-over acid-free papers/cardstocks
- Blender/Food Processor
- Plastic Basin that can totally immerse the size of your deckle and mold
- Deckle – Hoop / Frame used for cross-stitching
- Mold- Round flat Flour Strainer
- Old Towels
- Liquid starch (optional)
- Craft White Glue (optional)
- Sponge
Note:
If you have no wooden frame and screen available to use as your mold, you may use a flat flour sifter of any shape like what I did.
If you have no basin large enough to immerse your mold and deckle, use your kitchen sink.
Summertime is the best coz you just hang all the handmade papers to dry quickly. During cold or rainy seasons, you may dry each handmade paper by sponging and inserting each on old towels with cookie sheets layer by layer until no more water dripping. This part is best to do in the bathroom or outside coz it can be very messy.
You may add glitters, flat beads or fresh flowers during the process.
Never throw the left-over tiny particles at the end of the process coz you may still patiently create small uneven shape of handmade papers.
Lastly, if you use ordinary papers then you will be creating a NON acid-free and if you will be using your left-over acid-free cardstock then naturally the output would be acid-free.
Instructions:
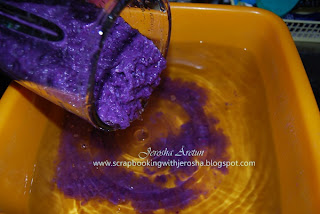
- First is to rip your papers into small pieces and let it soak on water for few minutes. This process will soften the paper fibers and saves time in blending. Place into the blender about half full and fill the blender with warm water and start blending. Usually it takes 30 to 45 seconds to have a smooth and well-blended consistency. If you notice that there are still big flakes, then blend again until you are satisfied.

- Now, fill the basin about half way with water and add your pulp and stir the mixture. Remember that the more pulp you add the thicker the finished paper will be. If that happens, just add more water.
- If you have plans of using your handmade paper for writing, it is best to add and stir 2 teaspoons of liquid starch. The ingredient will help prevent inks from soaking into the paper fibers.
- To make your handmade paper sturdy meaning you can bend the papers, add and stir 2 or 3 teaspoons of white glue.

- If you plan to add small objects like flat beads, glitters, or fresh flowers, now is the best time.
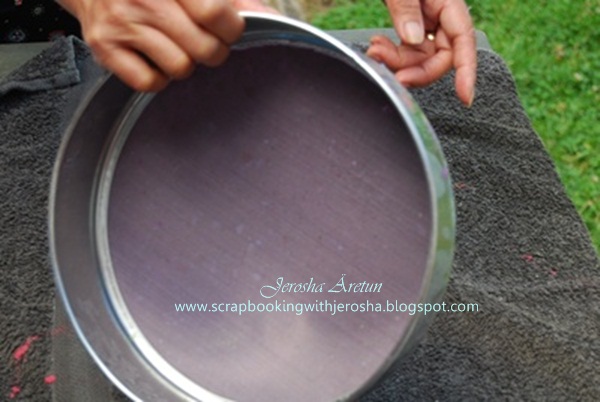
- Dip the mold into the pulp and then level it out gently by wiggling it side-to-side while submerged until the pulp on top of the screen looks even.

- Slowly lift the mold and wait till the water has drained. If you think the paper is very thick, either you remove some pulp from the tub or add more water. If it is too thin, either you add more pulp and stir the mixture again not forgetting to add more liquid starch and glue or simply remove water.

- When the mold stops dripping, gently place it on an old towel. Gently press the mold down flat, to drain more water. Then use sponge to press out as much water as possible. Wring the excess water from the sponge back into the large plastic basin.


- Here comes the tricky part. – Turn upside down the mold fast to release the paper. If it doesn’t fall-off, gently tap the mold. If it sticks to the mold, you may have pulled to fast or not pressed out enough water.


- Hang each on a clothesline when the sun is shining brightly or when you are sure that no more excess water from towels with cookie sheet lay down each on newspapers.

- Repeat the steps above until you were able to recycle your acid-free left-over cardstocks.
- Viola! You just have recycled your left-over acid free papers and may now use as part of your embellishments.


Here's a sample of handmade paper after adding fresh flowers in the process.

As I've said tiny bits from the process should not be thrown immediately. Try to make more papers out of it.

Happy crafting!
Happy Recycling!

 Posted by


0 comments:
Post a Comment